python实现逻辑回归的方法示例
本文实现的原理很简单,优化方法是用的梯度下降。后面有测试结果。
先来看看实现的示例代码:
# coding=utf-8
from math import exp

import matplotlib.pyplot as plt
import numpy as np
from sklearn.datasets.samples_generator import make_blobs


def sigmoid(num):
 '''

 :param num: 待计算的x
 :return: sigmoid之后的数值
 '''
 if type(num) == int or type(num) == float:
  return 1.0 / (1 + exp(-1 * num))
 else:
  raise ValueError, 'only int or float data can compute sigmoid'


class logistic():
 def __init__(self, x, y):
  if type(x) == type(y) == list:
   self.x = np.array(x)
   self.y = np.array(y)
  elif type(x) == type(y) == np.ndarray:
   self.x = x
   self.y = y
  else:
   raise ValueError, 'input data error'

 def sigmoid(self, x):
  '''

  :param x: 输入向量
  :return: 对输入向量整体进行simgoid计算后的向量结果
  '''
  s = np.frompyfunc(lambda x: sigmoid(x), 1, 1)
  return s(x)

 def train_with_punish(self, alpha, errors, punish=0.0001):
  '''

  :param alpha: alpha为学习速率
  :param errors: 误差小于多少时停止迭代的阈值
  :param punish: 惩罚系数
  :param times: 最大迭代次数
  :return:
  '''
  self.punish = punish
  dimension = self.x.shape[1]
  self.theta = np.random.random(dimension)
  compute_error = 100000000
  times = 0
  while compute_error > errors:
   res = np.dot(self.x, self.theta)
   delta = self.sigmoid(res) - self.y
   self.theta = self.theta - alpha * np.dot(self.x.T, delta) - punish * self.theta # 带惩罚的梯度下降方法
   compute_error = np.sum(delta)
   times += 1

 def predict(self, x):
  '''

  :param x: 给入新的未标注的向量
  :return: 按照计算出的参数返回判定的类别
  '''
  x = np.array(x)
  if self.sigmoid(np.dot(x, self.theta)) > 0.5:
   return 1
  else:
   return 0


def test1():
 '''
 用来进行测试和画图,展现效果
 :return:
 '''
 x, y = make_blobs(n_samples=200, centers=2, n_features=2, random_state=0, center_box=(10, 20))
 x1 = []
 y1 = []
 x2 = []
 y2 = []
 for i in range(len(y)):
  if y[i] == 0:
   x1.append(x[i][0])
   y1.append(x[i][1])
  elif y[i] == 1:
   x2.append(x[i][0])
   y2.append(x[i][1])
 # 以上均为处理数据,生成出两类数据
 p = logistic(x, y)
 p.train_with_punish(alpha=0.00001, errors=0.005, punish=0.01) # 步长是0.00001,最大允许误差是0.005,惩罚系数是0.01
 x_test = np.arange(10, 20, 0.01)
 y_test = (-1 * p.theta[0] / p.theta[1]) * x_test
 plt.plot(x_test, y_test, c='g', label='logistic_line')
 plt.scatter(x1, y1, c='r', label='positive')
 plt.scatter(x2, y2, c='b', label='negative')
 plt.legend(loc=2)
 plt.title('punish value = ' + p.punish.__str__())
 plt.show()


if __name__ == '__main__':
 test1()
运行结果如下图
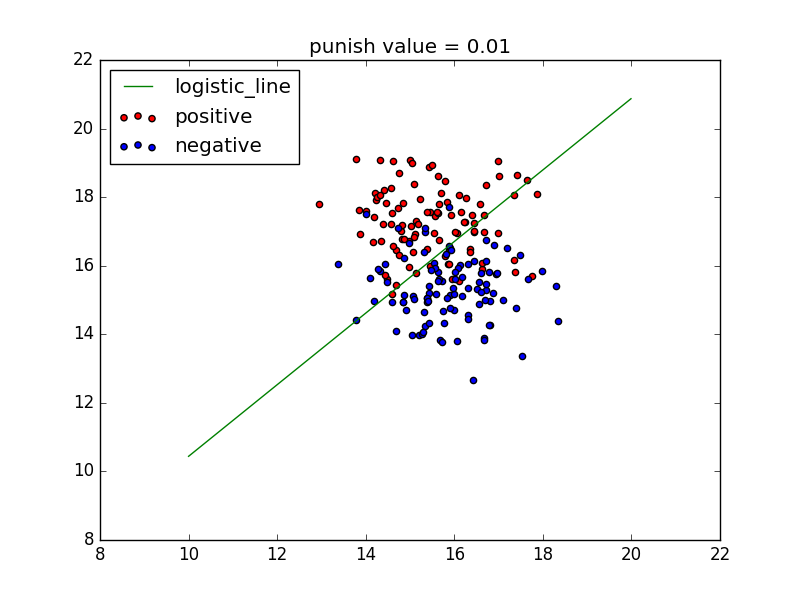
总结
以上就是这篇文章的全部内容了,希望本文的内容对大家的学习或者工作能带来一定的帮助,如果有疑问大家可以留言交流,谢谢大家对【听图阁-专注于Python设计】的支持。