PyQt5+Caffe+Opencv搭建人脸识别登录界面
最近开始学习Qt,结合之前学习过的caffe一起搭建了一个人脸识别登录系统的程序,新手可能有理解不到位的情况,还请大家多多指教。
我的想法是用opencv自带的人脸检测算法检测出面部,利用caffe训练好的卷积神经网络来提取特征,通过计算当前检测到的人脸与已近注册的所有用户的面部特征之间的相似度,如果最大的相似度大于一个阈值,就可以确定当前检测到的人脸对应为这个相似度最大的用户了。
###Caffe人脸识别
因为不断有新的用户加入,然而添加新用户后重新调整CNN的网络结构太费时间,所以不能用CNN去判别一个用户属于哪一类。一个训练好的人脸识别网络拥有很强大的特征提取能力(例如这里用到的VGG face),我们finetune预训练的网络时会调整最后一层的分类数目,所以最后一层的目的是为了分类,倒数第二个全连接层(或者前面的)提取到的特征通过简单的计算距离也可以达到很高的准确率,因此可以用计算相似度的方式判断类别。
载入finetune后的VGG模型
代码就不详细解释了,我用的是拿1000个人脸微调后的VGGface,效果比用直接下载来的weight文件好一点,这里可以用原始的权重文件代替。
import caffe
model_def = 'VGG_FACE_deploy.prototxt'
model_weights = 'VGG_Face_finetune_1000_iter_900.caffemodel'
# create transformer for the input called 'data'
net = caffe.Net(model_def,   # defines the structure of the model
        model_weights, # contains the trained weights
        caffe.TEST)
transformer = caffe.io.Transformer({'data': net.blobs['data'].data.shape})
transformer.set_transpose('data', (2,0,1)) # move image channels to outermost dimension
transformer.set_mean('data', np.array([104, 117, 123]))      # subtract the dataset-mean value in each channel
transformer.set_raw_scale('data', 255)   # rescale from [0, 1] to [0, 255]
transformer.set_channel_swap('data', (2,1,0)) # swap channels from RGB to BGRxpor
计算余弦相似度
import numpy as np

# 计算余弦距离
def cal_cos(A,B):
  num = A.dot(B.T) #若为行向量则 A * B.T
  print(B.shape)
  if B.ndim == 1:
    denom = np.linalg.norm(A) * np.linalg.norm(B)
  else:
    denom = np.linalg.norm(A) * np.linalg.norm(B, axis=1)
  #print(num)
  cos = num / denom #余弦值
  sim = 0.5 + 0.5 * cos #归一化
  return sim

def cal_feature(image):
  #for i,img_name in enumerate(os.listdir(path)):
    #image = caffe.io.load_image(os.path.join(path,img_name))
  transformed_image = transformer.preprocess('data', image)
  net.blobs['data'].data[0,:,:,:] = transformed_image
  output = net.forward()
  return net.blobs['fc7'].data[0]
cal_feature函数返回fc7层的输出,也就是image通过网络提取到的特征;A的维度为[1, 4096],为需要检测的目标,B的维度为[n,4096],表示所有已注册的用户的特征,cal_cos返回n个相似度,值越大,越可能是同一个人。
###Opencv人脸检测
检测人脸位置的算法用了opencv自带的人脸检测器。
import cv2

face_cascade = cv2.CascadeClassifier('haarcascade_frontalface_default.xml')
PyQt界面
定义全局变量存储用户的信息,提取到的特征,我用文件的形式将这些信息保存到本地,下一次运行时提前载入。
import sys
import os
import pickle
global ALLFEATURE, NEWFEATURE, tempUsrName, ALLUSER, USRNAME

with open('USRNAME.pickle', 'rb') as f:
  USRNAME = pickle.load(f)
with open('ALLUSER.pickle', 'rb') as f:
  ALLUSER = pickle.load(f)

ALLFEATURE = np.load('usrfeature.npy')
NEWFEATURE = np.array([])
tempUsrName = {}
设计一个登录界面
用PyQt设计一个界面,实现用户注册,注册时录入照片,用户密码登录,人脸识别登录等功能。
创建一个TabWidget界面
tab1用来实现密码登录,注册,tab2用来实现人脸识别登录。
from PyQt5.QtWidgets import (QWidget, QMessageBox, QLabel, QDialog,
  QApplication, QPushButton, QDesktopWidget, QLineEdit, QTabWidget)
from PyQt5.QtGui import QIcon, QPixmap, QImage, QPalette, QBrush
from PyQt5.QtCore import Qt, QTimer

class TabWidget(QTabWidget):

  def __init__(self, parent=None):
    super(TabWidget, self).__init__(parent)
    self.setWindowTitle('Face Recognition')
    self.setWindowIcon(QIcon('camera.png'))
    self.resize(400, 260)
    self.center()
    self.mContent = passWordSign()
    self.mIndex = faceSign()
    self.addTab(self.mContent, QIcon('camera.png'), u"密码登录")
    self.addTab(self.mIndex, u"人脸识别")
    palette=QPalette()
    icon=QPixmap('background.jpg').scaled(400, 260)
    palette.setBrush(self.backgroundRole(), QBrush(icon)) #添加背景图片
    self.setPalette(palette)

  def center(self):

    qr = self.frameGeometry()
    cp = QDesktopWidget().availableGeometry().center()
    qr.moveCenter(cp)
    self.move(qr.topLeft())

  def closeEvent(self, event):

    reply = QMessageBox.question(self, 'Message',
      "Are you sure to quit?", QMessageBox.Yes |
      QMessageBox.No, QMessageBox.No)

    if reply == QMessageBox.Yes:
      event.accept()
    else:
      event.ignore()


if __name__ == '__main__':

  app = QApplication(sys.argv)
  t = TabWidget()
  t.show()
  #ex = Example()
sys.exit(app.exec_())
用户注册和密码登录
分别添加两个按钮和两个文本框,文本框用于用户名和密码输入,按钮分别对应事件注册和登录。addPicture用于注册时录入用户照片。
class passWordSign(QWidget):

  def __init__(self):
    super().__init__()

    self.initUI()

  def initUI(self):

    #self.setGeometry(0, 0, 450, 300)
    self.signUpButton = QPushButton(QIcon('camera.png'), 'Sign up', self)
    self.signUpButton.move(300, 200)
    self.signInButton = QPushButton(QIcon('camera.png'), 'Sign in', self)
    self.signInButton.move(200, 200)
    self.usrNameLine = QLineEdit( self )
    self.usrNameLine.setPlaceholderText('User Name')
    self.usrNameLine.setFixedSize(200, 30)
    self.usrNameLine.move(100, 50)
    self.passWordLine = QLineEdit(self)
    self.passWordLine.setEchoMode(QLineEdit.Password)
    self.passWordLine.setPlaceholderText('Pass Word')
    self.passWordLine.setFixedSize(200, 30)
    self.passWordLine.move(100, 120)
    self.signInButton.clicked.connect(self.signIn)
    self.signUpButton.clicked.connect(self.signUp)
    self.show()

  def signIn(self):
    global ALLFEATURE, NEWFEATURE, tempUsrName, ALLUSER, USRNAME
    if self.usrNameLine.text() not in ALLUSER:
      QMessageBox.information(self,"Information","用户不存在,请注册")
    elif ALLUSER[self.usrNameLine.text()] == self.passWordLine.text():
      QMessageBox.information(self,"Information","Welcome!")

    else:
      QMessageBox.information(self,"Information","密码错误!")

  def signUp(self):
    global ALLFEATURE, NEWFEATURE, tempUsrName, ALLUSER, USRNAME
    if self.usrNameLine.text() in ALLUSER:
      QMessageBox.information(self,"Information","用户已存在!")
    elif len(self.passWordLine.text()) < 3:
      QMessageBox.information(self,"Information","密码太短!")
    else:
      tempUsrName.clear()
      tempUsrName[self.usrNameLine.text()] = self.passWordLine.text()
      self.addPicture()


  def addPicture(self):
    dialog = Dialog(parent=self)
    dialog.show()
录入用户人脸
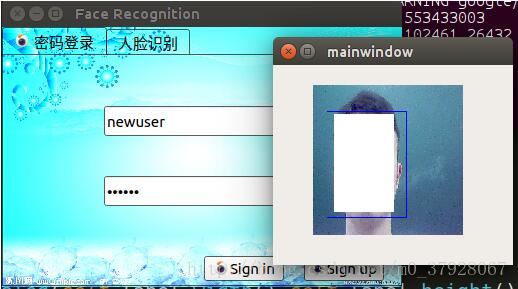
点击sign up按钮后弹出一个对话框,用一个label控件显示摄像头获取的照片。首先用opencv打开摄像头,用自带的人脸检测器检测到人脸self.face后,绘制一个蓝色的框,然后resize到固定的大小(对应网络的输入)。将opencv的图片格式转换为Qlabel可以显示的格式,用Qtimer定时器每隔一段时间刷新图片。检测鼠标点击事件mousePressEvent,点击鼠标后保存当前录入的用户注册信息和对应的特征。关闭摄像头,提示注册成功。
class Dialog(QDialog):
  def __init__(self, parent=None):
    QDialog.__init__(self, parent)
    self.resize(240, 200)
    self.label = QLabel(self)
    self.label.setFixedWidth(150)
    self.label.setFixedHeight(150)
    self.label.move(40, 20)
    pixMap = QPixmap("face.jpg").scaled(self.label.width(),self.label.height())
    self.label.setPixmap(pixMap)
    self.label.show()
    self.timer = QTimer()
    self.timer.start()
    self.timer.setInterval(100)
    self.cap = cv2.VideoCapture(0)
    self.timer.timeout.connect(self.capPicture)

  def mousePressEvent(self, event):
    global ALLFEATURE, NEWFEATURE, tempUsrName, ALLUSER, USRNAME
    self.cap.release()
    NEWFEATURE = cal_feature(self.face).reshape([1,-1])
    if NEWFEATURE.size > 0:
      for key, value in tempUsrName.items():
        ALLUSER[key] = value
        USRNAME.append(key)
        with open('ALLUSER.pickle', 'wb') as f:
          pickle.dump(ALLUSER, f)
        with open('USRNAME.pickle', 'wb') as f:
          pickle.dump(USRNAME, f)
        print(ALLFEATURE,NEWFEATURE)
        ALLFEATURE = np.concatenate((ALLFEATURE, NEWFEATURE), axis=0)
        np.save('usrfeature.npy', ALLFEATURE)
        QMessageBox.information(self,"Information","Success!")


  def capPicture(self):

    if (self.cap.isOpened()):
      # get a frame
      ret, img = self.cap.read()
      gray = cv2.cvtColor(img, cv2.COLOR_BGR2GRAY)
      faces = face_cascade.detectMultiScale(gray, 1.3, 5)
      for (x,y,w,h) in faces:
        img = cv2.rectangle(img,(x,y),(x+w,y+h),(255,0,0),2)
        roi_gray = gray[y:y+h, x:x+w]
        roi_color = img[y:y+h, x:x+w]
        self.face = cv2.resize(img[y:y+h, x:x+w],(224, 224), interpolation=cv2.INTER_CUBIC)
      height, width, bytesPerComponent = img.shape
      bytesPerLine = bytesPerComponent * width
      # 变换彩色空间顺序
      cv2.cvtColor(img, cv2.COLOR_BGR2RGB, img)
      # 转为QImage对象
      self.image = QImage(img.data, width, height, bytesPerLine, QImage.Format_RGB888)
      self.label.setPixmap(QPixmap.fromImage(self.image).scaled(self.label.width(),self.label.height()))
人脸识别登录
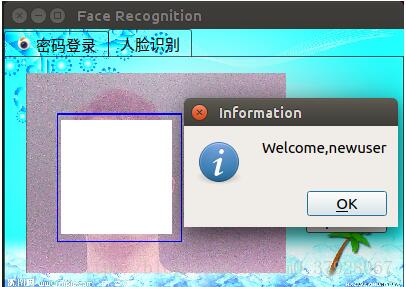
登录部分与之前类似,添加一个label控件用来显示图片,两个按钮用来开始检测和选定图片。当最大的相似度大于0.9时,显示登录成功。
class faceSign(QWidget):

  def __init__(self):
    super().__init__()

    self.initUI()

  def initUI(self):
    self.label = QLabel(self)
    self.label.setFixedWidth(260)
    self.label.setFixedHeight(200)
    self.label.move(20, 15)
    self.pixMap = QPixmap("face.jpg").scaled(self.label.width(),self.label.height())
    self.label.setPixmap(self.pixMap)
    self.label.show()
    self.startButton = QPushButton('start', self)
    self.startButton.move(300, 50)
    self.capPictureButton = QPushButton('capPicture', self)
    self.capPictureButton.move(300, 150)
    self.startButton.clicked.connect(self.start)
    self.capPictureButton.clicked.connect(self.cap)
    #self.cap = cv2.VideoCapture(0)
    #self.ret, self.img = self.cap.read()
    self.timer = QTimer()
    self.timer.start()
    self.timer.setInterval(100)


  def start(self,event):
    self.cap = cv2.VideoCapture(0)
    self.timer.timeout.connect(self.capPicture)

  def cap(self,event):
    global ALLFEATURE, NEWFEATURE, tempUsrName, ALLUSER, USRNAME
    self.cap.release()
    feature = cal_feature(self.face)
    #np.save('usrfeature.npy', ALLFEATURE)
    sim = cal_cos(feature,np.array(ALLFEATURE))
    m = np.argmax(sim)
    if max(sim)>0.9:
      print(sim, USRNAME)
      QMessageBox.information(self,"Information","Welcome," + USRNAME[m])
    else:
      QMessageBox.information(self,"Information","识别失败!")
    self.label.setPixmap(self.pixMap)

  def capPicture(self):

    if (self.cap.isOpened()):
      # get a frame
      ret, img = self.cap.read()
      gray = cv2.cvtColor(img, cv2.COLOR_BGR2GRAY)
      faces = face_cascade.detectMultiScale(gray, 1.3, 5)
      for (x,y,w,h) in faces:
        img = cv2.rectangle(img,(x,y),(x+w,y+h),(255,0,0),2)
        roi_gray = gray[y:y+h, x:x+w]
        roi_color = img[y:y+h, x:x+w]
        self.face = cv2.resize(img[y:y+h, x:x+w],(224, 224), interpolation=cv2.INTER_CUBIC)
      height, width, bytesPerComponent = img.shape
      bytesPerLine = bytesPerComponent * width
      # 变换彩色空间顺序
      cv2.cvtColor(img, cv2.COLOR_BGR2RGB, img)
      # 转为QImage对象
      self.image = QImage(img.data, width, height, bytesPerLine, QImage.Format_RGB888)
      self.label.setPixmap(QPixmap.fromImage(self.image).scaled(self.label.width(),self.label.height()))
###效果
密码登录,输入合法的密码后点击sign in,显示欢迎。

注册界面

识别界面

登录成功
点击capPicture按钮后,开始计算相似度,大于0.9提示登录成功,并显示用户名。

###缺点和不足
程序用pyinstaller打包后,亲测可以在别的linux电脑下运行。代码和文件可以参考我的Github(没有VGG face的权重),第一次写博客,非常感谢大家的意见。总结一下不足:
1.初始话caffe模型很费时间,所以程序打开时要等一两秒;
2.用户信息用文件的形式保存并不安全,可以用mysql保存到数据库,需要时调出;
3.人脸位置检测可以用faster rcnn代替,再加上对齐;
4.识别很耗费时间,因此不能实时检测,应该可以用多线程解决。
以上就是本文的全部内容,希望对大家的学习有所帮助,也希望大家多多支持【听图阁-专注于Python设计】。

