python OpenCV GrabCut使用实例解析
这篇文章主要介绍了python OpenCV GrabCut使用实例解析,文中通过示例代码介绍的非常详细,对大家的学习或者工作具有一定的参考学习价值,需要的朋友可以参考下
先上一个效果图:
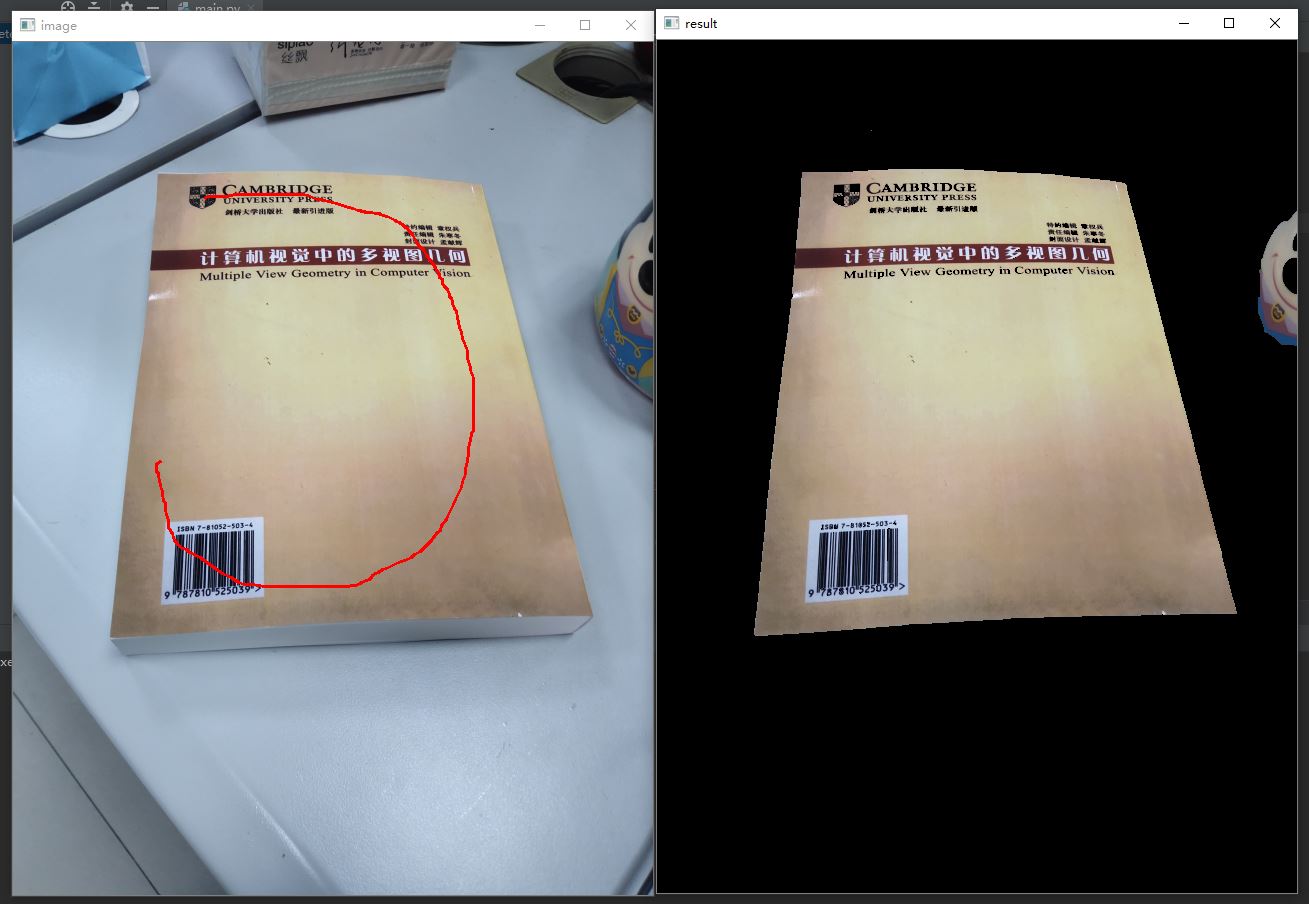
使用Python3.7+OpenCV 3.x.
需要引入 numpy库。
在图上用鼠标左键和右键标记前景和后景即可.
如果需要重新标记图像,关闭程序重新运行.
以下是具体实现代码
# -*- coding:utf-8 -*-

'''
  Python: 3.5.7
  opencv 3.x

  在图上用鼠标左键和右键标记前景和后景即可.
  如果需要重新标记图像,关闭程序重新运行.
  By Ynxf http://www.zhouws.com
'''

import cv2
import numpy as np
import time

img_src = '../test_images/3.jpg'

drawing = False
mode = False

class GrabCut:
  def __init__(self, t_img):
    self.img = t_img
    self.img_raw = img.copy()
    self.img_width = img.shape[0]
    self.img_height = img.shape[1]
    self.scale_size = 640 * self.img_width // self.img_height
    if self.img_width > 640:
      self.img = cv2.resize(self.img, (640, self.scale_size), interpolation=cv2.INTER_AREA)
    self.img_show = self.img.copy()
    self.img_gc = self.img.copy()
    self.img_gc = cv2.GaussianBlur(self.img_gc, (3, 3), 0)
    self.lb_up = False
    self.rb_up = False
    self.lb_down = False
    self.rb_down = False
    self.mask = np.full(self.img.shape[:2], 2, dtype=np.uint8)
    self.firt_choose = True


# 鼠标的回调函数
def mouse_event2(event, x, y, flags, param):
  global drawing, last_point, start_point
  # 左键按下:开始画图
  if event == cv2.EVENT_LBUTTONDOWN:
    drawing = True
    last_point = (x, y)
    start_point = last_point
    param.lb_down = True
    print('mouse lb down')
  elif event == cv2.EVENT_RBUTTONDOWN:
    drawing = True
    last_point = (x, y)
    start_point = last_point
    param.rb_down = True
    print('mouse rb down')
  # 鼠标移动,画图
  elif event == cv2.EVENT_MOUSEMOVE:
    if drawing:
      if param.lb_down:
        cv2.line(param.img_show, last_point, (x,y), (0, 0, 255), 2, -1)
        cv2.rectangle(param.mask, last_point, (x, y), 1, -1, 4)
      else:
        cv2.line(param.img_show, last_point, (x, y), (255, 0, 0), 2, -1)
        cv2.rectangle(param.mask, last_point, (x, y), 0, -1, 4)
      last_point = (x, y)
  # 左键释放:结束画图
  elif event == cv2.EVENT_LBUTTONUP:
    drawing = False
    param.lb_up = True
    param.lb_down = False
    cv2.line(param.img_show, last_point, (x,y), (0, 0, 255), 2, -1)
    if param.firt_choose:
      param.firt_choose = False
    cv2.rectangle(param.mask, last_point, (x,y), 1, -1, 4)
    print('mouse lb up')
  elif event == cv2.EVENT_RBUTTONUP:
    drawing = False
    param.rb_up = True
    param.rb_down = False
    cv2.line(param.img_show, last_point, (x,y), (255, 0, 0), 2, -1)
    if param.firt_choose:
      param.firt_choose = False
      param.mask = np.full(param.img.shape[:2], 3, dtype=np.uint8)
    cv2.rectangle(param.mask, last_point, (x,y), 0, -1, 4)
    print('mouse rb up')

if __name__ == '__main__':
  img = cv2.imread(img_src)
  if img is None:
    print('error: 图像为空')
  g_img = GrabCut(img)

  cv2.namedWindow('image')
  # 定义鼠标的回调函数
  cv2.setMouseCallback('image', mouse_event2, g_img)
  while (True):
    cv2.imshow('image', g_img.img_show)
    if g_img.lb_up or g_img.rb_up:
      g_img.lb_up = False
      g_img.rb_up = False
      start = time.process_time()
      bgdModel = np.zeros((1, 65), np.float64)
      fgdModel = np.zeros((1, 65), np.float64)

      rect = (1, 1, g_img.img.shape[1], g_img.img.shape[0])
      print(g_img.mask)
      mask = g_img.mask
      g_img.img_gc = g_img.img.copy()
      cv2.grabCut(g_img.img_gc, mask, rect, bgdModel, fgdModel, 5, cv2.GC_INIT_WITH_MASK)
      elapsed = (time.process_time() - start)
      mask2 = np.where((mask == 2) | (mask == 0), 0, 1).astype('uint8') # 0和2做背景
      g_img.img_gc = g_img.img_gc * mask2[:, :, np.newaxis] # 使用蒙板来获取前景区域
      cv2.imshow('result', g_img.img_gc)

      print("Time used:", elapsed)

    # 按下ESC键退出
    if cv2.waitKey(20) == 27:
      break
以上就是本文的全部内容,希望对大家的学习有所帮助,也希望大家多多支持【听图阁-专注于Python设计】。