ActiveMQ:使用Python访问ActiveMQ的方法
Windows 10家庭中文版,Python 3.6.4,stomp.py 4.1.21
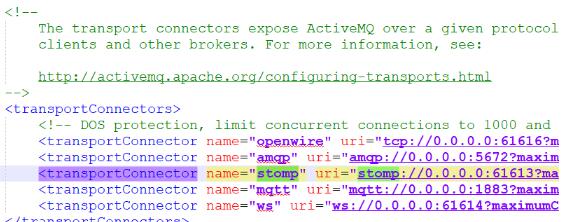
ActiveMQ支持Python访问,提供了基于STOMP协议(端口为61613)的库。
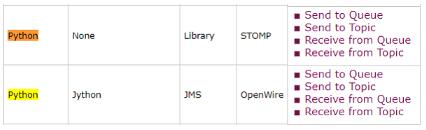
ActiveMQ的官文Cross Language Clients中给出了更详细的介绍,并附有示例代码,如下图:
第一行为常规Python访问,第二行为使用Jython访问的方式,四个操作。
Python访问ActiveMQ需要使用stomp.py,见其官网。
下载官网的代码,解压,命令行进入其目录,使用pyhthon setup.py install即可安装好,然后就可以使用stomp.py了。
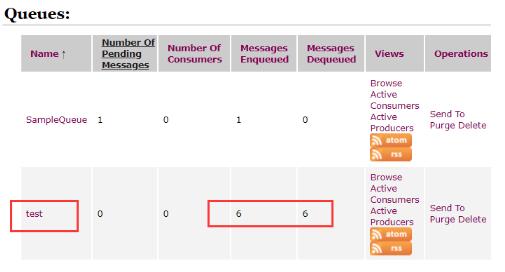
官方示例代码:给队列test发送一个消息,也可以把第7行的destination的“/queue/”去掉,只剩test。
import stomp

conn = stomp.Connection()
conn.set_listener('', MyListener())
conn.start()
conn.connect('admin', 'password', wait=True)
conn.send(body=' '.join(sys.argv[1:]), destination='/queue/test')
conn.disconnect()
测试结果:test队列接收到消息数量增加了
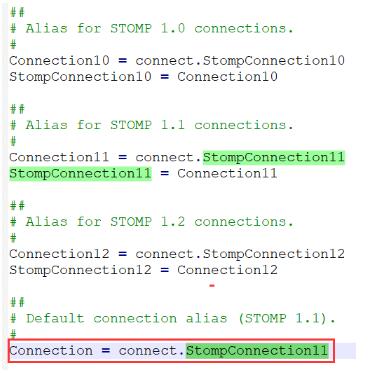
stomp.Connection()默认是connect.StompConnection11(协议1.1),还可以可以选择1.0、1.2。
在官方代码中,stomp.Connection()的参数为空,实际上可以有很多参数,比如,设置Broker的IP地址和端口,如下:其中的host_and_ports就是设置IP和端口的。
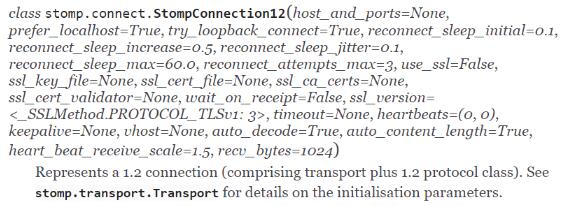
IP和端口设置示例:
c = stomp.Connection([('127.0.0.1', 62613)])
这里我犯错了,端口我协程了8161(ActiveMQ的Web访问的端口),经查询(百度搜索到stackoverflow.com)才知,STOMP协议用的是61613(ActiveMQ的配置文件中):
ActiveMQ官网的四个测试:
发送消息到队列Queue属于 点对点模式,不可以重复消费;
发送消息到主题Topic属于 发布/订阅模式,可以重复消费;
# Send a Message to an Apache ActiveMQ Queue
import stomp

conn = stomp.Connection10()

conn.start()

conn.connect()

conn.send('SampleQueue', 'Simples Assim')

conn.disconnect()

# Receive a Message from an Apache ActiveMQ Queue
import stomp
import time

class SampleListener(object):
 def on_message(self, headers, msg):
 print(msg)

conn = stomp.Connection10()

conn.set_listener('SampleListener', SampleListener())

conn.start()

conn.connect()

conn.subscribe('SampleQueue')

time.sleep(1) # secs

conn.disconnect()

# Send a Message to an Apache ActiveMQ Topic
import stomp

conn = stomp.Connection10()

conn.start()

conn.connect()

conn.send('/topic/SampleTopic', 'Simples Assim')

conn.disconnect()

# Receive a Message from an Apache ActiveMQ Topic (1)
import stomp
import time

class SampleListener(object):
 def on_message(self, headers, msg):
 print(msg)

conn = stomp.Connection10()

conn.set_listener('SampleListener', SampleListener())

conn.start()

conn.connect()

conn.subscribe('/topic/SampleTopic')

time.sleep(1) # secs

conn.disconnect()

# Receive a Message from an Apache ActiveMQ Topic (2)
import stomp
import time

class SampleListener(object):
 def on_message(self, headers, msg):
 print(msg)

conn = stomp.Connection10()

conn.set_listener('SampleListener', SampleListener())

conn.start()

conn.connect(headers={'client-id':'SampleClient'})

conn.subscribe(destination='/topic/SampleTopic', headers={'activemq.subscriptionName':'SampleSubscription'})

time.sleep(1) # secs

conn.disconnect()
以上这篇ActiveMQ:使用Python访问ActiveMQ的方法就是小编分享给大家的全部内容了,希望能给大家一个参考,也希望大家多多支持【听图阁-专注于Python设计】。
