pygame学习笔记(3):运动速率、时间、事件、文字
1、运动速率
上节中,实现了一辆汽车在马路上由下到上行驶,并使用了pygame.time.delay(200)来进行时间延迟。看了很多参考材料,基本每个材料都会谈到不同配置机器下运动速率的问题,有的是通过设定频率解决,有的是通过设定速度解决,自己本身水平有限,看了几篇,觉得还是《Beginning Game Development with Python and Pygame》这里面提到一个方法比较好。代码如下,代码里更改的地方主要是main里的代码,其中利用clock=pygame.time.Clock()来定义时钟,speed=250.0定义了速度,每秒250像素,time_passed=clock.tick()为上次运行时间单位是毫秒,time_passed_seconds=time_passed/1000.0将单位改为秒,distance_moved=time_passed_seconds*speed时间乘以速度得到移动距离,这样就能保证更加流畅。
import pygame,sys
def lineleft():
plotpoints=[]
for x in range(0,640):
y=-5*x+1000
plotpoints.append([x,y])
pygame.draw.lines(screen,[0,0,0],False,plotpoints,5)
pygame.display.flip()
def lineright():
plotpoints=[]
for x in range(0,640):
y=5*x-2000
plotpoints.append([x,y])
pygame.draw.lines(screen,[0,0,0],False,plotpoints,5)
pygame.display.flip()
def linemiddle():
plotpoints=[]
x=300
for y in range(0,480,20):
plotpoints.append([x,y])
if len(plotpoints)==2:
pygame.draw.lines(screen,[0,0,0],False,plotpoints,5)
plotpoints=[]
pygame.display.flip()
def loadcar(yloc):
my_car=pygame.image.load('ok1.jpg')
locationxy=[310,yloc]
screen.blit(my_car,locationxy)
pygame.display.flip()
if __name__=='__main__':
pygame.init()
screen=pygame.display.set_caption('hello world!')
screen=pygame.display.set_mode([640,480])
screen.fill([255,255,255])
lineleft()
lineright()
linemiddle()
clock=pygame.time.Clock()
looper=480
speed=250.0
while True:
for event in pygame.event.get():
if event.type==pygame.QUIT:
sys.exit()
pygame.draw.rect(screen,[255,255,255],[310,(looper+132),83,132],0)
time_passed=clock.tick()
time_passed_seconds=time_passed/1000.0
distance_moved=time_passed_seconds*speed
looper-=distance_moved
if looper<-480:
looper=480
loadcar(looper)
2、事件
我理解的就是用来解决键盘、鼠标、遥控器等输入后做出什么反映的。例如上面的例子,可以通过按上方向键里向上来使得小车向上移动,按下向下,使得小车向下移动。当小车从下面倒出时,会从上面再出现,当小车从上面驶出时,会从下面再出现。代码如下。event.type == pygame.KEYDOWN用来定义事件类型,if event.key==pygame.K_UP这里是指当按下向上箭头时,车前进。if event.key==pygame.K_DOWN则相反,指按下向下箭头,车后退。
import pygame,sys
def lineleft():
plotpoints=[]
for x in range(0,640):
y=-5*x+1000
plotpoints.append([x,y])
pygame.draw.lines(screen,[0,0,0],False,plotpoints,5)
pygame.display.flip()
def lineright():
plotpoints=[]
for x in range(0,640):
y=5*x-2000
plotpoints.append([x,y])
pygame.draw.lines(screen,[0,0,0],False,plotpoints,5)
pygame.display.flip()
def linemiddle():
plotpoints=[]
x=300
for y in range(0,480,20):
plotpoints.append([x,y])
if len(plotpoints)==2:
pygame.draw.lines(screen,[0,0,0],False,plotpoints,5)
plotpoints=[]
pygame.display.flip()
def loadcar(yloc):
my_car=pygame.image.load('ok1.jpg')
locationxy=[310,yloc]
screen.blit(my_car,locationxy)
pygame.display.flip()
if __name__=='__main__':
pygame.init()
screen=pygame.display.set_caption('hello world!')
screen=pygame.display.set_mode([640,480])
screen.fill([255,255,255])
lineleft()
lineright()
linemiddle()
looper=480
while True:
for event in pygame.event.get():
if event.type==pygame.QUIT:
sys.exit()
elif event.type == pygame.KEYDOWN:
if event.key==pygame.K_UP:
looper=looper-50
if looper<-480:
looper=480
pygame.draw.rect(screen,[255,255,255],[310,(looper+132),83,132],0)
loadcar(looper)
if event.key==pygame.K_DOWN:
looper=looper+50
if looper>480:
looper=-480
pygame.draw.rect(screen,[255,255,255],[310,(looper-132),83,132],0)
loadcar(looper)
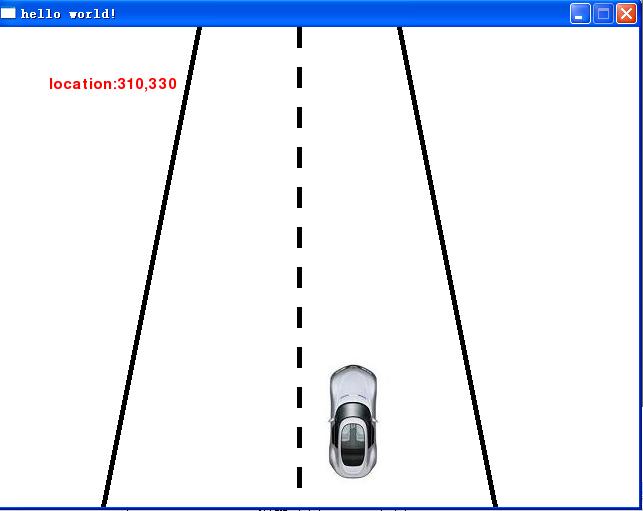
3、字体及字符显示
使用字体模块用来做游戏的文字显示,大部分游戏都会有诸如比分、时间、生命值等的文字信息。pygame主要是使用pygame.font模块来完成,常用到的一些方法是:
pygame.font.SysFont(None, 16),第一个参数是说明字体的,可以是"arial"等,这里None表示默认字体。第二个参数表示字的大小。如果无法知道当前系统中装了哪些字体,可以使用pygame.font.get_fonts()来获得所有可用字体。
pygame.font.Font("AAA.ttf", 16),用来使用TTF字体文件。
render("hello world!", True, (0,0,0), (255, 255, 255)),render方法用来创建文字。第一个参数是写的文字;第二个参数是否开启抗锯齿,就是说True的话字体会比较平滑,不过相应的速度有一点点影响;第三个参数是字体的颜色;第四个是背景色,无表示透明。
下面将上面的例子添加当前汽车坐标:
import pygame,sys
def lineleft():
plotpoints=[]
for x in range(0,640):
y=-5*x+1000
plotpoints.append([x,y])
pygame.draw.lines(screen,[0,0,0],False,plotpoints,5)
pygame.display.flip()
def lineright():
plotpoints=[]
for x in range(0,640):
y=5*x-2000
plotpoints.append([x,y])
pygame.draw.lines(screen,[0,0,0],False,plotpoints,5)
pygame.display.flip()
def linemiddle():
plotpoints=[]
x=300
for y in range(0,480,20):
plotpoints.append([x,y])
if len(plotpoints)==2:
pygame.draw.lines(screen,[0,0,0],False,plotpoints,5)
plotpoints=[]
pygame.display.flip()
def loadcar(yloc):
my_car=pygame.image.load('ok1.jpg')
locationxy=[310,yloc]
screen.blit(my_car,locationxy)
pygame.display.flip()
def loadtext(xloc,yloc):
textstr='location:'+str(xloc)+','+str(yloc)
text_screen=my_font.render(textstr, True, (255, 0, 0))
screen.blit(text_screen, (50,50))
if __name__=='__main__':
pygame.init()
screen=pygame.display.set_caption('hello world!')
screen=pygame.display.set_mode([640,480])
my_font=pygame.font.SysFont(None,22)
screen.fill([255,255,255])
loadtext(310,0)
lineleft()
lineright()
linemiddle()
looper=480
while True:
for event in pygame.event.get():
if event.type==pygame.QUIT:
sys.exit()
elif event.type == pygame.KEYDOWN:
if event.key==pygame.K_UP:
looper=looper-50
if looper<-132:
looper=480
if event.key==pygame.K_DOWN:
looper=looper+50
if looper>480:
looper=-132
loadtext(310,looper)
screen.fill([255,255,255])
loadtext(310,looper)
lineleft()
lineright()
linemiddle()
loadcar(looper)
这个例子里直接让背景重绘一下,就不会再像1、2里面那样用空白的rect去覆盖前面的模块了。