Python实现按特定格式对文件进行读写的方法示例
本文实例讲述了Python实现按特定格式对文件进行读写的方法。分享给大家供大家参考,具体如下:
#! /usr/bin/env python
#coding=utf-8
class ResultFile(object):
  def __init__(self, res):
    self.res = res
  def WriteFile(self):
    fp = open('pre_result.txt', 'w')
    print 'write start!'
    try:
      for item in self.res:
        fp.write(item['host'])
        fp.write('\r')
        fp.write(str(item['cpu']))#write方法的实参需要为string类型
        fp.write('\r')
        fp.write(str(item['mem']))
        fp.write('\n')
    finally:
      fp.close()
      print 'write finish!'
  def ReadFile(self):
    res = []
    fp = open('pre_result.txt', 'r')
    try:
      lines = fp.readlines()#读取出全部数据,按行存储
    finally:
      fp.close()
    for line in lines:
      dict = {}
      #print line.split() #like['compute21', '2', '4']
      line_list = line.split() #默认以空格为分隔符对字符串进行切片
      dict['host'] = line_list[0]
      dict['cpu'] = int(line_list[1])#读取出来的是字符
      dict['mem'] = int(line_list[2])
      res.append(dict)
    return res
if __name__ == '__main__':
  result_list=[{'host':'compute21', 'cpu':2, 'mem':4},{'host':'compute21', 'cpu':2, 'mem':4},
         {'host':'compute22', 'cpu':2, 'mem':4},{'host':'compute23', 'cpu':2, 'mem':4},
         {'host':'compute22', 'cpu':2, 'mem':4},{'host':'compute23', 'cpu':2, 'mem':4},
         {'host':'compute24', 'cpu':2, 'mem':4}]
  file_handle = ResultFile(result_list)
  #1、写入数据
  #print 'write start!'
  file_handle.WriteFile()
  #print 'write finish!'
  #2、读取数据
  res = file_handle.ReadFile()
  print res
写入的文件:
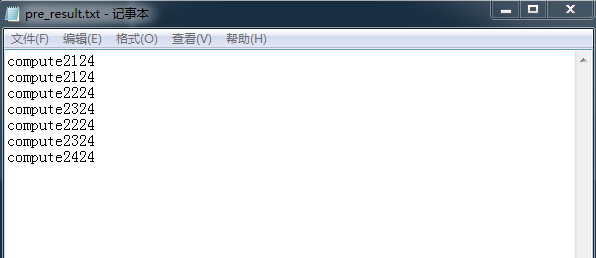
每一行的数据之间其实已经加入空格。
运行结果:
write start!
write finish!
[{'mem': 4, 'host': 'compute21', 'cpu': 2}, {'mem': 4, 'host':
'compute21', 'cpu': 2}, {'mem': 4, 'host': 'compute22', 'cpu': 2},
{'mem': 4, 'host': 'compute23', 'cpu': 2}, {'mem': 4, 'host':
'compute22', 'cpu': 2}, {'mem': 4, 'host': 'compute23', 'cpu': 2},
{'mem': 4, 'host': 'compute24', 'cpu': 2}]
实现了按原有格式写入和读取。
更多关于Python相关内容感兴趣的读者可查看本站专题:《Python编码操作技巧总结》、《Python图片操作技巧总结》、《Python数据结构与算法教程》、《Python Socket编程技巧总结》、《Python函数使用技巧总结》、《Python字符串操作技巧汇总》、《Python入门与进阶经典教程》及《Python文件与目录操作技巧汇总》
希望本文所述对大家Python程序设计有所帮助。