Python决策树和随机森林算法实例详解
本文实例讲述了Python决策树和随机森林算法。分享给大家供大家参考,具体如下:
决策树和随机森林都是常用的分类算法,它们的判断逻辑和人的思维方式非常类似,人们常常在遇到多个条件组合问题的时候,也通常可以画出一颗决策树来帮助决策判断。本文简要介绍了决策树和随机森林的算法以及实现,并使用随机森林算法和决策树算法来检测FTP暴力破解和POP3暴力破解,详细代码可以参考:
https://github.com/traviszeng/MLWithWebSecurity
决策树算法
决策树表现了对象属性和属性值之间的一种映射关系。决策树中的每个节点表示某个对象,而每个分叉路径则表示某个可能的属性值,而每个叶节点则对应从根节点到该叶节点所经历的路径所表现的对象值。在数据挖掘中,我们常常使用决策树来进行数据分类和预测。
决策树的helloworld
在这一小节,我们简单使用决策树来对iris数据集进行数据分类和预测。这里我们要使用sklearn下的tree的graphviz来帮助我们导出决策树,并以pdf的形式存储。具体代码如下:
#决策树的helloworld 使用决策树对iris数据集进行分类
from sklearn.datasets import load_iris
from sklearn import tree
import pydotplus
#导入iris数据集
iris = load_iris()
#初始化DecisionTreeClassifier
clf = tree.DecisionTreeClassifier()
#适配数据
clf = clf.fit(iris.data, iris.target)
#将决策树以pdf格式可视化
dot_data = tree.export_graphviz(clf, out_file=None)
graph = pydotplus.graph_from_dot_data(dot_data)
graph.write_pdf("iris.pdf")
iris数据集得到的可视化决策树如下图所示:
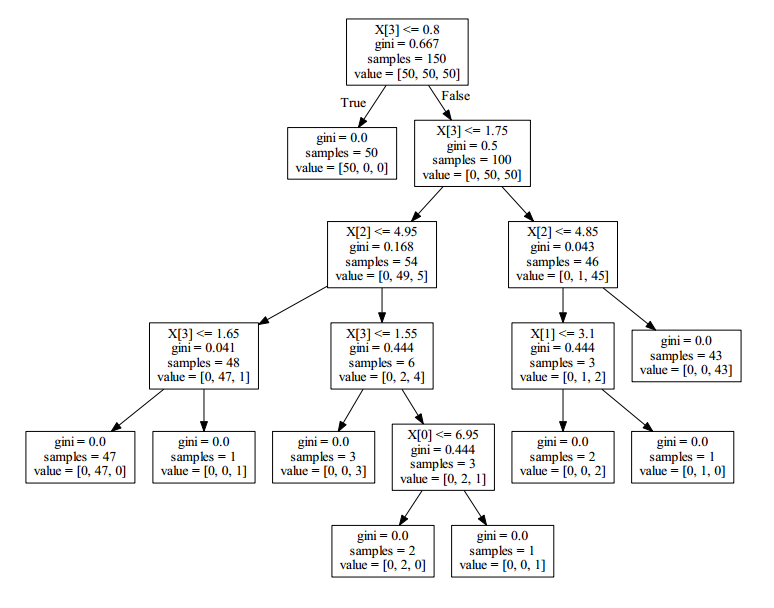
通过这个小例子,我们可以初步感受到决策树的工作过程和特点。相较于其他的分类算法,决策树产生的结果更加直观也更加符合人类的思维方式。
使用决策树检测POP3暴力破解
在这里我们是用KDD99数据集中POP3相关的数据来使用决策树算法来学习如何识别数据集中和POP3暴力破解相关的信息。关于KDD99数据集的相关内容可以自行google一下。下面是使用决策树算法的源码:
#使用决策树算法检测POP3暴力破解
import re
import matplotlib.pyplot as plt
from sklearn.feature_extraction.text import CountVectorizer
from sklearn.model_selection import cross_val_score
import os
from sklearn.datasets import load_iris
from sklearn import tree
import pydotplus
#加载kdd数据集
def load_kdd99(filename):
  X=[]
  with open(filename) as f:
    for line in f:
      line = line.strip('\n')
      line = line.split(',')
      X.append(line)
  return X
#找到训练数据集
def get_guess_passwdandNormal(x):
  v=[]
  features=[]
  targets=[]
  #找到标记为guess-passwd和normal且是POP3协议的数据
  for x1 in x:
    if ( x1[41] in ['guess_passwd.','normal.'] ) and ( x1[2] == 'pop_3' ):
      if x1[41] == 'guess_passwd.':
        targets.append(1)
      else:
        targets.append(0)
    #挑选与POP3密码破解相关的网络特征和TCP协议内容的特征作为样本特征
      x1 = [x1[0]] + x1[4:8]+x1[22:30]
      v.append(x1)
  for x1 in v :
    v1=[]
    for x2 in x1:
      v1.append(float(x2))
    features.append(v1)
  return features,targets
if __name__ == '__main__':
  v=load_kdd99("../../data/kddcup99/corrected")
  x,y=get_guess_passwdandNormal(v)
  clf = tree.DecisionTreeClassifier()
  print(cross_val_score(clf, x, y, n_jobs=-1, cv=10))
  clf = clf.fit(x, y)
  dot_data = tree.export_graphviz(clf, out_file=None)
  graph = pydotplus.graph_from_dot_data(dot_data)
  graph.write_pdf("POP3Detector.pdf")
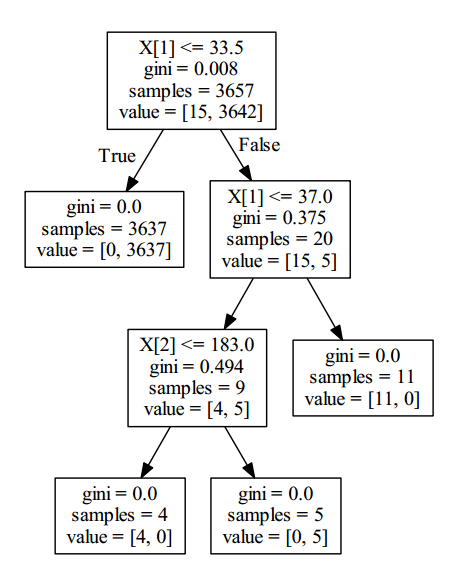
随后生成的用于辨别是否POP3暴力破解的的决策树如下:
随机森林算法
随机森林指的是利用多棵树对样本进行训练并预测的一种分类器。是一个包含多个决策树的分类器,并且其输出类别是由个别树输出的类别的众数决定的。随机森林的每一颗决策树之间是没有关联的。在得到森林之后,当有一个新的输入样本进入的时候,就让森林中的每一颗决策树分别进行判断,看看这个样本属于哪一类,然后看看哪一类被选择最多,则预测这个样本为那一类。一般来说,随机森林的判决性能优于决策树。
随机森林的helloworld
接下来我们利用随机生成的一些数据直观的看看决策树和随机森林的准确率对比:
from sklearn.model_selection import cross_val_score
from sklearn.datasets import make_blobs
from sklearn.ensemble import RandomForestClassifier
from sklearn.ensemble import ExtraTreesClassifier
from sklearn.tree import DecisionTreeClassifier
X,y = make_blobs(n_samples = 10000,n_features=10,centers = 100,random_state = 0)
clf = DecisionTreeClassifier(max_depth = None,min_samples_split=2,random_state = 0)
scores = cross_val_score(clf,X,y)
print("决策树准确率;",scores.mean())
clf = RandomForestClassifier(n_estimators=10,max_depth = None,min_samples_split=2,random_state = 0)
scores = cross_val_score(clf,X,y)
print("随机森林准确率:",scores.mean())
最后可以看到决策树的准确率是要稍逊于随机森林的。

使用随机森林算法检测FTP暴力破解
接下来我们使用ADFA-LD数据集中关于FTP的数据使用随机森林算法建立一个随机森林分类器,ADFA-LD数据集中记录了函数调用序列,每个文件包含的函数调用的序列个数都不一样。相关数据集的详细内容请自行google。
详细源码如下:
# -*- coding:utf-8 -*-
#使用随机森林算法检测FTP暴力破解
import re
import matplotlib.pyplot as plt
from sklearn.feature_extraction.text import CountVectorizer
from sklearn.model_selection import cross_val_score
import os
from sklearn import tree
import pydotplus
import numpy as np
from sklearn.ensemble import RandomForestClassifier
def load_one_flle(filename):
  x=[]
  with open(filename) as f:
    line=f.readline()
    line=line.strip('\n')
  return line
def load_adfa_training_files(rootdir):
  x=[]
  y=[]
  list = os.listdir(rootdir)
  for i in range(0, len(list)):
    path = os.path.join(rootdir, list[i])
    if os.path.isfile(path):
      x.append(load_one_flle(path))
      y.append(0)
  return x,y
def dirlist(path, allfile):
  filelist = os.listdir(path)
  for filename in filelist:
    filepath = path+filename
    if os.path.isdir(filepath):
      #处理路径异常
      dirlist(filepath+'/', allfile)
    else:
      allfile.append(filepath)
  return allfile
def load_adfa_hydra_ftp_files(rootdir):
  x=[]
  y=[]
  allfile=dirlist(rootdir,[])
  for file in allfile:
    #正则表达式匹配hydra异常ftp文件
    if re.match(r"../../data/ADFA-LD/Attack_Data_Master/Hydra_FTP_\d+/UAD-Hydra-FTP*",file):
      x.append(load_one_flle(file))
      y.append(1)
  return x,y
if __name__ == '__main__':
  x1,y1=load_adfa_training_files("../../data/ADFA-LD/Training_Data_Master/")
  x2,y2=load_adfa_hydra_ftp_files("../../data/ADFA-LD/Attack_Data_Master/")
  x=x1+x2
  y=y1+y2
  vectorizer = CountVectorizer(min_df=1)
  x=vectorizer.fit_transform(x)
  x=x.toarray()
  #clf = tree.DecisionTreeClassifier()
  clf = RandomForestClassifier(n_estimators=10, max_depth=None,min_samples_split=2, random_state=0)
  clf = clf.fit(x,y)
  score = cross_val_score(clf, x, y, n_jobs=-1, cv=10)
  print(score)
  print('平均正确率为:',np.mean(score))
最后可以获得一个准确率约在98.4%的随机森林分类器。
更多关于Python相关内容感兴趣的读者可查看本站专题:《Python数据结构与算法教程》、《Python编码操作技巧总结》、《Python函数使用技巧总结》、《Python字符串操作技巧汇总》及《Python入门与进阶经典教程》
希望本文所述对大家Python程序设计有所帮助。
