php版本CKEditor 4和CKFinder安装及配置方法图文教程
本文实例讲述了php版本CKEditor 4和CKFinder安装及配置方法。分享给大家供大家参考,具体如下:
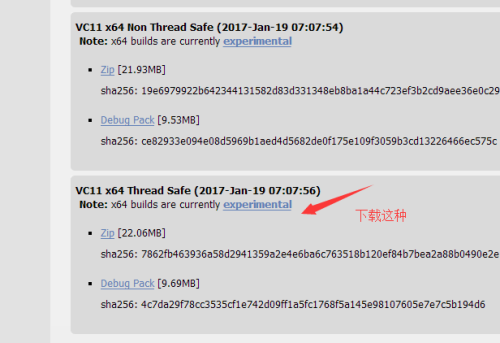
下载并解压CKEditor 4和CKFinder
CKEditor 4下载地址:https://ckeditor.com/cke4/builder,选择自定义的版本,记得加上中文语言包
CKFinder下载地址:https://download.cksource.com/CKFinder/CKFinder for PHP/3.4.4/ckfinder_php_3.4.4.zip
查看CKEditor的示例文件,http://127.0.0.1/ckeditor/samples/
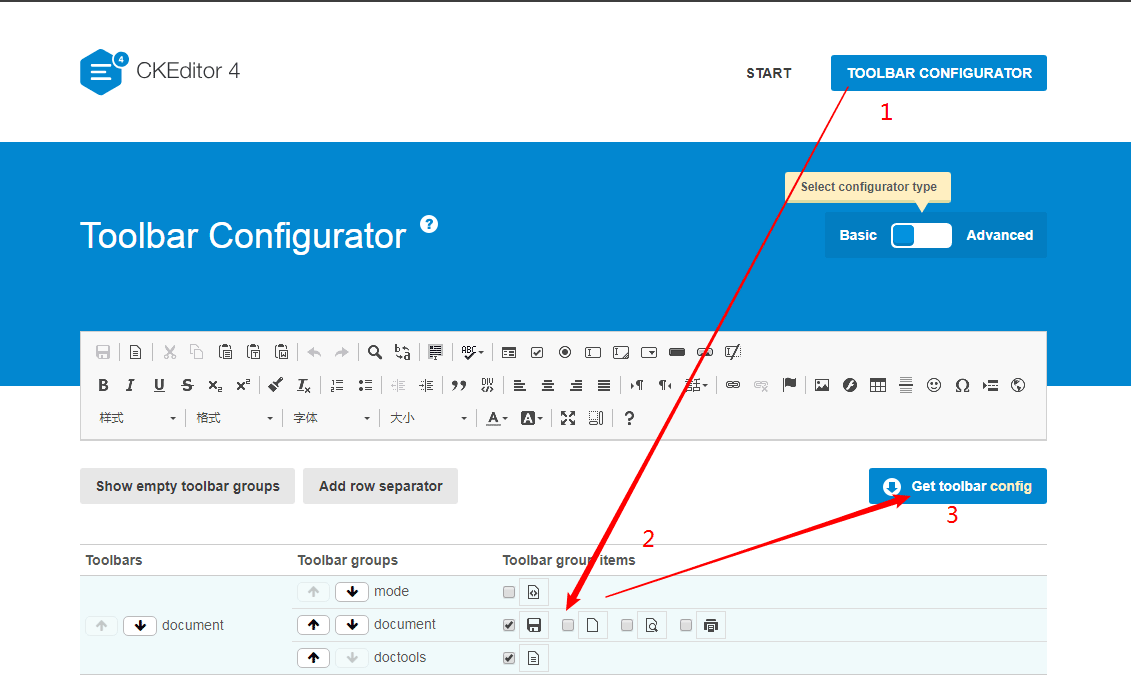
根据你的需求选择自定义工具栏,选好之后点击Get toolbar config,把这个配置代码复制,备用
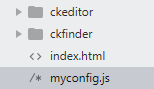
在CKEditor 4同级目录新建index.html,和myconfig.js
index.html的源代码为:
<!DOCTYPE html>
<html>
<head>
    <meta charset="utf-8">
    <title>CKEditor Sample</title>
    <!-- 加载ckeditor.js -->
    <script src="./ckeditor/ckeditor.js"></script>
</head>
<body id="main">
    <textarea name="editor1" id="editor1" cols="30" rows="10">
        这是一个CKEditor测试
    </textarea>
<script>
    // 这样就可以使用啦
    CKEDITOR.replace('editor1',{
        //toolbar : 'Basic',      //方式1,在此直接写配置
        //uiColor : '#9ab8f5'
        customConfig : '../myconfig.js' //方式2,加载配置js,相对于ckeditor.js的路径
    });
</script>
</body>
</html>
myconfig.js的源代码为:
//特别注意,每次修改都要ctrl+f5 清除缓存后查看
CKEDITOR.editorConfig = function( config ) {
  config.language = "zh-cn" ; //语言,对应ckeditor下的lang文件夹
    config.uiColor = '#9ab8f5';  //编辑器颜色
    config.width = '900';     //编辑器宽
    config.height = '500';    //编辑器高
    //自定义工具栏,刚才从示例哪里复制的代码
    config.toolbarGroups = [
        '/',
        { name: 'document', groups: [ 'mode', 'document', 'doctools' ] },
        { name: 'clipboard', groups: [ 'clipboard', 'undo' ] },
        { name: 'editing', groups: [ 'find', 'selection', 'spellchecker', 'editing' ] },
        { name: 'forms', groups: [ 'forms' ] },
        { name: 'basicstyles', groups: [ 'basicstyles', 'cleanup' ] },
        { name: 'paragraph', groups: [ 'list', 'indent', 'blocks', 'align', 'bidi', 'paragraph' ] },
        { name: 'links', groups: [ 'links' ] },
        { name: 'insert', groups: [ 'insert' ] },
        { name: 'styles', groups: [ 'styles' ] },
        { name: 'colors', groups: [ 'colors' ] },
        { name: 'tools', groups: [ 'tools' ] },
        { name: 'others', groups: [ 'others' ] },
        { name: 'about', groups: [ 'about' ] }
    ];
    config.removeButtons = 'NewPage,Save,Preview,Cut,Copy,Paste,PasteText,PasteFromWord,Find,Replace,SelectAll,Scayt,HiddenField,Form,Radio,TextField,Textarea,Select,Button,ImageButton,Outdent,Indent,Subscript,Superscript,Strike,Blockquote,CreateDiv,BidiLtr,BidiRtl,Language,Anchor,Table,HorizontalRule,Smiley,SpecialChar,PageBreak,Iframe,ShowBlocks,About,Source';
    //ckfinder的相关配置项
    config.filebrowserBrowseUrl = './ckfinder/ckfinder.html' ;
  config.filebrowserImageBrowseUrl = './ckfinder/ckfinder.html?type=Images' ;
  config.filebrowserFlashBrowseUrl = './ckfinder/ckfinder.html?type=Flash' ;
  config.filebrowserUploadUrl = './ckfinder/core/connector/php/connector.php?command=QuickUpload&type=Files' ;
  config.filebrowserImageUploadUrl = './ckfinder/core/connector/php/connector.php?command=QuickUpload&type=Images' ;
  config.filebrowserFlashUploadUrl = './ckfinder/core/connector/php/connector.php?command=QuickUpload&type=Flash' ;
  config.filebrowserWindowWidth = '600';   //文件浏览宽
  config.filebrowserWindowHeight = '300';   //文件浏览宽
};
网上搜索有同学总结了最全的配置项,详见附录说明
图片上传,点击浏览服务器,会出下面的提示

修改ckfinder文件夹下config.php,将29行的return false;改为return true;
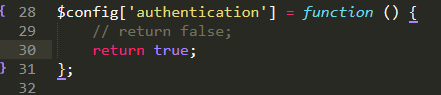
ckfinder即可正常使用,上传图片的默认保存位置为根目录下的ckfinder->userfiles->images。
CKEDITOR.editorConfig = function( config )
{
    // config.language = 'fr';
    // config.uiColor = '#AADC6E';
    config.filebrowserBrowseUrl = '/CKEditorAndCKFinder/ckfinder/ckfinder.html' ;
  config.filebrowserImageBrowseUrl = '/CKEditorAndCKFinder/ckfinder/ckfinder.html?type=Images' ;
  config.filebrowserFlashBrowseUrl = '/CKEditorAndCKFinder/ckfinder/ckfinder.html?type=Flash' ;
  config.filebrowserUploadUrl = '/CKEditorAndCKFinder/ckfinder/core/connector/java/connector.java?command=QuickUpload&type=Files' ;
  config.filebrowserImageUploadUrl = '/CKEditorAndCKFinder/ckfinder/core/connector/java/connector.java?command=QuickUpload&type=Images' ;
  config.filebrowserFlashUploadUrl = '/CKEditorAndCKFinder/ckfinder/core/connector/java/connector.java?command=QuickUpload&type=Flash' ;
  config.filebrowserWindowWidth = '1000';
  config.filebrowserWindowHeight = '700';
  config.language = "zh-cn" ;
  //编辑器样式,有三种:'kama'(默认)、'office2003'、'v2'
  //config.skin = "v2";
  //背景颜色
  //config.uiColor = "#FFF";
  //工具栏(基础'Basic'、全能'Full'、自定义)
  config.toolbar = 'Full';
  //工具栏是否可以被收缩
  //config.toolbarCanCollapse = false;
  //工具栏的位置
  //config.toolbarLocation = "bottom";
  //工具栏默认是否展开
  //config.toolbarStartupExpanded = false;
  //取消“拖拽以改变尺寸”的功能
  //config.resize_enabled = false;
  //改变大小的最大高度
  //config.resize_maxHeight = 3000;
  //改变大小的最大宽度
  //config.resize_minWidth = 3000;
  //改变大小的最小高度
  //config.resize_minHeight = 250;
  //改变大小的最小宽度
  //config.resize_minWidth = 750;
  //当提交包含有此编辑器的表单时,是否自动更新元素内的数据
  //config.autoUpdateElement = true;
  //设置是使用绝对目录还是相对目录,为空为相对目录
  //config.baseHref = "";
  //编辑器的z-index值
  //config.baseFloatZIndex = 10000;
  //设置快捷键
  //config.keystrokes = [];
  //设置快捷键 可能与浏览器快捷键冲突
  //config.blockedKeystrokes = [];
  //设置编辑内元素的背景色的取值
  //config.colorButton_backStyle = {
  //    element : 'span',
  //    styles : {'background-color' : '#(color)'}
  //}
  //设置前景色的取值
  //config.colorButton_colors
  //是否在选择颜色时显示“其它颜色”选项
  //config.colorButton_enableMore = false;
  //前景色默认值设置
  //config.colorButton_foreStyle = {
  //    element : 'span',
  //    styles : {'background-color' : '#(color)'}
  //}
  //所需要添加的CSS文件 在此添加 可使用相对路径和网站的绝对路径
  //config.contentsCss = "ckeditor/contents.css"
  //文字方向
  //config.contentsLangDirection = "rtl";
  //CKeditor的配置文件 若不想配置 留空即可
  //CKEDITOR.replace("myfield",{customConfig : "ckeditor/config.js"});
  //界面编辑框的背景色
  //config.dialog_backgroundCoverColor = "rgb(a,b,c)";
  //config.dialog_backgroundCoverColor = "white";
  //背景的不透明度
  //config.dialog_backgroundCoverOpacity = 0.5;
  //移动或者改变元素时 边框的吸附距离 单位:像素
  //config.dialog_magnetDistance = 20;
  //是否拒绝本地拼写检查和提示 默认为拒绝 目前仅firefox和safari支持
  //config.disableNativeSpellChecker = true;
  //进行表格编辑功能 如:添加行或列 目前仅firefox支持
  //sconfig.disableNativeTableHandles = true; 默认不开启
  //设置HTML文档类型
  //config.docType = '<!DOCTYPE HTML PUBLIC "-//W3C//DTD HTML 4.0 Transitional//EN">';
  //是否对编辑区域进行渲染
  //config.editingBlock = true;
  //编辑器中回车产生的标签
  //config.enterMode = CKEDITOR_ENTER_BR;
  //是否使用HTML实体进行输出
  //config.entities = true;
  //定义更多的实体
  //config.entities_additional = "#1049";
  //是否转换一些难以显示的字符为相应的HTML字符
  //config.entities_greek = true;
  //是否转换一些拉丁字符为HTML
  //cofig.entities_latin = true;
  //是否转换一些特殊字符为ASCII字符
  //config.entities_processNumerical = false;
  //添加新组件
  //config.extraPlugins = "myplugin";
  //使用搜索时的高亮色
  //config.find_highlight = {
  //    element : "span",
  //    style : {"background-color" : "#ff0", "color" : "#00f"}
  //}
  //默认的字体名
  //config.font_defaultLabel = "Arial";
  //字体编辑时的字符集 可以添加常用的中文字符:宋体、楷体、黑体等
  //config.font_names = "Arial;Times New Roman;Verdana";
  //文字的默认式样
  //config.font_style = {};
  //字体默认大小
  //config.fontSize_defaultLabel = "12px";
  //字体编辑时可选的字体大小
  //config.fontSize_sizes = "8/8px;9/9px;10/10px;11/11px;12/12px;14/14px;16/16px;18/18px;20/20px;22/22px;24/24px;26/26px;28/28px;36/36px;48/48px;72/72px";
  //设置字体大小时 使用的式样
  //config.fontSize_style = {};
  //是否强制复制来的内容去除格式
  //config.forcePasteAsPlainText = false;//不去除
  //是否强制用“&”来代替“&”
  //config.forceSimpleAmpersand = false;
  //对address标签进行格式化
  //config.format_address = { element : 'address', attributes : { class : 'styledAddress' } };
  //对DIV标签自动进行格式化
  //config.format_div = { element : 'div', attributes : { class : 'normalDiv' } };
  //对H1标签自动进行格式化
  //config.format_h1 = { element : 'h1', attributes : { class : 'contentTitle1' } };
  //对H2标签自动进行格式化
  //config.format_h2 = { element : 'h2', attributes : { class : 'contentTitle2' } };
  //对H3标签自动进行格式化
  //config.format_h3 = { element : 'h3', attributes : { class : 'contentTitle3' } };
  //对H4标签自动进行格式化
  //config.format_h4 = { element : 'h4', attributes : { class : 'contentTitle4' } };
  //对H5标签自动进行格式化
  //config.format_h5 = { element : 'h5', attributes : { class : 'contentTitle5' } };
  //对H6标签自动进行格式化
  //config.format_h6 = { element : 'h6', attributes : { class : 'contentTitle6' } };
  //对P标签自动进行格式化
  //config.format_p = { element : 'p', attributes : { class : 'normalPara' } };
  //对PRE标签自动进行格式化
  //config.format_pre = { element : 'pre', attributes : { class : 'code' } };
  //用分号分隔的标签名字 在工具栏上显示
  //config.format_tags = "p;h1;h2;h3;h4;h5;h6;pre;address;div";
  //是否使用完整的html编辑模式 如使用,其源码将包含:<html><body></body></html>等标签
  //config.fullPage = false;
  //是否忽略段落中的空字符
  //config.ignoreEmptyParagraph = true;
  //在清除图片属性框中的链接属性时 是否同时清除两边的<a>标签
  //config.image_removeLinkByEmptyURL = true;
  //一组用逗号分隔的标签名称,显示在左下角的层次嵌套中
  //config.menu_groups ='clipboard,form,tablecell,tablecellproperties,tablerow,tablecolumn,table,anchor,link,image,flash,checkbox,radio,textfield,hiddenfield,imagebutton,button,select,textarea';
  //显示子菜单时的延迟,单位:ms
  //config.menu_subMenuDelay = 400;
  //当执行“新建”命令时,编辑器中的内容
  //config.newpage_html = "";
  //当从word里复制文字进来时,是否进行文字的格式化去除
  //config.pasteFromWorldIgnoreFontFace = true; //默认忽略格式
  //是否使用<h1><h2>等标签修饰或者代替从word文档中粘贴过来的内容
  //config.pasteFromWorkKeepsStructure = false;
  //从word中粘贴内容时是否移除格式
  //config.pasteFromWorkRemoveStyle = false;
  //对应后台语言的类型来对输出的HTML内容进行格式化,默认为空
  //config.protectedSource.push( /<\?[\s\S]*?\?>/g );  // PHP code
  //config.protectedSource.push( /<%[\s\S]*?%>/g );  // ASP code
  //config.protectedSource.push( /(]+>[\s|\S]*?<\/asp:[^\>]+>)|(]+\/>)/gi );  // ASP.Net code
  //当输入:shift+Enter时插入的标签
  //config.shiftEnterMode = CKEDITOR.ENTER_P;
  //可选的表情替代字符
  //config.smiley_descriptions = [
  //     ':)', ':(', ';)', ':D', ':/', ':P',
  //     '', '', '', '', '', '',
  //     '', ';(', '', '', '', '',
  //     '', ':kiss', '' ];
  //对应的表情图片
  //config.smiley_images = [
  //  'regular_smile.gif','sad_smile.gif','wink_smile.gif','teeth_smile.gif','confused_smile.gif','tounge_smile.gif',
  //  'embaressed_smile.gif','omg_smile.gif','whatchutalkingabout_smile.gif','angry_smile.gif','angel_smile.gif','shades_smile.gif',
  //  'devil_smile.gif','cry_smile.gif','lightbulb.gif','thumbs_down.gif','thumbs_up.gif','heart.gif',
  //  'broken_heart.gif','kiss.gif','envelope.gif'];
  //表情的地址
  //config.smiley_path = "plugins/smiley/images";
  //页面载入时,编辑框是否立即获得焦点
  //config.startupForce = false;
  //载入时,以何种方式编辑 源码和所见即所得 "source"和"wysiwyg"
  //config.startupMode = "wysiwyg";
  //载入时,是否显示框体的边框
  //config.startupOutlineBlocks = false;
  //是否载入样式文件
  // Load from the styles' styles folder (mystyles.js file).
  //config.stylesSet = 'mystyles';
  // Load from a relative URL.
  //config.stylesSet = 'mystyles:/editorstyles/styles.js';
  // Load from a full URL.
  //config.stylesSet = 'mystyles:http://www.example.com/editorstyles/styles.js';
  // Load from a list of definitions.
  //config.stylesSet = [
  //{ name : 'Strong Emphasis', element : 'strong' },
  //{ name : 'Emphasis', element : 'em' }, ... ];
  //起始的索引值
  //config.tabIndex = 0;
  //当用户键入TAB时,编辑器走过的空格数,( ) 当值为0时,焦点将移出编辑框
  //config.tabSpaces = 4;
  //默认使用的模板
  //config.templates = "default";
  //用逗号分隔的模板文件
  //config.templates_files = ['plugins/templates/templates/default.js'];
  //当使用模板时,“编辑内容将被替换”框是否选中
  //config.templates_replaceContent = true;
  //主题
  //config.theme = "default";
  //撤销的记录步数
  //config.undoStackSize = 20;
  //config.contentsCss = "/CKEditorAndCKFinder/ckeditor/css/mysitestyles.css";
};
更多关于PHP相关内容感兴趣的读者可查看本站专题:《PHP扩展开发教程》、《PHP网络编程技巧总结》、《php curl用法总结》、《PHP数组(Array)操作技巧大全》、《PHP数据结构与算法教程》、《php程序设计算法总结》及《php字符串(string)用法总结》
希望本文所述对大家PHP程序设计有所帮助。