Python简单读写Xls格式文档的方法示例
本文实例讲述了Python简单读写Xls格式文档的方法。分享给大家供大家参考,具体如下:
1. 模块安装
使用pip install命令安装,
即:
pip install xlrd
pip install xlwt
如下图:


2. python 代码
import xlrd
import xlwt
import datetime
def set_style(name,height,format,bold=False):
  style = xlwt.XFStyle()
  if format.strip()!='':
    style.num_format_str =format
  font = xlwt.Font()
  font.name=name
  font.bold=bold
  font.color_index=4
  font.height=height
  alignment = xlwt.Alignment()
  #HORZ_GENERAL, HORZ_LEFT, HORZ_CENTER, HORZ_RIGHT, HORZ_FILLED, HORZ_JUSTIFIED, HORZ_CENTER_ACROSS_SEL, HORZ_DISTRIBUTED
  alignment.horz = xlwt.Alignment.HORZ_CENTER
  #VERT_TOP, VERT_CENTER, VERT_BOTTOM, VERT_JUSTIFIED, VERT_DISTRIBUTED
  alignment.vert = xlwt.Alignment.VERT_CENTER
  style.alignment = alignment
  style.font=font
  return style
def set_colstyle(sheet,cindex):
  col=sheet.col(cindex)
  col.width =256*20
  #col.height =100
def writeXls(path):
  wb = xlwt.Workbook()
  sheet = wb.add_sheet('测试',cell_overwrite_ok=True)
  set_colstyle(sheet,3)
  #标题
  heads=['姓名','学科','分数','日期']
  for h in range(0,len(heads)):
    sheet.write(0,h,heads[h],set_style('Arial',300,'',True))
  #数据
  sheet.write_merge(1,2,0,0,'张三',set_style('Arial',300,'',False))
  sheet.write(1,1,'语文',set_style('Arial',240,'',False))
  sheet.write(1,2,85,set_style('Arial',240,'',False))
  sheet.write(1,3,datetime.date.today(),set_style('Arial',240,'yyyy/mm/dd',False))
  sheet.write(2,1,'数学',set_style('Arial',240,'',False))
  sheet.write(2,2,85,set_style('Arial',240,'',False))
  sheet.write(2,3,datetime.date.today(),set_style('Arial',240,'yyyy/mm/dd',False))
  sheet.write_merge(3,4,0,0,'李四',set_style('Arial',300,'',False))
  sheet.write(3,1,'语文',set_style('Arial',240,'',False))
  sheet.write(3,2,95,set_style('Arial',240,'',False))
  sheet.write(3,3,datetime.date.today(),set_style('Arial',240,'yyyy/mm/dd',False))
  sheet.write(4,1,'数学',set_style('Arial',240,'',False))
  sheet.write(4,2,95,set_style('Arial',240,'',False))
  sheet.write(4,3,datetime.date.today(),set_style('Arial',240,'yyyy/mm/dd',False))
  wb.save(path)
def ismerge(sheet,merge,r,c):
  #merge=sheet.merged_cells
  for m in merge:
    if r>=m[0] and r<m[1] and c==m[2]:
      r=m[0]
      c==m[2]
      break
  return r,c
def readXls(path):
  wb=xlrd.open_workbook(path,formatting_info=True)
  #sheetname=wb.sheet_names()[0]
  sheet=wb.sheet_by_index(0)
  rows=sheet.nrows
  cols=sheet.ncols
  merge=sheet.merged_cells
  #merged_cells返回的这四个参数的含义是:(row,row_range,col,col_range),
  #其中[row,row_range)包括row,不包括row_range
  print('--------------------------------------------------------------------')
  for r in range(0,rows):
    listStr = []
    for c in range(0,cols):
      merg=ismerge(sheet,merge,r,c)
      if (sheet.cell(merg[0],merg[1]).ctype==3):
        data_value=xlrd.xldate_as_tuple(sheet.cell_value(merg[0],merg[1]),wb.datemode)
        #print(datetime.date(*data_value[:3]).strftime('%Y/%m/%d'))
        listStr.append(datetime.date(*data_value[:3]).strftime('%Y/%m/%d'))
      else:
        #print(sheet.cell_value(merg[0],merg[1]))
        listStr.append(sheet.cell_value(merg[0],merg[1]))
      #print(sheet.cell(merg[0],merg[1]).value)
      #print(sheet.cell(r,c).ctype)
    print(' |\t'.join(str(s) for s in listStr if s not in [None]))
    print('--------------------------------------------------------------------')
if __name__ == '__main__':
  #writeXls('H:\测试.xls')
  readXls('H:\测试.xls')
3.效果展示
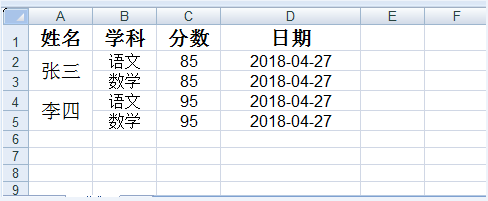
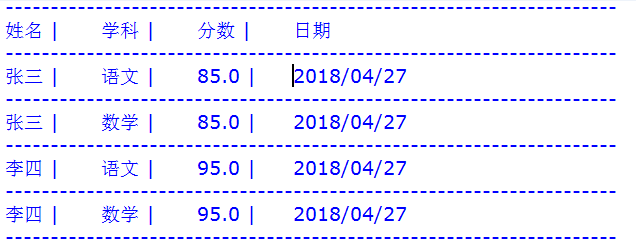
更多关于Python相关内容感兴趣的读者可查看本站专题:《Python操作Excel表格技巧总结》、《Python文件与目录操作技巧汇总》、《Python文本文件操作技巧汇总》、《Python数据结构与算法教程》、《Python函数使用技巧总结》、《Python字符串操作技巧汇总》及《Python入门与进阶经典教程》
希望本文所述对大家Python程序设计有所帮助。