Python wxPython库消息对话框MessageDialog用法示例
本文实例讲述了Python wxPython库消息对话框MessageDialog用法。分享给大家供大家参考,具体如下:
消息对话框即我们平时说的Messagebox,看看它的原型,下面是wxWidgets中的原型定义,C++风格,与python风格的区别就是wx前缀与后面名称直接相连,例如wxMessageDialog,在wxpython中使用时就是wx.MessageDialog
wxMessageDialog(wxWindow* parent, const wxString& message, const wxString& caption = "Message box", long style = wxOK | wxCANCEL, const wxPoint& pos = wxDefaultPosition)
其各参数不多做介绍,主要看看ShowModal()方法,它使用应用程序在对话框关闭前不能响应其它窗口的用户事件,返回一个整数,取值如下:
wx.ID_YES, wx.ID_NO, wx.ID_CANCEL, wx.ID_OK。
另外,style的取值主要有以下几种:
| wxOK | Show an OK button. |
| wxCANCEL | Show a Cancel button. |
| wxYES_NO | Show Yes and No buttons. |
| wxYES_DEFAULT | Used with wxYES_NO, makes Yes button the default - which is the default behaviour. |
| wxNO_DEFAULT | Used with wxYES_NO, makes No button the default. |
| wxICON_EXCLAMATION | Shows an exclamation mark icon. |
| wxICON_HAND | Shows an error icon. |
| wxICON_ERROR | Shows an error icon - the same as wxICON_HAND. |
| wxICON_QUESTION | Shows a question mark icon. |
| wxICON_INFORMATION | Shows an information (i) icon. |
| wxSTAY_ON_TOP | The message box stays on top of all other window, even those of the other applications (Windows only). |
还是看一个例子:
代码:
#!/usr/bin/env python
# -*- coding: utf-8 -*-
import wx
class MyFrame(wx.Frame):
 def __init__(self, parent, id):
  wx.Frame.__init__(self, parent, id, u'测试面板Panel', size = (600, 300))
  #创建面板
  panel = wx.Panel(self)
  #在Panel上添加Button
  button = wx.Button(panel, label = u'关闭', pos = (150, 60), size = (100, 60))
  #绑定单击事件
  self.Bind(wx.EVT_BUTTON, self.OnCloseMe, button)
 def OnCloseMe(self, event):
  dlg = wx.MessageDialog(None, u"消息对话框测试", u"标题信息", wx.YES_NO | wx.ICON_QUESTION)
  if dlg.ShowModal() == wx.ID_YES:
   self.Close(True)
  dlg.Destroy()
if __name__ == '__main__':
 app = wx.PySimpleApp()
 frame = MyFrame(parent = None, id = -1)
 frame.Show()
 app.MainLoop()
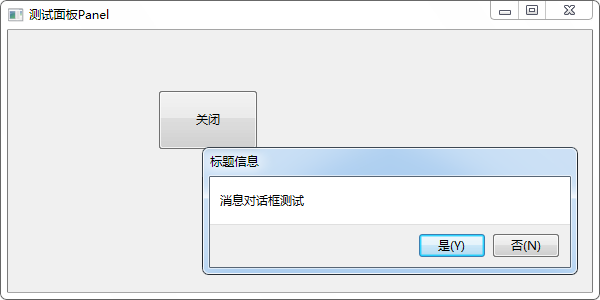
测试:
更多关于Python相关内容感兴趣的读者可查看本站专题:《Python数据结构与算法教程》、《Python Socket编程技巧总结》、《Python函数使用技巧总结》、《Python字符串操作技巧汇总》、《Python入门与进阶经典教程》及《Python文件与目录操作技巧汇总》
希望本文所述对大家Python程序设计有所帮助。