Django中数据库的数据关系:一对一,一对多,多对多
一对一:
一对一的关系极为一个数据仅对应一个数据,用下图的结构图可以帮助理解:
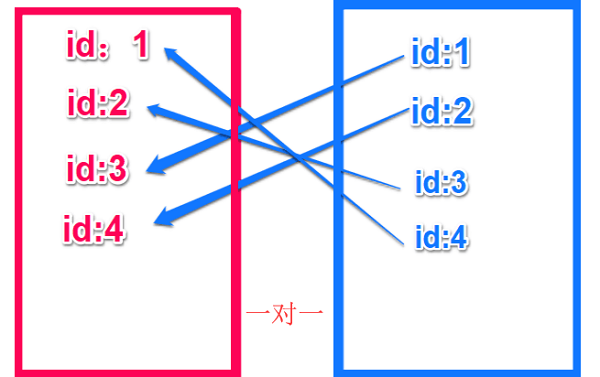
下面用代码实现一下,首先要创建工程项目如下:
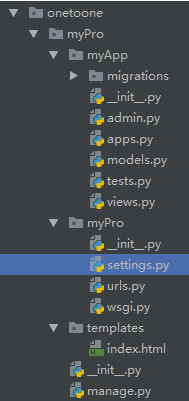
接着,我们定义模型:
来到models.py文件,创建两个模型:
from django.db import models
# Create your models here.
class One(models.Model):
  oname = models.CharField(max_length=20,null=True)
  oage = models.CharField(max_length=20,null=True)
  odate = models.DateField(null=True)
class Two(models.Model):
# 设置一对一关系,是通过将表中的字段设置为主键完成的
# on_delete=models.CASCADE 当父表中的某一条数据删除的时候
  # 相关字表中的数据也会被删除
  tsub = models.OneToOneField(One,on_delete=models.CASCADE,primary_key=True)
  tfond = models.CharField(max_length=20,null=True)
  tdes = models.CharField(max_length=200,null=True)
来到myPro文件夹下添加以下两句代码:
import pymysql
pymysql.install_as_MySQLdb()
下面可以迁移文件:
python manage.py makemigrations
python manage.py migrate
这样我们就创建了两个表:
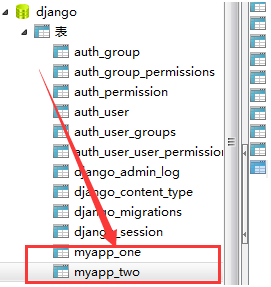
来到views.py文件中添加数据,代码如下:
from django.shortcuts import render
from .models import One,Two
# Create your views here.
def index(request):
  o1 = One.objects.create(oname='张三',oage=11,odate='2011-11-11')
  o2 = One.objects.create(oname='张三2',oage=12,odate='2012-12-12')
  t1 = Two.objects.create(tsub=o1,tfond='o1',tdes='我喜欢o1')
  t2 = Two.objects.create(tsub=o2,tfond='o2',tdes='我喜欢o2')
  return render(request,'index.html')
运行之后,将添加数据的代码注释掉,否则后面每运行一次都会添加。
下面,我们通过查询数据来甄别其中的关系。
def select(request):
  t1 = Two.objects.get(tsub__oname = '张三')
  return render(request,'index.html',{'t1':t1})
一对多
即一个对象对应着对个对象。
创建模型代码:
from django.db import models
# Create your models here.
class People(models.Model):
  name = models.CharField(max_length=50)
  card_num = models.IntegerField(default=0)
class Card(models.Model):
  number = models.CharField(max_length=20)
  person = models.ForeignKey(People,on_delete=models.CASCADE)
  source = models.CharField(max_length=50)
urls.py路由设置:
from django.contrib import admin
from django.urls import path
from myApp import views
urlpatterns = [
  path('admin/', admin.site.urls),
  path('add/',views.add),
  path('select/',views.select),
]
views.py文件中代码:
from django.shortcuts import render
from .models import People,Card
from django.http import HttpResponse
# Create your views here.
# 添加数据
def add(request):
  # p1 = People.objects.create(name='小王',card_num = 4)
  # p2 = People.objects.create(name='老王', card_num=40)
  #
  # c1 = Card(number='101',source = '中国银行',person = p1)
  # c2 = Card(number='102', source='中国农行', person=p1)
  # c3 = Card(number='110', source='中国建行', person=p1)
  # c1.save()
  # c2.save()
  # c3.save()
  #
  # c4 = Card(number='201', source='河南郑州美容美发', person=p2)
  # c5 = Card(number='202', source='郑州交通一卡通', person=p2)
  # c6 = Card(number='203', source='郑州逍遥镇胡辣汤', person=p2)
  # c7 = Card(number='204', source='郑州惠济四附院', person=p2)
  #
  # c4.save()
  # c5.save()
  # c6.save()
  # c7.save()
  return HttpResponse('添加成功')
def select(request):
  # 查找number=203的人
  c1 = Card.objects.get(number='203')
  print(c1.person.name)
  # 查找id为3对应的人
  c2 = Card.objects.get(id=3)
  print(c2.person.name)
  # 查找c2的所有卡
  result = c2.person.card_set.all()
  print(result)
  for res in result:
    print(res.source)
  # 查找名字为老王的所有卡种
  result = People.objects.get(name='老王')
  for card in result.card_set.all():
    print(card.source)
  return HttpResponse('查询成功')
多对多
即多个对象对应对个对象,类似公交车坐车,人可以坐多个公交车,公交车也可以载不同的人。
创建模型代码如下:
from django.db import models
# Create your models here.
class Publication(models.Model):
  pname = models.CharField(max_length=200)
  paddress = models.CharField(max_length=200)
class Book(models.Model):
  bname = models.CharField(max_length=200)
  bauthor = models.CharField(max_length=200)
  publication = models.ManyToManyField(Publication)
视图文件views.py文件代码如下:
from django.shortcuts import render
from .models import Publication,Book
from django.http import HttpResponse
# Create your views here.
def add(request):
  # p1 = Publication(pname='大象出版社',paddress='河南',)
  # p2 = Publication(pname='北京出版社',paddress='北京')
  # p3 = Publication(pname='清华出版社',paddress='河北')
  # p1.save()
  # p2.save()
  # p3.save()
  #
  # b1 = Book(bname='海底两万里',bauthor='赵四')
  # b2 = Book(bname='遮天',bauthor='辰东')
  # b3 = Book(bname='童年', bauthor='xxxx')
  # b4 = Book(bname='在人间', bauthor='yyyy')
  # b5 = Book(bname='我的大学', bauthor='张飞')
  # b6 = Book(bname='汤姆索亚历险记', bauthor='赵六儿')
  # b1.save()
  # b2.save()
  # b3.save()
  # b4.save()
  # b5.save()
  # b6.save()
  #
  # b1.publication.add(p1,p2,p3)
  # b2.publication.add(p1,p2)
  # b3.publication.add(p1,p3)
  # b4.publication.add(p2,p3)
  # b5.publication.add(p3)
  # 多对多关系,两个表不直接产生联系,而是将两个表之间的关系记录在中间表上
  # 中间表不需要创建,会自动生成
  return HttpResponse('添加成功')
def select(request):
  # 通过书籍查找对应的出版社
  b1 = Book.objects.get(bname='童年')
  # 获取出版童年的所有出版社
  b1_publication = b1.publication.all()
  for pub in b1_publication:
    print(pub.pname)
    print(pub.paddress)
  p1 = Publication.objects.get(pname = '清华出版社')
  all_book = p1.book_set.all()
  print('------------------')
  for book in all_book:
    print(book.bname)
    print(book.bauthor)
  return HttpResponse('查找成功')
这样,就介绍完了。
总结
以上就是这篇文章的全部内容了,希望本文的内容对大家的学习或者工作具有一定的参考学习价值,谢谢大家对【听图阁-专注于Python设计】的支持。如果你想了解更多相关内容请查看下面相关链接