用Django写天气预报查询网站
创建项目
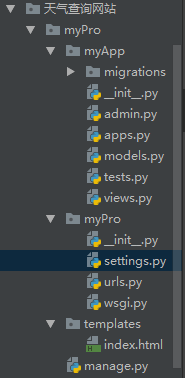
创建工程项目如下所示:
设置文件settings.py中的设置主要有两个
1.注册app
2.设置templates的路径
前面的文章已经介绍过多次如何设置了,此处不再做详细赘述。
主要流程分以下几步:
1.从接口获取数据,经过urls.py文件传送给index.html文件。
2.在index.html文件中做界面处理,使界面美观好看。
3.添加查询功能。
获取数据和传送数据在前面的电影查询网站已经讲过 ,这里着重说一下添加查询功能的原理。
本次仍然是用form表单实现查询功能,form表单的method不做设置的话会默认get请求,当我们第一次传送数据到界面之后,
可以在form表单设置个请求方式,然后在下次请求数据的时候,添加一个判断,判断的时候把form表单输入的城市信息更改
为下次请求的时候的城市信息即可。
下附代码:
视图文件views.py文件中的代码如下:
from django.shortcuts import render
import requests
# Create your views here.
def index(request):
  if request.method == 'POST':
    city = request.POST['city']
    url = 'http://api.map.baidu.com/telematics/v3/weather?location={}&output=json&ak=TueGDhCvwI6fOrQnLM0qmXxY9N0OkOiQ&callback=?'.format(city)
  else:
    url = 'http://api.map.baidu.com/telematics/v3/weather?location=郑州&output=json&ak=TueGDhCvwI6fOrQnLM0qmXxY9N0OkOiQ&callback=?'
  json_data = requests.get(url).json()
  weather = json_data['results'][0]['weather_data']
  today_weather = weather[0]
  t_weather = weather[1]
  tt_weather = weather[2]
  ttt_weather =weather[3]
  city = json_data['results'][0]['currentCity']
  context = {
    'today':today_weather,
    'city':city,
    'list':[t_weather,tt_weather,ttt_weather]
  }
  return render(request,'index.html',context)
urls.py文件中的代码如下:
from django.contrib import admin
from django.urls import path
from myApp import views
urlpatterns = [
  path('admin/', admin.site.urls),
  path('index/',views.index),
  path('select/',views.index),
]
index.html界面文件代码如下:
<!DOCTYPE html>
<html lang="en">
<head>
  <meta charset="UTF-8">
  <title>{{city}}天气信息</title>
  <style>
    html,body{
      height:100%;
      margin:0;
      color: white;
      text-align: center;
    }
    body{
      /*渐变色*/
      background: linear-gradient(#1078c7,#7196b4);
    }
    form{
      text-align: center;
    }
    main img{
      width: 80px;
    }
    h1{
      margin:5px;
    }
    footer{
      display: flex;
    }
    section{
      flex-grow: 1;
      border-right:1px solid greenyellow;
    }
    section:nth-child(3){
      border:none;
    }
  </style>
</head>
<body>
  <form action="/select/" method="POST">
    {% csrf_token %}
    <input name="city" type="text" placeholder="请输入城市">
    <button type="submit">查询</button>
  </form>
  <main>
    <h2>实时天气</h2>
    <img src="{{today.dayPictureUrl}}" alt="">
    <h1>{{today.temperature}}</h1>
    <div>
      {{today.weather}}<br>
      {{today.wind}}<br>
      {{today.date}}<br>
    </div>
  </main>
  <footer>
    {% for weather in list %}
      <section>
        <h4>{{weather.date}}</h4>
        <img src="{{weather.dayPictureUrl}}" alt="">
        <div>
          {{weather.temperature}}<br>
          {{weather.weather}}<br>
          {{weather.wind}}<br>
        </div>
      </section>
    {% endfor %}
  </footer>
</body>
</html>
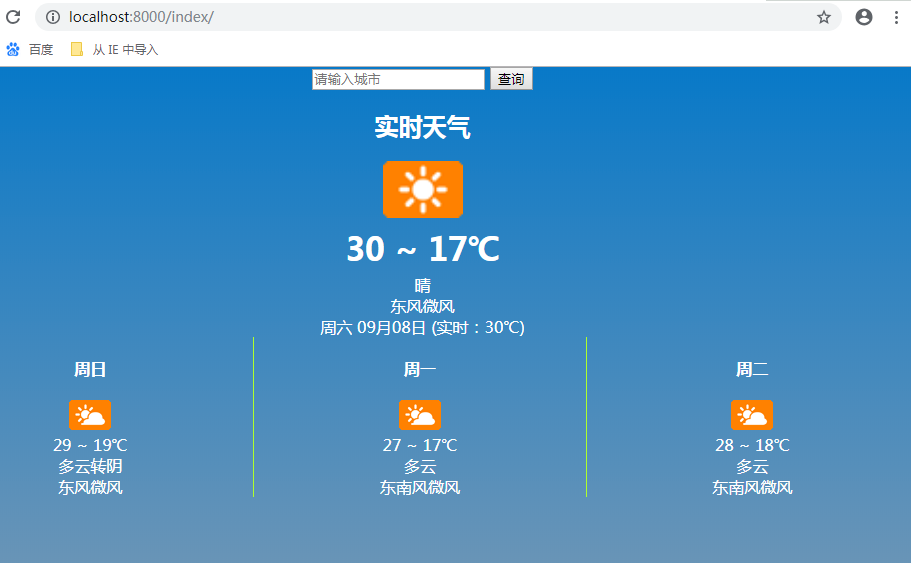
python manage.py runserver 启动服务器,在浏览器打开网址,即可看到效果:
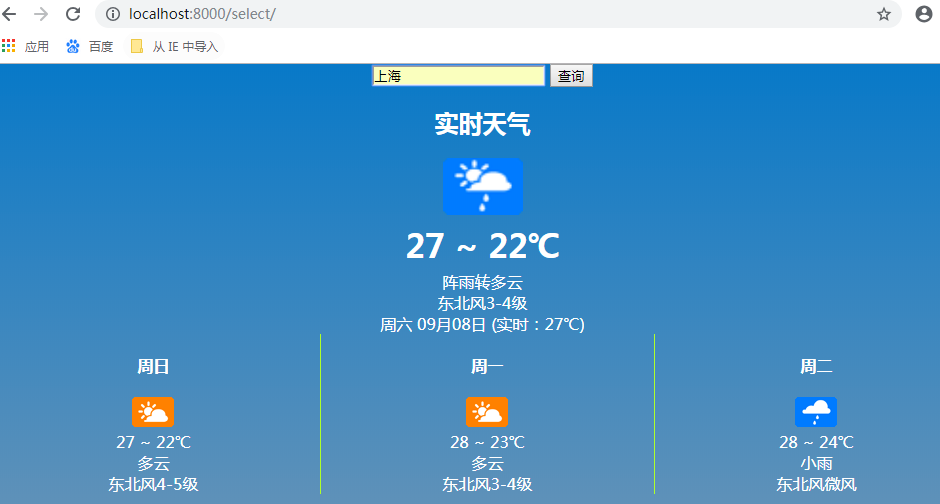
在上面的查询框中输入城市名,即可查询别的城市天气信息:
总结
以上就是这篇文章的全部内容了,希望本文的内容对大家的学习或者工作具有一定的参考学习价值,谢谢大家对【听图阁-专注于Python设计】的支持。如果你想了解更多相关内容请查看下面相关链接