python下载微信公众号相关文章
本文实例为大家分享了python下载微信公众号相关文章的具体代码,供大家参考,具体内容如下
目的:从零开始学自动化测试公众号中下载“pytest"一系列文档
1、搜索微信号文章关键字搜索
2、对搜索结果前N页进行解析,获取文章标题和对应URL
主要使用的是requests和bs4中的Beautifulsoup
Weixin.py
import requests
from urllib.parse import quote
from bs4 import BeautifulSoup
import re
from WeixinSpider.HTML2doc import MyHTMLParser

class WeixinSpider(object):

 def __init__(self, gzh_name, pageno,keyword):
  self.GZH_Name = gzh_name
  self.pageno = pageno
  self.keyword = keyword.lower()
  self.page_url = []
  self.article_list = []
  self.headers = {
   'User-Agent': 'Mozilla/5.0 (Windows NT 10.0; WOW64) AppleWebKit/537.36 (KHTML, like Gecko) Chrome/70.0.3538.110 Safari/537.36'}
  self.timeout = 5
  # [...] 用来表示一组字符,单独列出:[amk] 匹配 'a','m'或'k'
  # re+ 匹配1个或多个的表达式。
  self.pattern = r'[\\/:*?"<>|\r\n]+'

 def get_page_url(self):
  for i in range(1,self.pageno+1):
   # https://weixin.sogou.com/weixin?query=从零开始学自动化测试&_sug_type_=&s_from=input&_sug_=n&type=2&page=2&ie=utf8
   url = "https://weixin.sogou.com/weixin?query=%s&_sug_type_=&s_from=input&_sug_=n&type=2&page=%s&ie=utf8" \
     % (quote(self.GZH_Name),i)
   self.page_url.append(url)

 def get_article_url(self):
  article = {}
  for url in self.page_url:
   response = requests.get(url,headers=self.headers,timeout=self.timeout)
   result = BeautifulSoup(response.text, 'html.parser')
   articles = result.select('ul[class="news-list"] > li > div[class="txt-box"] > h3 > a ')
   for a in articles:
    # print(a.text)
    # print(a["href"])
    if self.keyword in a.text.lower():
      new_text=re.sub(self.pattern,"",a.text)
      article[new_text] = a["href"]
      self.article_list.append(article)


headers = {'User-Agent':
      'Mozilla/5.0 (Windows NT 10.0; WOW64) AppleWebKit/537.36 (KHTML, like Gecko) Chrome/70.0.3538.110 Safari/537.36'}
timeout = 5
gzh_name = 'pytest文档'
My_GZH = WeixinSpider(gzh_name,5,'pytest')
My_GZH.get_page_url()
# print(My_GZH.page_url)
My_GZH.get_article_url()
# print(My_GZH.article_list)
for article in My_GZH.article_list:
 for (key,value) in article.items():
  url=value
  html_response = requests.get(url,headers=headers,timeout=timeout)
  myHTMLParser = MyHTMLParser(key)
  myHTMLParser.feed(html_response.text)
  myHTMLParser.doc.save(myHTMLParser.docfile)
HTML2doc.py
from html.parser import HTMLParser
import requests
from docx import Document
import re
from docx.shared import RGBColor
import docx


class MyHTMLParser(HTMLParser):
 def __init__(self,docname):
  HTMLParser.__init__(self)
  self.docname=docname
  self.docfile = r"D:\pytest\%s.doc"%self.docname
  self.doc=Document()
  self.title = False
  self.code = False
  self.text=''
  self.processing =None
  self.codeprocessing =None
  self.picindex = 1
  self.headers = {
   'User-Agent': 'Mozilla/5.0 (Windows NT 10.0; WOW64) AppleWebKit/537.36 (KHTML, like Gecko) Chrome/70.0.3538.110 Safari/537.36'}
  self.timeout = 5

 def handle_startendtag(self, tag, attrs):
  # 图片的处理比较复杂,首先需要找到对应的图片的url,然后下载并写入doc中
  if tag == "img":
   if len(attrs) == 0:
    pass
   else:
    for (variable, value) in attrs:
     if variable == "data-type":
      picname = r"D:\pytest\%s%s.%s" % (self.docname, self.picindex, value)
      # print(picname)
     if variable == "data-src":
      picdata = requests.get(value, headers=self.headers, timeout=self.timeout)
      # print(value)
    self.picindex = self.picindex + 1
    # print(self.picindex)
    with open(picname, "wb") as pic:
     pic.write(picdata.content)
    try:
     self.doc.add_picture(picname)
    except docx.image.exceptions.UnexpectedEndOfFileError as e:
     print(e)

 def handle_starttag(self, tag, attrs):
  if re.match(r"h(\d)", tag):
   self.title = True
  if tag =="p":
   self.processing = tag
  if tag == "code":
   self.code = True
   self.codeprocessing = tag

 def handle_data(self, data):
   if self.title == True:
    self.doc.add_heading(data, level=2)
   # if self.in_div == True and self.tag == "p":
   if self.processing:
    self.text = self.text + data
   if self.code == True:
    p =self.doc.add_paragraph()
    run=p.add_run(data)
    run.font.color.rgb = RGBColor(111,111,111)

 def handle_endtag(self, tag):
  self.title = False
  # self.code = False
  if tag == self.processing:
   self.doc.add_paragraph(self.text)

   self.processing = None
   self.text=''
  if tag == self.codeprocessing:
   self.code =False
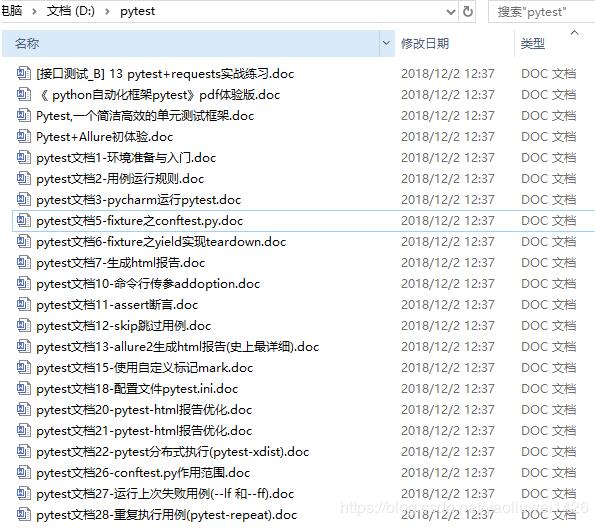
运行结果:

缺少部分文档,如pytest文档4,是因为搜狗微信文章搜索结果中就没有
以上就是本文的全部内容,希望对大家的学习有所帮助,也希望大家多多支持【听图阁-专注于Python设计】。
