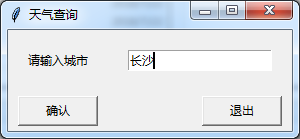
python可视化爬虫界面之天气查询
执行效果如下:

from tkinter import *
import urllib.request
import gzip
import json
from tkinter import messagebox
root = Tk()
def main():
  # 输入窗口
  root.title('Python学习交流群:973783996') # 窗口标题
  Label(root, text='请输入城市').grid(row=0, column=0) # 设置标签并调整位置
  enter = Entry(root) # 输入框
  enter.grid(row=0, column=1, padx=20, pady=20) # 调整位置
  enter.delete(0, END) # 清空输入框
  enter.insert(0, 'Python学习交流群:973783996') # 设置默认文本
  # enter_text = enter.get()#获取输入框的内容
   running = 1
   def get_weather_data(): # 获取网站数据
    city_name = enter.get() # 获取输入框的内容
    url1 = 'http://wthrcdn.etouch.cn/weather_mini?city=' + urllib.parse.quote(city_name)
    url2 = 'http://wthrcdn.etouch.cn/weather_mini?citykey=101010100'
    # 网址1只需要输入城市名,网址2需要输入城市代码
    # print(url1)
    weather_data = urllib.request.urlopen(url1).read()
    # 读取网页数据
    weather_data = gzip.decompress(weather_data).decode('utf-8')
    # 解压网页数据
    weather_dict = json.loads(weather_data)
    # 将json数据转换为dict数据
    if weather_dict.get('desc') == 'invilad-citykey':
      print(messagebox.askokcancel("xing", "你输入的城市名有误,或者天气中心未收录你所在城市"))
    else:
      # print(messagebox.askokcancel('xing','bingguo'))
      show_data(weather_dict, city_name)  def show_data(weather_dict, city_name): # 显示数据
    forecast = weather_dict.get('data').get('forecast') # 获取数据块
    root1 = Tk() # 副窗口
    root1.geometry('650x280') # 修改窗口大小
    root1.title(city_name + '天气状况') # 副窗口标题
     # 设置日期列表
    for i in range(5): # 将每一天的数据放入列表中
      LANGS = [(forecast[i].get('date'), '日期'),
           (forecast[i].get('fengxiang'), '风向'),
           (str(forecast[i].get('fengji')), '风级'),
           (forecast[i].get('high'), '最高温'),
           (forecast[i].get('low'), '最低温'),
           (forecast[i].get('type'), '天气')]
      group = LabelFrame(root1, text='天气状况', padx=0, pady=0) # 框架
      group.pack(padx=11, pady=0, side=LEFT) # 放置框架
      for lang, value in LANGS: # 将数据放入框架中
        c = Label(group, text=value + ': ' + lang)
        c.pack(anchor=W)
    Label(root1, text='今日' + weather_dict.get('data').get('ganmao'),
       fg='green').place(x=40, y=20, height=40) # 温馨提示
    Label(root1, text="StarMan: 49star.com", fg="green", bg="yellow").place(x=10, y=255, width=125,                              height=20) # 作者网站
    Button(root1, text='确认并退出', width=10, command=root1.quit).place(x=500, y=230, width=80, height=40) # 退出按钮
    root1.mainloop()
  # 布置按键
  Button(root, text="确认", width=10, command=get_weather_data) \
    .grid(row=3, column=0, sticky=W, padx=10, pady=5)
  Button(root, text='退出', width=10, command=root.quit) \
    .grid(row=3, column=1, sticky=E, padx=10, pady=5)
  if running == 1:
    root.mainloop()
 if __name__ == '__main__':
  main()
以上就是本文的全部内容,希望对大家的学习有所帮助,也希望大家多多支持【听图阁-专注于Python设计】。