Python使用sklearn实现的各种回归算法示例
本文实例讲述了Python使用sklearn实现的各种回归算法。分享给大家供大家参考,具体如下:
使用sklearn做各种回归
基本回归:线性、决策树、SVM、KNN
集成方法:随机森林、Adaboost、GradientBoosting、Bagging、ExtraTrees
1. 数据准备
为了实验用,我自己写了一个二元函数,y=0.5*np.sin(x1)+ 0.5*np.cos(x2)+0.1*x1+3。其中x1的取值范围是0~50,x2的取值范围是-10~10,x1和x2的训练集一共有500个,测试集有100个。其中,在训练集的上加了一个-0.5~0.5的噪声。生成函数的代码如下:
def f(x1, x2):
  y = 0.5 * np.sin(x1) + 0.5 * np.cos(x2) + 0.1 * x1 + 3
  return y
def load_data():
  x1_train = np.linspace(0,50,500)
  x2_train = np.linspace(-10,10,500)
  data_train = np.array([[x1,x2,f(x1,x2) + (np.random.random(1)-0.5)] for x1,x2 in zip(x1_train, x2_train)])
  x1_test = np.linspace(0,50,100)+ 0.5 * np.random.random(100)
  x2_test = np.linspace(-10,10,100) + 0.02 * np.random.random(100)
  data_test = np.array([[x1,x2,f(x1,x2)] for x1,x2 in zip(x1_test, x2_test)])
  return data_train, data_test
其中训练集(y上加有-0.5~0.5的随机噪声)和测试集(没有噪声)的图像如下:

2. scikit-learn的简单使用
scikit-learn非常简单,只需实例化一个算法对象,然后调用fit()函数就可以了,fit之后,就可以使用predict()函数来预测了,然后可以使用score()函数来评估预测值和真实值的差异,函数返回一个得分。
完整程式化代码为:
import numpy as np
import matplotlib.pyplot as plt
###########1.数据生成部分##########
def f(x1, x2):
  y = 0.5 * np.sin(x1) + 0.5 * np.cos(x2) + 3 + 0.1 * x1
  return y
def load_data():
  x1_train = np.linspace(0,50,500)
  x2_train = np.linspace(-10,10,500)
  data_train = np.array([[x1,x2,f(x1,x2) + (np.random.random(1)-0.5)] for x1,x2 in zip(x1_train, x2_train)])
  x1_test = np.linspace(0,50,100)+ 0.5 * np.random.random(100)
  x2_test = np.linspace(-10,10,100) + 0.02 * np.random.random(100)
  data_test = np.array([[x1,x2,f(x1,x2)] for x1,x2 in zip(x1_test, x2_test)])
  return data_train, data_test
train, test = load_data()
x_train, y_train = train[:,:2], train[:,2] #数据前两列是x1,x2 第三列是y,这里的y有随机噪声
x_test ,y_test = test[:,:2], test[:,2] # 同上,不过这里的y没有噪声
###########2.回归部分##########
def try_different_method(model):
  model.fit(x_train,y_train)
  score = model.score(x_test, y_test)
  result = model.predict(x_test)
  plt.figure()
  plt.plot(np.arange(len(result)), y_test,'go-',label='true value')
  plt.plot(np.arange(len(result)),result,'ro-',label='predict value')
  plt.title('score: %f'%score)
  plt.legend()
  plt.show()
###########3.具体方法选择##########
####3.1决策树回归####
from sklearn import tree
model_DecisionTreeRegressor = tree.DecisionTreeRegressor()
####3.2线性回归####
from sklearn import linear_model
model_LinearRegression = linear_model.LinearRegression()
####3.3SVM回归####
from sklearn import svm
model_SVR = svm.SVR()
####3.4KNN回归####
from sklearn import neighbors
model_KNeighborsRegressor = neighbors.KNeighborsRegressor()
####3.5随机森林回归####
from sklearn import ensemble
model_RandomForestRegressor = ensemble.RandomForestRegressor(n_estimators=20)#这里使用20个决策树
####3.6Adaboost回归####
from sklearn import ensemble
model_AdaBoostRegressor = ensemble.AdaBoostRegressor(n_estimators=50)#这里使用50个决策树
####3.7GBRT回归####
from sklearn import ensemble
model_GradientBoostingRegressor = ensemble.GradientBoostingRegressor(n_estimators=100)#这里使用100个决策树
####3.8Bagging回归####
from sklearn.ensemble import BaggingRegressor
model_BaggingRegressor = BaggingRegressor()
####3.9ExtraTree极端随机树回归####
from sklearn.tree import ExtraTreeRegressor
model_ExtraTreeRegressor = ExtraTreeRegressor()
###########4.具体方法调用部分##########
try_different_method(model_DecisionTreeRegressor)
3.结果展示
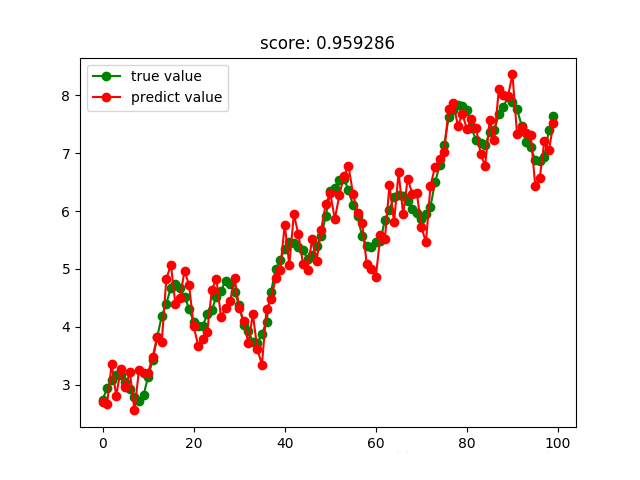
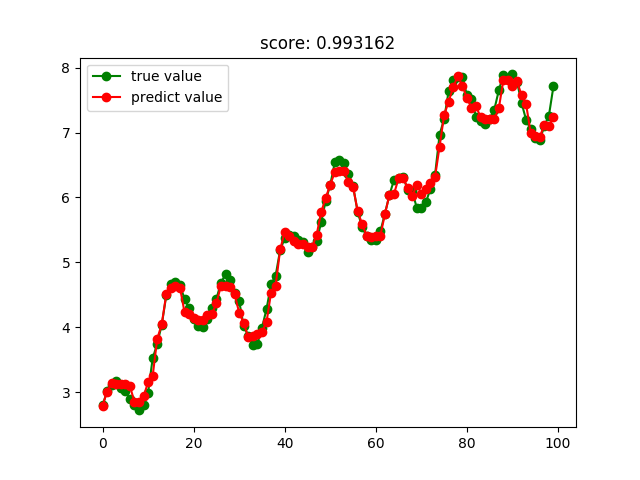
决策树回归结果:
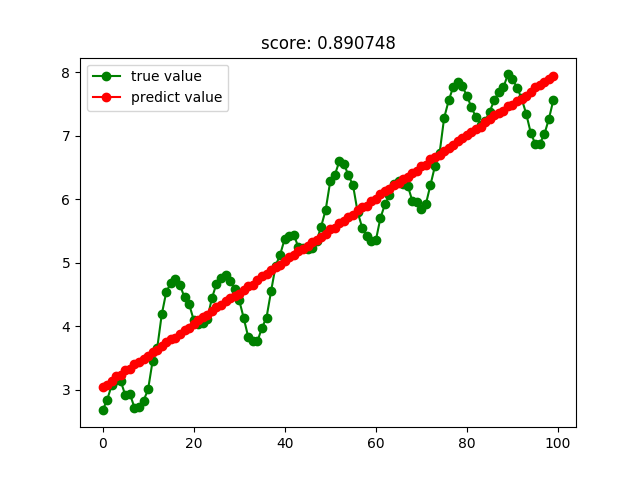
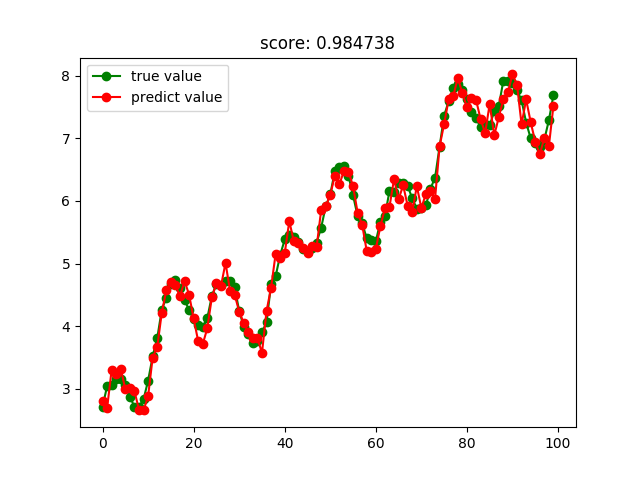
线性回归结果:
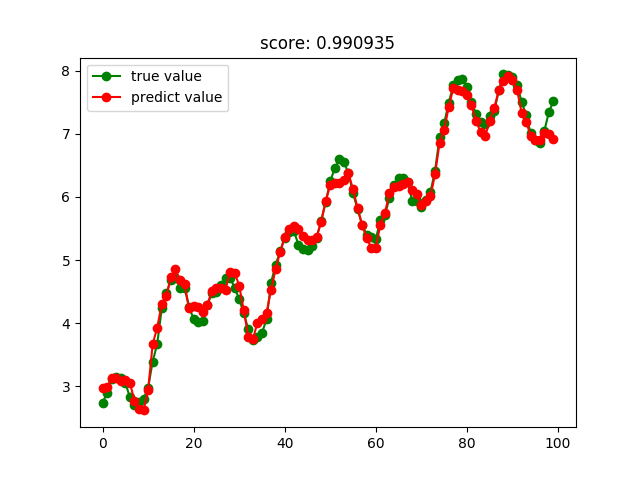
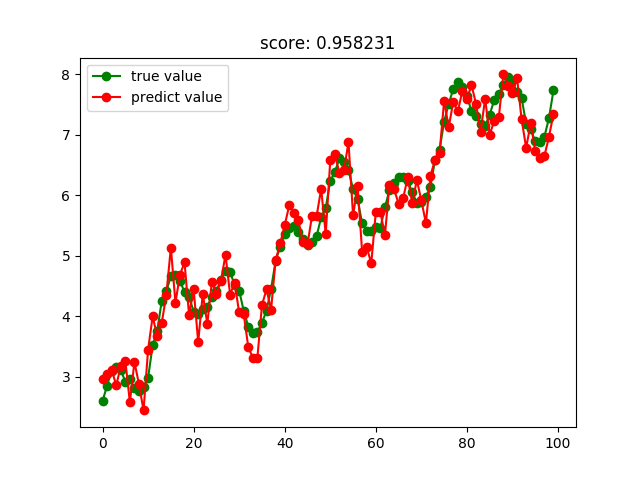
SVM回归结果:
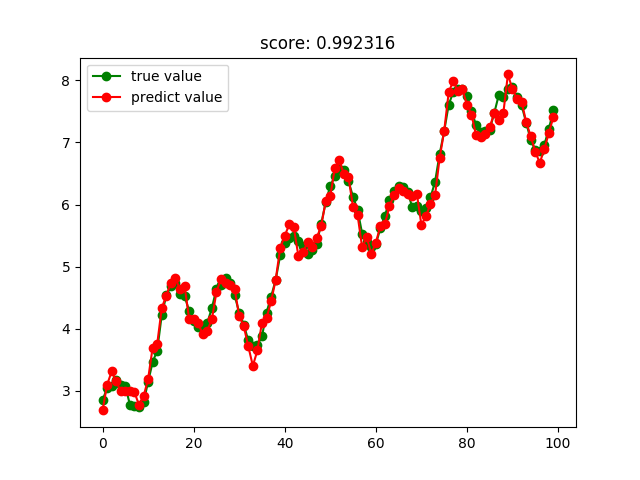
KNN回归结果:
随机森林回归结果:

Adaboost回归结果:

GBRT回归结果:
Bagging回归结果:
极端随机树回归结果:
更多关于Python相关内容感兴趣的读者可查看本站专题:《Python数据结构与算法教程》、《Python加密解密算法与技巧总结》、《Python编码操作技巧总结》、《Python函数使用技巧总结》、《Python字符串操作技巧汇总》及《Python入门与进阶经典教程》
希望本文所述对大家Python程序设计有所帮助。
