python实现LBP方法提取图像纹理特征实现分类的步骤
题目描述
这篇博文是数字图像处理的大作业.
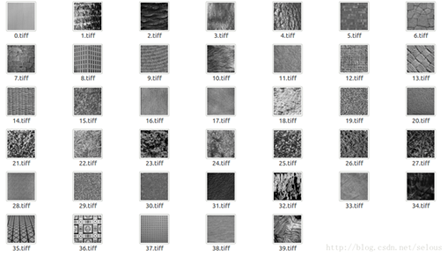
题目描述:给定40张不同风格的纹理图片,大小为512*512,要求将每张图片分为大小相同的9块,利用其中的5块作为训练集,剩余的4块作为测试集,构建适当的模型实现图片的分类.
图片如下图所示:

分析:由于数据集太小,所以神经网络模型并不适合此类的图像处理.就需要寻找方法提取图像的纹理信息.本文采用LBP的方法提取图像的纹理信息,然后转化成直方图作为图像的特征,然后使用多分类的方法进行分类.
环境
python2.7,jupyter notebook,anaconda
实现
读取数据
Numpy包数组操作API格式化数据
def loadPicture():
  train_index = 0;
  test_index = 0;
  train_data = np.zeros( (200,171,171) );
  test_data = np.zeros( (160,171,171) );
  train_label = np.zeros( (200) );
  test_label = np.zeros( (160) );
  for i in np.arange(40):
    image = mpimg.imread('picture/'+str(i)+'.tiff');
    data = np.zeros( (513,513) );
    data[0:image.shape[0],0:image.shape[1]] = image;
    #切割后的图像位于数据的位置
    index = 0;
    #将图片分割成九块
    for row in np.arange(3):
      for col in np.arange(3):
        if index<5:
          train_data[train_index,:,:] = data[171*row:171*(row+1),171*col:171*(col+1)];
          train_label[train_index] = i;
          train_index+=1;
        else:
          test_data[test_index,:,:] = data[171*row:171*(row+1),171*col:171*(col+1)];
          test_label[test_index] = i;
          test_index+=1;
        index+=1;
  return train_data,test_data,train_label,test_label;
特征提取
LBP特征提取方法
radius = 1;
n_point = radius * 8;

def texture_detect():
  train_hist = np.zeros( (200,256) );
  test_hist = np.zeros( (160,256) );
  for i in np.arange(200):
    #使用LBP方法提取图像的纹理特征.
    lbp=skft.local_binary_pattern(train_data[i],n_point,radius,'default');
    #统计图像的直方图
    max_bins = int(lbp.max() + 1);
    #hist size:256
    train_hist[i], _ = np.histogram(lbp, normed=True, bins=max_bins, range=(0, max_bins));

  for i in np.arange(160):
    lbp = skft.local_binary_pattern(test_data[i],n_point,radius,'default');
    #统计图像的直方图
    max_bins = int(lbp.max() + 1);
    #hist size:256
    test_hist[i], _ = np.histogram(lbp, normed=True, bins=max_bins, range=(0, max_bins));


  return train_hist,test_hist;
训练分类器
SVM支持向量机分类.
import matplotlib.image as mpimg
import matplotlib.pyplot as plt
import numpy as np
from sklearn.multiclass import OneVsRestClassifier
from sklearn.svm import SVR
from skimage import feature as skft
train_data,test_data,train_label,test_label= loadPicture();
train_hist,test_hist = texture_detect();
svr_rbf = SVR(kernel='rbf', C=1e3, gamma=0.1);
OneVsRestClassifier(svr_rbf,-1).fit(train_hist, train_label).score(test_hist,test_label)
实验测试集结果的正确率为:90.6%

第一次使用python的numpy包,对其中的api是真的不熟悉,代码还可以优化.其中和matlab里的矩阵操作也有不少不同,但是关于机器学习的scikitlearn包确实很好用.
总结:结果的正确率不是很高,所以还是可以在分类器上优化,或者寻找更好的特征提取的方式.
以上就是本文的全部内容,希望对大家的学习有所帮助,也希望大家多多支持【听图阁-专注于Python设计】。


