详解PyTorch中Tensor的高阶操作
条件选取:torch.where(condition, x, y) → Tensor
返回从 x 或 y 中选择元素的张量,取决于 condition
操作定义:
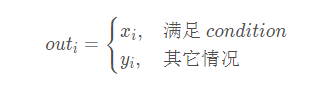
举个例子:
>>> import torch
>>> c = randn(2, 3)
>>> c
tensor([[ 0.0309, -1.5993, 0.1986],
    [-0.0699, -2.7813, -1.1828]])
>>> a = torch.ones(2, 3)
>>> a
tensor([[1., 1., 1.],
    [1., 1., 1.]])
>>> b = torch.zeros(2, 3)
>>> b
tensor([[0., 0., 0.],
    [0., 0., 0.]])
>>> torch.where(c > 0, a, b)
tensor([[1., 0., 1.],
    [0., 0., 0.]])
把张量中的每个数据都代入条件中,如果其大于 0 就得出 a,其它情况就得出 b,同样是把 a 和 b 的相同位置的数据导出。
查表搜集:torch.gather(input, dim, index, out=None) → Tensor
沿给定轴 dim,将输入索引张量 index 指定位置的值进行聚合
对一个3维张量,输出可以定义为:
- out[i][j][k] = tensor[index[i][j][k]][j][k] # dim=0
- out[i][j][k] = tensor[i][index[i][j][k]][k] # dim=1
- out[i][j][k] = tensor[i][j][index[i][j][k]] # dim=3
举个例子:
>>> a = torch.randn(4, 10)
>>> b = a.topk(3, dim = 1)
>>> b
(tensor([[ 1.0134, 0.8785, -0.0373],
    [ 1.4378, 1.4022, 1.0115],
    [ 0.8985, 0.6795, 0.6439],
    [ 1.2758, 1.0294, 1.0075]]), tensor([[5, 7, 6],
    [2, 5, 8],
    [5, 9, 2],
    [7, 9, 6]]))
>>> index = b[1]
>>> index
tensor([[5, 7, 6],
    [2, 5, 8],
    [5, 9, 2],
    [7, 9, 6]])
>>> label = torch.arange(10) + 100
>>> label
tensor([100, 101, 102, 103, 104, 105, 106, 107, 108, 109])
>>> torch.gather(label.expand(4, 10), dim=1, index=index.long()) # 进行聚合操作
tensor([[105, 107, 106],
    [102, 105, 108],
    [105, 109, 102],
    [107, 109, 106]])
把 label 扩展为二维数据后,以 index 中的每个数据为索引,取出在 label 中索引位置的数据,再以 index 的的位置摆放。
比如,最后得出的结果中,第一行的 105 就是 label.expand(4, 10) 中第一行中索引为 5 的数据,提取出来后放在 5 所在的位置。
以上就是本文的全部内容,希望对大家的学习有所帮助,也希望大家多多支持【听图阁-专注于Python设计】。