使用python实现对元素的长截图功能
一.目标
浏览网页的时候,看见哪个元素,就能截取哪个元素当图片,不管那个元素有多长

二.所用工具和第三方库
python ,PIL,selenium
pycharm
三.代码部分
长截图整体思路:
1.获取元素
2.移动,截图,移动,截图,直到抵达元素的底部
3.把截图按照元素所在位置切割,在所有图片中只保留该元素
4.拼接
如果driver在环境变量中,那么不用指定路径
b=webdriver.Chrome(executable_path=r"C:\Users\Desktop\chromedriver.exe")#指定一下driver
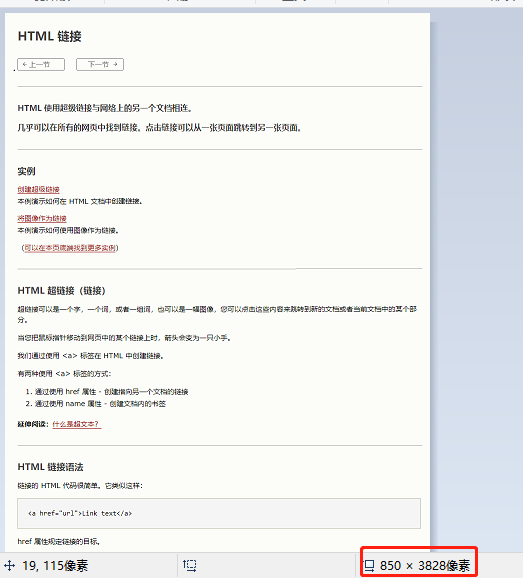
b.get("https://www.w3school.com.cn/html/html_links.asp")
b.maximize_window()#最大化窗口
打开网站
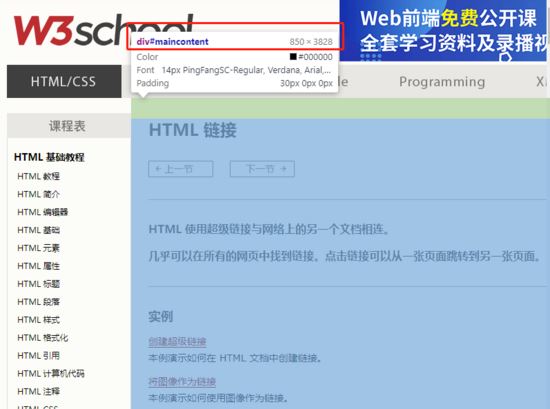
我们可以看见一个ID为maincontent的元素,宽度为850PX,长度为3828PX,这个长度必须使用才能长截图才能完整截下来
el=b.find_element_by_id("maincontent")#找到元素
我们还需要一个重要的参数,就是你电脑一次能截取多高的像素
先用下图代码获取一个图片
#fp为存放图片的地址
b.get_screenshot_as_file(fp)
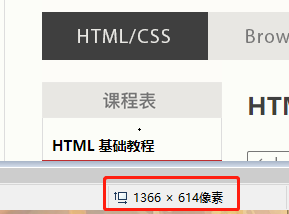
也就是说用我电脑上截图的默认高度为614像素
所以我设置一个变量:
sc_hight=614
然后设置一下其他变量
 count = int(el.size["height"] / sc_hight) # 元素的高度除以你每次截多少就是次数
  start_higth = el.location["y"] # 元素的初始高度
  max_px = start_higth + (count - 1) * sc_hight # for循环中最大的px
  last_px = el.size["height"] + start_higth - sc_hight # 元素最底部的位置
  surplus_px = last_px - max_px # 剩余的边的高度
  img_path = [] # 用来存放图片地址
注释:
1.count为元素的高度/每次截取的高度,比如这次实例中元素高度为3828PX,我每次截614px,需要6.2次,int之后变成6,也就是截6次,还剩一点,那一点后面再说
2.start_higth为初始高度,这个没有什么可说的
3.max_px为循环结束后,到达的高度
4.last_px为元素最底部的高度
5.surplus_px就是移动6次后,还没有截取的高度
屏幕每次移动,移动sc_hight个像素,初始位置为(0,元素的Y值)
 for i in range(0, count):
    js = "scrollTo(0,%s)" % (start_higth + i * sc_hight) # 用于移动滑轮,每次移动614px,初始值是元素的初始高度
    b.execute_script(js) # 执行js
    time.sleep(0.5)
    fp = r"C:\Users\wdj\Desktop\%s.png" % i # 图片地址,运行的话,改一下
    b.get_screenshot_as_file(fp) # 屏幕截图,这里是截取是完整的网页图片,你可以打断点看一下图片
    img = Image.open(fp=fp)
    img2 = img.crop((el.location["x"], 0, el.size["width"] + el.location["x"], sc_hight)) # 剪切图片
    img2.save(fp) # 保存图片,覆盖完整的网页图片
    img_path.append(fp) # 添加图片路径
    time.sleep(0.5)
    print(js)
  else:
    js = "scrollTo(0,%s)" % last_px # 滚动到最后一个位置
    b.execute_script(js)
    fp = r"C:\Users\wdj\Desktop\last.png"
    b.get_screenshot_as_file(fp)
    img = Image.open(fp=fp)
    print((el.location["x"], sc_hight - surplus_px, el.size["width"] + el.location["x"], sc_hight))
    img2 = img.crop((el.location["x"], sc_hight - surplus_px, el.size["width"] + el.location["x"], sc_hight))
    img2.save(fp)
    img_path.append(fp)
    print(js)
上面是把该元素的在页面都截完,并且剪切,把图片保存的路径放入img_path
最后一步:把所有截图都贴到新创建的图片中
 new_img = Image.new("RGB", (el.size["width"], el.size["height"])) # 创建一个新图片,大小为元素的大小
  k = 0
  for i in img_path:
    tem_img = Image.open(i)
    new_img.paste(tem_img, (0, sc_hight * k)) # 把图片贴上去,间隔一个截图的距离
    k += 1
  else:
    new_img.save(r"C:\Users\wdj\Desktop\test.png") # 保存
运行效果图:
说明完整的截取下来了
补充优化:
如果是个小元素怎么办,不用长截图就能截取的那种
因为很简单我就直接贴代码了
 start_higth = el.location["y"]
  js = "scrollTo(0,%s)" % (start_higth)
  b.execute_script(js) # 执行js
  time.sleep(0.5)
  fp = r"C:\Users\wdj\Desktop\test.png" # 图片地址,运行的话,改一下
  b.get_screenshot_as_file(fp)
  img = Image.open(fp=fp)
  img2 = img.crop((el.location["x"], 0, el.size["width"] + el.location["x"], el.size["height"])) # 剪切图片
  img2.save(fp)
效果如下:

完整代码:
from selenium import webdriver
from PIL import Image
import time
def short_sc(el,b):
  start_higth = el.location["y"]
  js = "scrollTo(0,%s)" % (start_higth)
  b.execute_script(js) # 执行js
  time.sleep(0.5)
  fp = r"C:\Users\wdj\Desktop\test.png" # 图片地址,运行的话,改一下
  b.get_screenshot_as_file(fp)
  img = Image.open(fp=fp)
  img2 = img.crop((el.location["x"], 0, el.size["width"] + el.location["x"], el.size["height"])) # 剪切图片
  img2.save(fp)
def long_sc(el,b):
  count = int(el.size["height"] / sc_hight) # 元素的高度除以你每次截多少就是次数
  start_higth = el.location["y"] # 元素的初始高度
  max_px = start_higth + (count - 1) * sc_hight # for循环中最大的px
  last_px = el.size["height"] + start_higth - sc_hight # 元素最底部的位置
  surplus_px = last_px - max_px # 剩余的边的高度
  img_path = [] # 用来存放图片地址
  for i in range(0, count):
    js = "scrollTo(0,%s)" % (start_higth + i * sc_hight) # 用于移动滑轮,每次移动614px,初始值是元素的初始高度
    b.execute_script(js) # 执行js
    time.sleep(0.5)
    fp = r"C:\Users\wdj\Desktop\%s.png" % i # 图片地址,运行的话,改一下
    b.get_screenshot_as_file(fp) # 屏幕截图,这里是截取是完整的网页图片,你可以打断点看一下图片
    img = Image.open(fp=fp)
    img2 = img.crop((el.location["x"], 0, el.size["width"] + el.location["x"], sc_hight)) # 剪切图片
    img2.save(fp) # 保存图片,覆盖完整的网页图片
    img_path.append(fp) # 添加图片路径
    time.sleep(0.5)
    print(js)
  else:
    js = "scrollTo(0,%s)" % last_px # 滚动到最后一个位置
    b.execute_script(js)
    fp = r"C:\Users\wdj\Desktop\last.png"
    b.get_screenshot_as_file(fp)
    img = Image.open(fp=fp)
    print((el.location["x"], sc_hight - surplus_px, el.size["width"] + el.location["x"], sc_hight))
    img2 = img.crop((el.location["x"], sc_hight - surplus_px, el.size["width"] + el.location["x"], sc_hight))
    img2.save(fp)
    img_path.append(fp)
    print(js)
  new_img = Image.new("RGB", (el.size["width"], el.size["height"])) # 创建一个新图片,大小为元素的大小
  k = 0
  for i in img_path:
    tem_img = Image.open(i)
    new_img.paste(tem_img, (0, sc_hight * k)) # 把图片贴上去,间隔一个截图的距离
    k += 1
  else:
    new_img.save(r"C:\Users\wdj\Desktop\test.png") # 保存
b=webdriver.Chrome(executable_path=r"C:\Users\wdj\Desktop\chromedriver.exe")#指定一下driver
b.get("https://www.w3school.com.cn/html/html_links.asp")
b.maximize_window()#最大化窗口
# b.get_screenshot_as_file(fp)
sc_hight=614#你屏幕截图默认的大小,可以去截一张,去画图里面看看是多少像素,我这里是614像素
# b.switch_to.frame(b.find_element_by_xpath('//*[@id="intro"]/iframe'))
el=b.find_element_by_id("maincontent")#找到元素
if el.size["height"]>sc_hight:
  long_sc(el,b)
else:
  short_sc(el,b)
完整代码
PS:
有些特殊情况,比如截取的元素在iframe中,直接用driver.switch_to.frame(iframe元素)即可
或者不是iframe,但是元素有overflow属性,直接用JS把他的overflow去掉就行