tensorflow建立一个简单的神经网络的方法
本笔记目的是通过tensorflow实现一个两层的神经网络。目的是实现一个二次函数的拟合。
如何添加一层网络
代码如下:
def add_layer(inputs, in_size, out_size, activation_function=None):
  # add one more layer and return the output of this layer
  Weights = tf.Variable(tf.random_normal([in_size, out_size]))
  biases = tf.Variable(tf.zeros([1, out_size]) + 0.1)
  Wx_plus_b = tf.matmul(inputs, Weights) + biases
  if activation_function is None:
    outputs = Wx_plus_b
  else:
    outputs = activation_function(Wx_plus_b)
  return outputs
注意该函数中是xW+b,而不是Wx+b。所以要注意乘法的顺序。x应该定义为[类别数量, 数据数量], W定义为[数据类别,类别数量]。
创建一些数据
# Make up some real data
x_data = np.linspace(-1,1,300)[:, np.newaxis]
noise = np.random.normal(0, 0.05, x_data.shape)
y_data = np.square(x_data) - 0.5 + noise
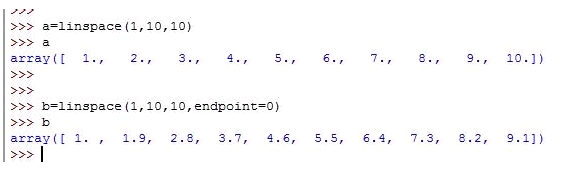
numpy的linspace函数能够产生等差数列。start,stop决定等差数列的起止值。endpoint参数指定包不包括终点值。
numpy.linspace(start, stop, num=50, endpoint=True, retstep=False, dtype=None)[source]
Return evenly spaced numbers over a specified interval.
Returns num evenly spaced samples, calculated over the interval [start, stop].
noise函数为添加噪声所用,这样二次函数的点不会与二次函数曲线完全重合。
numpy的newaxis可以新增一个维度而不需要重新创建相应的shape在赋值,非常方便,如上面的例子中就将x_data从一维变成了二维。
添加占位符,用作输入
# define placeholder for inputs to network
xs = tf.placeholder(tf.float32, [None, 1])
ys = tf.placeholder(tf.float32, [None, 1])
添加隐藏层和输出层
# add hidden layer
l1 = add_layer(xs, 1, 10, activation_function=tf.nn.relu)
# add output layer
prediction = add_layer(l1, 10, 1, activation_function=None)
计算误差,并用梯度下降使得误差最小
# the error between prediciton and real data
loss = tf.reduce_mean(tf.reduce_sum(tf.square(ys - prediction),reduction_indices=[1]))
train_step = tf.train.GradientDescentOptimizer(0.1).minimize(loss)
完整代码如下:
from __future__ import print_function
import tensorflow as tf
import numpy as np
import matplotlib.pyplot as plt

def add_layer(inputs, in_size, out_size, activation_function=None):
  # add one more layer and return the output of this layer
  Weights = tf.Variable(tf.random_normal([in_size, out_size]))
  biases = tf.Variable(tf.zeros([1, out_size]) + 0.1)
  Wx_plus_b = tf.matmul(inputs, Weights) + biases
  if activation_function is None:
    outputs = Wx_plus_b
  else:
    outputs = activation_function(Wx_plus_b)
  return outputs

# Make up some real data
x_data = np.linspace(-1,1,300)[:, np.newaxis]
noise = np.random.normal(0, 0.05, x_data.shape)
y_data = np.square(x_data) - 0.5 + noise

# define placeholder for inputs to network
xs = tf.placeholder(tf.float32, [None, 1])
ys = tf.placeholder(tf.float32, [None, 1])
# add hidden layer
l1 = add_layer(xs, 1, 10, activation_function=tf.nn.relu)
# add output layer
prediction = add_layer(l1, 10, 1, activation_function=None)

# the error between prediciton and real data
loss = tf.reduce_mean(tf.reduce_sum(tf.square(ys - prediction),
           reduction_indices=[1]))
train_step = tf.train.GradientDescentOptimizer(0.1).minimize(loss)

# important step
init = tf.initialize_all_variables()
sess = tf.Session()
sess.run(init)

# plot the real data
fig = plt.figure()
ax = fig.add_subplot(1,1,1)
ax.scatter(x_data, y_data)
plt.ion()
plt.show()

for i in range(1000):
  # training
  sess.run(train_step, feed_dict={xs: x_data, ys: y_data})
  if i % 50 == 0:
    # to visualize the result and improvement
    try:
      ax.lines.remove(lines[0])
    except Exception:
      pass
    prediction_value = sess.run(prediction, feed_dict={xs: x_data})
    # plot the prediction
    lines = ax.plot(x_data, prediction_value, 'r-', lw=5)
    plt.pause(0.1)
运行结果:

以上就是本文的全部内容,希望对大家的学习有所帮助,也希望大家多多支持【听图阁-专注于Python设计】。