pytorch cnn 识别手写的字实现自建图片数据
本文主要介绍了pytorch cnn 识别手写的字实现自建图片数据,分享给大家,具体如下:
# library
# standard library
import os
# third-party library
import torch
import torch.nn as nn
from torch.autograd import Variable
from torch.utils.data import Dataset, DataLoader
import torchvision
import matplotlib.pyplot as plt
from PIL import Image
import numpy as np
# torch.manual_seed(1) # reproducible
# Hyper Parameters
EPOCH = 1 # train the training data n times, to save time, we just train 1 epoch
BATCH_SIZE = 50
LR = 0.001 # learning rate
root = "./mnist/raw/"
def default_loader(path):
# return Image.open(path).convert('RGB')
return Image.open(path)
class MyDataset(Dataset):
def __init__(self, txt, transform=None, target_transform=None, loader=default_loader):
fh = open(txt, 'r')
imgs = []
for line in fh:
line = line.strip('\n')
line = line.rstrip()
words = line.split()
imgs.append((words[0], int(words[1])))
self.imgs = imgs
self.transform = transform
self.target_transform = target_transform
self.loader = loader
fh.close()
def __getitem__(self, index):
fn, label = self.imgs[index]
img = self.loader(fn)
img = Image.fromarray(np.array(img), mode='L')
if self.transform is not None:
img = self.transform(img)
return img,label
def __len__(self):
return len(self.imgs)
train_data = MyDataset(txt= root + 'train.txt', transform = torchvision.transforms.ToTensor())
train_loader = DataLoader(dataset = train_data, batch_size=BATCH_SIZE, shuffle=True)
test_data = MyDataset(txt= root + 'test.txt', transform = torchvision.transforms.ToTensor())
test_loader = DataLoader(dataset = test_data, batch_size=BATCH_SIZE)
class CNN(nn.Module):
def __init__(self):
super(CNN, self).__init__()
self.conv1 = nn.Sequential( # input shape (1, 28, 28)
nn.Conv2d(
in_channels=1, # input height
out_channels=16, # n_filters
kernel_size=5, # filter size
stride=1, # filter movement/step
padding=2, # if want same width and length of this image after con2d, padding=(kernel_size-1)/2 if stride=1
), # output shape (16, 28, 28)
nn.ReLU(), # activation
nn.MaxPool2d(kernel_size=2), # choose max value in 2x2 area, output shape (16, 14, 14)
)
self.conv2 = nn.Sequential( # input shape (16, 14, 14)
nn.Conv2d(16, 32, 5, 1, 2), # output shape (32, 14, 14)
nn.ReLU(), # activation
nn.MaxPool2d(2), # output shape (32, 7, 7)
)
self.out = nn.Linear(32 * 7 * 7, 10) # fully connected layer, output 10 classes
def forward(self, x):
x = self.conv1(x)
x = self.conv2(x)
x = x.view(x.size(0), -1) # flatten the output of conv2 to (batch_size, 32 * 7 * 7)
output = self.out(x)
return output, x # return x for visualization
cnn = CNN()
print(cnn) # net architecture
optimizer = torch.optim.Adam(cnn.parameters(), lr=LR) # optimize all cnn parameters
loss_func = nn.CrossEntropyLoss() # the target label is not one-hotted
# training and testing
for epoch in range(EPOCH):
for step, (x, y) in enumerate(train_loader): # gives batch data, normalize x when iterate train_loader
b_x = Variable(x) # batch x
b_y = Variable(y) # batch y
output = cnn(b_x)[0] # cnn output
loss = loss_func(output, b_y) # cross entropy loss
optimizer.zero_grad() # clear gradients for this training step
loss.backward() # backpropagation, compute gradients
optimizer.step() # apply gradients
if step % 50 == 0:
cnn.eval()
eval_loss = 0.
eval_acc = 0.
for i, (tx, ty) in enumerate(test_loader):
t_x = Variable(tx)
t_y = Variable(ty)
output = cnn(t_x)[0]
loss = loss_func(output, t_y)
eval_loss += loss.data[0]
pred = torch.max(output, 1)[1]
num_correct = (pred == t_y).sum()
eval_acc += float(num_correct.data[0])
acc_rate = eval_acc / float(len(test_data))
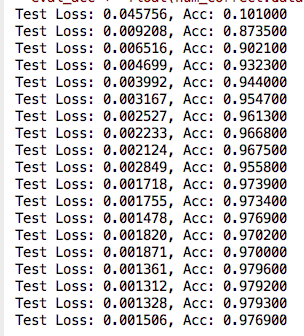
print('Test Loss: {:.6f}, Acc: {:.6f}'.format(eval_loss / (len(test_data)), acc_rate))
图片和label 见上一篇文章《pytorch 把MNIST数据集转换成图片和txt》
结果如下:
以上就是本文的全部内容,希望对大家的学习有所帮助,也希望大家多多支持【听图阁-专注于Python设计】。
