PyQt4 treewidget 选择改变颜色,并设置可编辑的方法
如下所示:
# -*- coding: utf-8 -*-
import sys
from PySide.QtGui import *
from PySide.QtCore import *


global Item_temp
Item_temp=''


class TreeWidget(QWidget):
  def __init__(self):
    super(TreeWidget, self).__init__()
    self.setWindowTitle('TreeWidget')

    self.tree = QTreeWidget() # 实例化一个TreeWidget对象
    self.tree.setColumnCount(2) # 设置部件的列数为2
    self.tree.setDropIndicatorShown(True)

    self.tree.setSelectionMode(QAbstractItemView.ExtendedSelection)
    self.tree.setHeaderLabels(['Key', 'Value']) # 设置头部信息对应列的标识符


    # 设置root为self.tree的子树,故root是根节点
    root = QTreeWidgetItem(self.tree)
    root.setText(0, 'root') # 设置根节点的名称

    root.setCheckState(0, Qt.Unchecked);
    root.setFlags(root.flags() | Qt.ItemIsEditable)
    #设置可编辑


    # 为root节点设置子结点
    child1 = QTreeWidgetItem(root)
    child1.setText(0, 'child1')
    child1.setText(1, 'name1')
    child1.setCheckState(0, Qt.Unchecked);


    child2 = QTreeWidgetItem(root)
    child2.setText(0, 'child2')
    child2.setText(1, 'name2')
    child2.setCheckState(0, Qt.Unchecked);

    child3 = QTreeWidgetItem(root)
    child3.setText(0, 'child3')
    child3.setCheckState(0, Qt.Unchecked);

    child4 = QTreeWidgetItem(child3)

    child4.setText(0, 'child4')
    child4.setToolTip(0,'child4')
    #child4.statusTip(0)
    QToolTip.setFont(QFont('OldEnglish', 30))
    child4.setText(1, 'name4')
    child4.setToolTip(1,'name4')
    child4.setCheckState(0, Qt.Unchecked);

    child5 = QTreeWidgetItem(child3)
    child5.setText(0, 'child5')
    child5.setToolTip(0,'child5')
    #child5.statusTip(0)
    QToolTip.setFont(QFont('OldEnglish', 30))
    child5.setText(1, 'name5')
    child5.setToolTip(1,'name5')
    child5.setCheckState(0, Qt.Unchecked);


    button=QPushButton("test")
    self.lay=QVBoxLayout()
    self.lay.addWidget(button)
    self.lay.addWidget(self.tree)

    button.clicked.connect(self.getText)
    #self.tree.itemChanged.connect(self.handleChanged)
    self.tree.itemDoubleClicked.connect(self.handleChanged)

    #self.tree.itemDoubleClicked.connect(self.handleChanged)

    self.tree.addTopLevelItem(root)
    self.setLayout(self.lay) # 将tree部件设置为该窗口的核心框架
  def handleChanged(self, item, column):
    #print dir(item)
    global Item_temp
    if Item_temp=="":
      Item_temp=(item,column)
      item.setBackground(column,QColor(100,150,50))
      print Item_temp
    else:
      print Item_temp
      Item_temp[0].setBackground(Item_temp[1],QColor(255,255,255))
      item.setBackground(column,QColor(120,150,50))
      Item_temp=(item,column)
      print Item_temp


    #self.tree.selectedItems()
    #item.setBackgroundColor(column,QColor(40,150,50))
    #col=QColor(190,150,50)
    #item.setForeground(column,QBrush(col))

    #print dir(item)


  def getText(self):
    t=QTreeWidgetItemIterator(self.tree);
    #print dir(QTreeWidgetItemIterator)
    while(t):
      try:
        print t.value().text(0)
      except:
        break
      t.next()
      #print t


app = QApplication(sys.argv)
#app.aboutToQuit.connect(app.deleteLater)
tp = TreeWidget()
tp.show()
#app.installEventFilter(tp)
app.exec_()
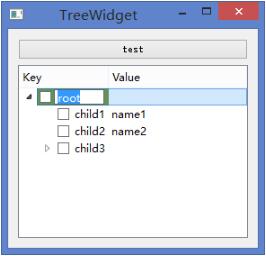
#root.setFlags(root.flags() | Qt.ItemIsEditable)
#设置可编辑
#item.setBackground(column,QColor(120,150,50))
#设置背景颜色
#getText 获取所有item(迭代)
以上这篇PyQt4 treewidget 选择改变颜色,并设置可编辑的方法就是小编分享给大家的全部内容了,希望能给大家一个参考,也希望大家多多支持【听图阁-专注于Python设计】。

