Python SELENIUM上传文件或图片实现过程
逛网站的时候经常会遇到需要上传图片的操作,这里主要来说下selenium操作上传文件的操作。
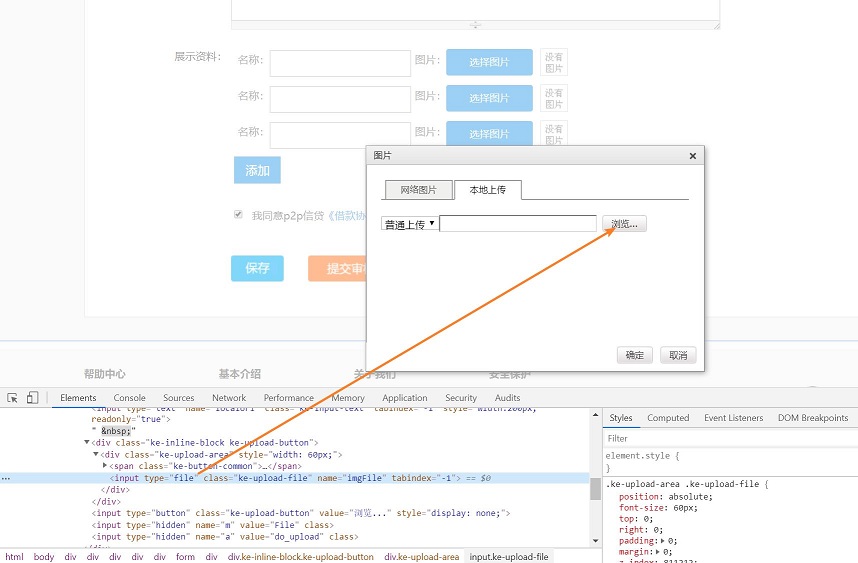
前提条件:定位的元素必须是type 属性是file类型。即type="file",如下图:
详细用法:

参考代码:
from selenium import webdriver
import time


driver = webdriver.Chrome()


def test_open_page():
  '''打开界面'''
  driver.maximize_window()
  driver.get('http://106.233.81.250/fw/index.php?ctl=user&act=login')

def test_register(user,password):
  '''输入用户名密码'''
  driver.find_element_by_css_selector('#login-email-address').send_keys(user)
  driver.find_element_by_css_selector('#login-password').send_keys(password)
  driver.find_element_by_xpath('//input[@type="submit"]').click()
  driver.implicitly_wait(30)
  driver.find_element_by_xpath('//input[@value="取消"]').click()

def test_money():
  '''操作我要借款'''
  #driver.find_element_by_link_text('我要借款').click()
  el = driver.find_elements_by_css_selector('.pr20')
  el[2].click()
  ele = driver.find_elements_by_xpath('//div[@class="tc pt10"]/a/img')
  ele[0].click()

def test_input_info():
  '''输入借款信息'''
  driver.find_element_by_css_selector('#borrowtitle').send_keys(2)
  driver.find_element_by_css_selector('#borrowamount').send_keys(2000)
  driver.find_element_by_css_selector('#repaytime').send_keys(20)
  driver.find_element_by_css_selector('#apr').send_keys(20)
  # todo js操作滚动条
  js1 = "document.documentElement.scrollTop=1000"
  driver.execute_script(js1)
  time.sleep(1)
  elem = driver.find_elements_by_xpath('//div[@style="width:710px;"]/input[@type="text"]')
  elem[0].send_keys(2)
  driver.find_element_by_xpath('//button[@rel="file_1"]').click()
  time.sleep(1)
  driver.find_element_by_xpath('//li[text()="本地上传"]').click()
  time.sleep(1)
  # todo 文件操作上传图片
  driver.find_element_by_name('imgFile').send_keys(r'D:\file\1.png')
  time.sleep(1)
  driver.find_element_by_xpath('//input[@type="button" and @value="确定"]').click()

def test_closed():
  time.sleep(6)
  driver.quit()

test_open_page()
test_register('admin','admin')
test_money()
test_input_info()
test_closed()
以上就是本文的全部内容,希望对大家的学习有所帮助,也希望大家多多支持【听图阁-专注于Python设计】。


