Pytorch使用MNIST数据集实现CGAN和生成指定的数字方式
CGAN的全拼是Conditional Generative Adversarial Networks,条件生成对抗网络,在初始GAN的基础上增加了图片的相应信息。
这里用传统的卷积方式实现CGAN。
import torch
from torch.utils.data import DataLoader
from torchvision.datasets import MNIST
from torchvision import transforms
from torch import optim
import torch.nn as nn
import matplotlib.pyplot as plt
import numpy as np
from torch.autograd import Variable
import pickle
import copy

import matplotlib.gridspec as gridspec
import os

def save_model(model, filename): #保存为CPU中可以打开的模型
 state = model.state_dict()
 x=state.copy()
 for key in x:
  x[key] = x[key].clone().cpu()
 torch.save(x, filename)

def showimg(images,count):
 images=images.to('cpu')
 images=images.detach().numpy()
 images=images[[6, 12, 18, 24, 30, 36, 42, 48, 54, 60, 66, 72, 78, 84, 90, 96]]
 images=255*(0.5*images+0.5)
 images = images.astype(np.uint8)
 grid_length=int(np.ceil(np.sqrt(images.shape[0])))
 plt.figure(figsize=(4,4))
 width = images.shape[2]
 gs = gridspec.GridSpec(grid_length,grid_length,wspace=0,hspace=0)
 for i, img in enumerate(images):
  ax = plt.subplot(gs[i])
  ax.set_xticklabels([])
  ax.set_yticklabels([])
  ax.set_aspect('equal')
  plt.imshow(img.reshape(width,width),cmap = plt.cm.gray)
  plt.axis('off')
  plt.tight_layout()
#  plt.tight_layout()
 plt.savefig(r'./CGAN/images/%d.png'% count, bbox_inches='tight')

def loadMNIST(batch_size): #MNIST图片的大小是28*28
 trans_img=transforms.Compose([transforms.ToTensor()])
 trainset=MNIST('./data',train=True,transform=trans_img,download=True)
 testset=MNIST('./data',train=False,transform=trans_img,download=True)
 # device = torch.device("cuda:0" if torch.cuda.is_available() else "cpu")
 trainloader=DataLoader(trainset,batch_size=batch_size,shuffle=True,num_workers=10)
 testloader = DataLoader(testset, batch_size=batch_size, shuffle=False, num_workers=10)
 return trainset,testset,trainloader,testloader

class discriminator(nn.Module):
 def __init__(self):
  super(discriminator,self).__init__()
  self.dis=nn.Sequential(
   nn.Conv2d(1,32,5,stride=1,padding=2),
   nn.LeakyReLU(0.2,True),
   nn.MaxPool2d((2,2)),

   nn.Conv2d(32,64,5,stride=1,padding=2),
   nn.LeakyReLU(0.2,True),
   nn.MaxPool2d((2,2))
  )
  self.fc=nn.Sequential(
   nn.Linear(7 * 7 * 64, 1024),
   nn.LeakyReLU(0.2, True),
   nn.Linear(1024, 10),
   nn.Sigmoid()
  )
 def forward(self, x):
  x=self.dis(x)
  x=x.view(x.size(0),-1)
  x=self.fc(x)
  return x

class generator(nn.Module):
 def __init__(self,input_size,num_feature):
  super(generator,self).__init__()
  self.fc=nn.Linear(input_size,num_feature) #1*56*56
  self.br=nn.Sequential(
   nn.BatchNorm2d(1),
   nn.ReLU(True)
  )
  self.gen=nn.Sequential(
   nn.Conv2d(1,50,3,stride=1,padding=1),
   nn.BatchNorm2d(50),
   nn.ReLU(True),

   nn.Conv2d(50,25,3,stride=1,padding=1),
   nn.BatchNorm2d(25),
   nn.ReLU(True),

   nn.Conv2d(25,1,2,stride=2),
   nn.Tanh()
  )
 def forward(self, x):
  x=self.fc(x)
  x=x.view(x.size(0),1,56,56)
  x=self.br(x)
  x=self.gen(x)
  return x

if __name__=="__main__":
 criterion=nn.BCELoss()
 num_img=100
 z_dimension=110
 D=discriminator()
 G=generator(z_dimension,3136) #1*56*56
 trainset, testset, trainloader, testloader = loadMNIST(num_img) # data
 D=D.cuda()
 G=G.cuda()
 d_optimizer=optim.Adam(D.parameters(),lr=0.0003)
 g_optimizer=optim.Adam(G.parameters(),lr=0.0003)
 '''
 交替训练的方式训练网络
 先训练判别器网络D再训练生成器网络G
 不同网络的训练次数是超参数
 也可以两个网络训练相同的次数,
 这样就可以不用分别训练两个网络
 '''
 count=0
 #鉴别器D的训练,固定G的参数
 epoch = 119
 gepoch = 1
 for i in range(epoch):
  for (img, label) in trainloader:
   labels_onehot = np.zeros((num_img,10))
   labels_onehot[np.arange(num_img),label.numpy()]=1
#    img=img.view(num_img,-1)
#    img=np.concatenate((img.numpy(),labels_onehot))
#    img=torch.from_numpy(img)
   img=Variable(img).cuda()
   real_label=Variable(torch.from_numpy(labels_onehot).float()).cuda()#真实label为1
   fake_label=Variable(torch.zeros(num_img,10)).cuda()#假的label为0

   #compute loss of real_img
   real_out=D(img) #真实图片送入判别器D输出0~1
   d_loss_real=criterion(real_out,real_label)#得到loss
   real_scores=real_out#真实图片放入判别器输出越接近1越好

   #compute loss of fake_img
   z=Variable(torch.randn(num_img,z_dimension)).cuda()#随机生成向量
   fake_img=G(z)#将向量放入生成网络G生成一张图片
   fake_out=D(fake_img)#判别器判断假的图片
   d_loss_fake=criterion(fake_out,fake_label)#假的图片的loss
   fake_scores=fake_out#假的图片放入判别器输出越接近0越好

   #D bp and optimize
   d_loss=d_loss_real+d_loss_fake
   d_optimizer.zero_grad() #判别器D的梯度归零
   d_loss.backward() #反向传播
   d_optimizer.step() #更新判别器D参数

   #生成器G的训练compute loss of fake_img
   for j in range(gepoch):
    z =torch.randn(num_img, 100) # 随机生成向量
    z=np.concatenate((z.numpy(),labels_onehot),axis=1)
    z=Variable(torch.from_numpy(z).float()).cuda()
    fake_img = G(z) # 将向量放入生成网络G生成一张图片
    output = D(fake_img) # 经过判别器得到结果
    g_loss = criterion(output, real_label)#得到假的图片与真实标签的loss
    #bp and optimize
    g_optimizer.zero_grad() #生成器G的梯度归零
    g_loss.backward() #反向传播
    g_optimizer.step()#更新生成器G参数
    temp=real_label
  if (i%10==0) and (i!=0):
   print(i)
   torch.save(G.state_dict(),r'./CGAN/Generator_cuda_%d.pkl'%i)
   torch.save(D.state_dict(), r'./CGAN/Discriminator_cuda_%d.pkl' % i)
   save_model(G, r'./CGAN/Generator_cpu_%d.pkl'%i) #保存为CPU中可以打开的模型
   save_model(D, r'./CGAN/Discriminator_cpu_%d.pkl'%i) #保存为CPU中可以打开的模型
  print('Epoch [{}/{}], d_loss: {:.6f}, g_loss: {:.6f} '
     'D real: {:.6f}, D fake: {:.6f}'.format(
    i, epoch, d_loss.data[0], g_loss.data[0],
    real_scores.data.mean(), fake_scores.data.mean()))
  temp=temp.to('cpu')
  _,x=torch.max(temp,1)
  x=x.numpy()
  print(x[[6, 12, 18, 24, 30, 36, 42, 48, 54, 60, 66, 72, 78, 84, 90, 96]])
  showimg(fake_img,count)
  plt.show()
  count += 1
和基础GAN Pytorch使用MNIST数据集实现基础GAN 里面的卷积版网络比较起来,这里修改的主要是这几个地方:
生成网络的输入值增加了真实图片的类标签,生成网络的初始向量z_dimension之前用的是100维,由于MNIST有10类,Onehot以后一张图片的类标签是10维,所以将类标签放在后面z_dimension=100+10=110维;
训练生成器的时候,由于生成网络的输入向量z_dimension=110维,而且是100维随机向量和10维真实图片标签拼接,需要做相应的拼接操作;
z =torch.randn(num_img, 100) # 随机生成向量
z=np.concatenate((z.numpy(),labels_onehot),axis=1)
z=Variable(torch.from_numpy(z).float()).cuda()
由于计算Loss和生成网络的输入向量都需要用到真实图片的类标签,需要重新生成real_label,对label进行onehot。其中real_label就是真实图片的标签,当num_img=100时,real_label的维度是(100,10);
labels_onehot = np.zeros((num_img,10))
labels_onehot[np.arange(num_img),label.numpy()]=1
img=Variable(img).cuda()
real_label=Variable(torch.from_numpy(labels_onehot).float()).cuda()#真实label为1
fake_label=Variable(torch.zeros(num_img,10)).cuda()#假的label为0
real_label的维度是(100,10),计算Loss的时候也要有对应的维度,判别网络的输出也不再是标量,而是要修改为10维;
nn.Linear(1024, 10)
在输出图片的同时输出期望的类标签。
temp=temp.to('cpu')
_,x=torch.max(temp,1)#返回值有两个,第一个是按列的最大值,第二个是相应最大值的列标号
x=x.numpy()
print(x[[6, 12, 18, 24, 30, 36, 42, 48, 54, 60, 66, 72, 78, 84, 90, 96]])
epoch等于0、25、50、75、100时训练的结果:
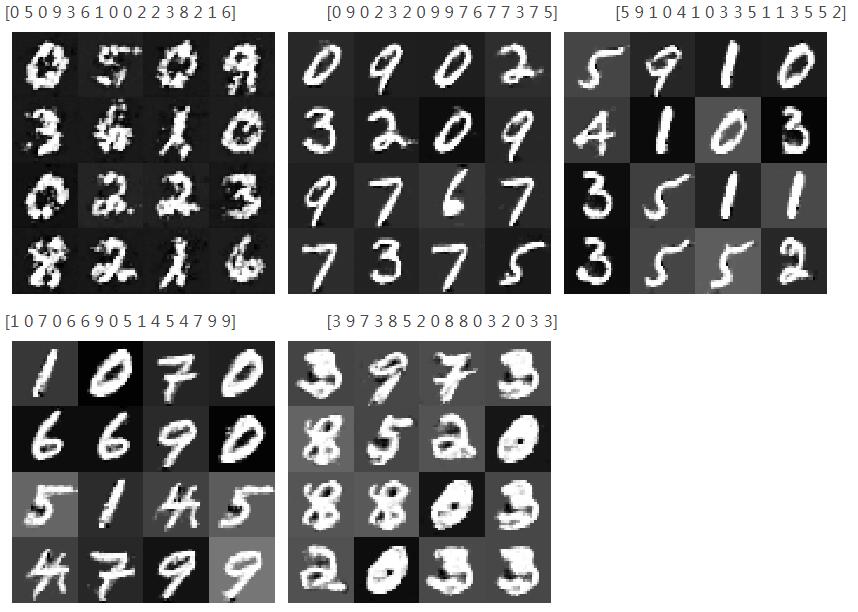
可以看到训练到后面图像反而变模糊可能是训练过拟合
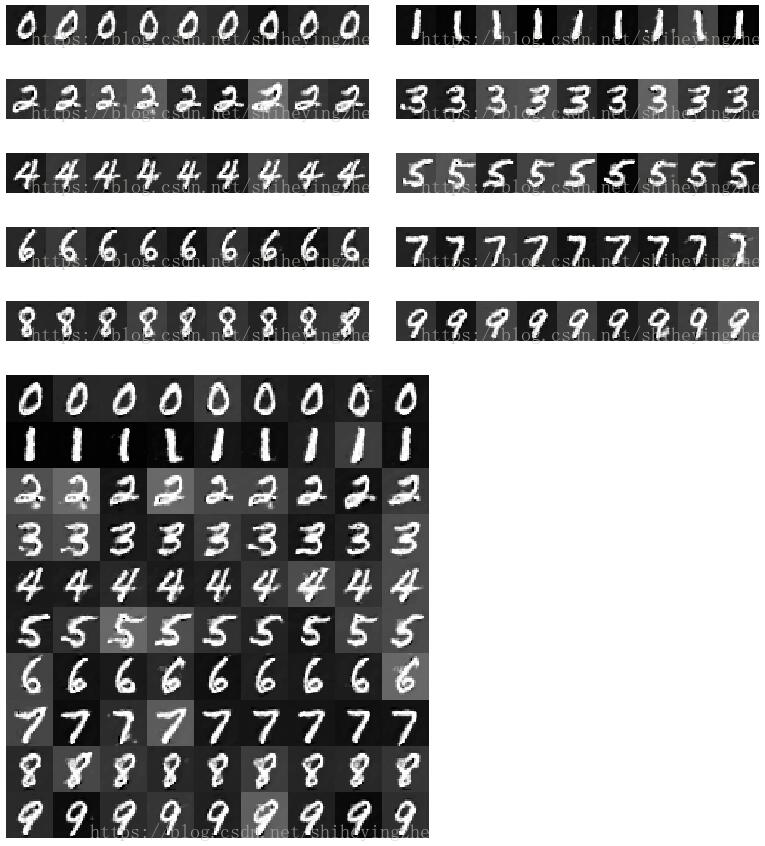
用模型生成指定的数字:
在训练的过程中保存了训练好的模型,根据输出图片的清晰度,用清晰度较高的模型,使用随机向量和10维类标签来指定生成的数字。
import torch
import torch.nn as nn
import pickle
import numpy as np
import matplotlib.pyplot as plt
import matplotlib.gridspec as gridspec

num_img=9
class discriminator(nn.Module):
 def __init__(self):
  super(discriminator, self).__init__()
  self.dis = nn.Sequential(
   nn.Conv2d(1, 32, 5, stride=1, padding=2),
   nn.LeakyReLU(0.2, True),
   nn.MaxPool2d((2, 2)),

   nn.Conv2d(32, 64, 5, stride=1, padding=2),
   nn.LeakyReLU(0.2, True),
   nn.MaxPool2d((2, 2))
  )
  self.fc = nn.Sequential(
   nn.Linear(7 * 7 * 64, 1024),
   nn.LeakyReLU(0.2, True),
   nn.Linear(1024, 10),
   nn.Sigmoid()
  )

 def forward(self, x):
  x = self.dis(x)
  x = x.view(x.size(0), -1)
  x = self.fc(x)
  return x


class generator(nn.Module):
 def __init__(self, input_size, num_feature):
  super(generator, self).__init__()
  self.fc = nn.Linear(input_size, num_feature) # 1*56*56
  self.br = nn.Sequential(
   nn.BatchNorm2d(1),
   nn.ReLU(True)
  )
  self.gen = nn.Sequential(
   nn.Conv2d(1, 50, 3, stride=1, padding=1),
   nn.BatchNorm2d(50),
   nn.ReLU(True),

   nn.Conv2d(50, 25, 3, stride=1, padding=1),
   nn.BatchNorm2d(25),
   nn.ReLU(True),

   nn.Conv2d(25, 1, 2, stride=2),
   nn.Tanh()
  )

 def forward(self, x):
  x = self.fc(x)
  x = x.view(x.size(0), 1, 56, 56)
  x = self.br(x)
  x = self.gen(x)
  return x


def show(images):
 images = images.detach().numpy()
 images = 255 * (0.5 * images + 0.5)
 images = images.astype(np.uint8)
 plt.figure(figsize=(4, 4))
 width = images.shape[2]
 gs = gridspec.GridSpec(1, num_img, wspace=0, hspace=0)
 for i, img in enumerate(images):
  ax = plt.subplot(gs[i])
  ax.set_xticklabels([])
  ax.set_yticklabels([])
  ax.set_aspect('equal')
  plt.imshow(img.reshape(width, width), cmap=plt.cm.gray)
  plt.axis('off')
  plt.tight_layout()
 plt.tight_layout()
 # plt.savefig(r'drive/深度学习/DCGAN/images/%d.png' % count, bbox_inches='tight')
 return width

def show_all(images_all):
 x=images_all[0]
 for i in range(1,len(images_all),1):
  x=np.concatenate((x,images_all[i]),0)
 print(x.shape)
 x = 255 * (0.5 * x + 0.5)
 x = x.astype(np.uint8)
 plt.figure(figsize=(9, 10))
 width = x.shape[2]
 gs = gridspec.GridSpec(10, num_img, wspace=0, hspace=0)
 for i, img in enumerate(x):
  ax = plt.subplot(gs[i])
  ax.set_xticklabels([])
  ax.set_yticklabels([])
  ax.set_aspect('equal')
  plt.imshow(img.reshape(width, width), cmap=plt.cm.gray)
  plt.axis('off')
  plt.tight_layout()


 # 导入相应的模型
z_dimension = 110
D = discriminator()
G = generator(z_dimension, 3136) # 1*56*56
D.load_state_dict(torch.load(r'./CGAN/Discriminator.pkl'))
G.load_state_dict(torch.load(r'./CGAN/Generator.pkl'))
# 依次生成0到9
lis=[]
for i in range(10):
 z = torch.randn((num_img, 100)) # 随机生成向量
 x=np.zeros((num_img,10))
 x[:,i]=1
 z = np.concatenate((z.numpy(), x),1)
 z = torch.from_numpy(z).float()
 fake_img = G(z) # 将向量放入生成网络G生成一张图片
 lis.append(fake_img.detach().numpy())
 output = D(fake_img) # 经过判别器得到结果
 show(fake_img)
 plt.savefig('./CGAN/generator/%d.png' % i, bbox_inches='tight')

show_all(lis)
plt.savefig('./CGAN/generator/all.png', bbox_inches='tight')
plt.show()
生成的结果是:
以上这篇Pytorch使用MNIST数据集实现CGAN和生成指定的数字方式就是小编分享给大家的全部内容了,希望能给大家一个参考,也希望大家多多支持【听图阁-专注于Python设计】。