Python 自动补全(vim)
一、vim python自动补全插件:pydiction
可以实现下面python代码的自动补全:
1.简单python关键词补全
2.python 函数补全带括号
3.python 模块补全
4.python 模块内函数,变量补全
5.from module import sub-module 补全
想为vim启动自动补全需要下载插件,地址如下:
http://vim.sourceforge.net/scripts/script.php?script_id=850
https://github.com/rkulla/pydiction
安装配置:
wget https://github.com/rkulla/pydiction/archive/master.zip
unzip -q master
mv pydiction-master pydiction
mkdir -p ~/.vim/tools/pydiction
cp -r pydiction/after ~/.vim
cp pydiction/complete-dict ~/.vim/tools/pydiction
确保文件结构如下:
# tree ~/.vim
/root/.vim
├── after
│ └── ftplugin
│ └── python_pydiction.vim
└── tools
└── pydiction
└── complete-dict
创建~/.vimrc,确保其中内容如下:
# cat ~/.vimrc
filetype plugin on
let g:pydiction_location = '~/.vim/tools/pydiction/complete-dict'
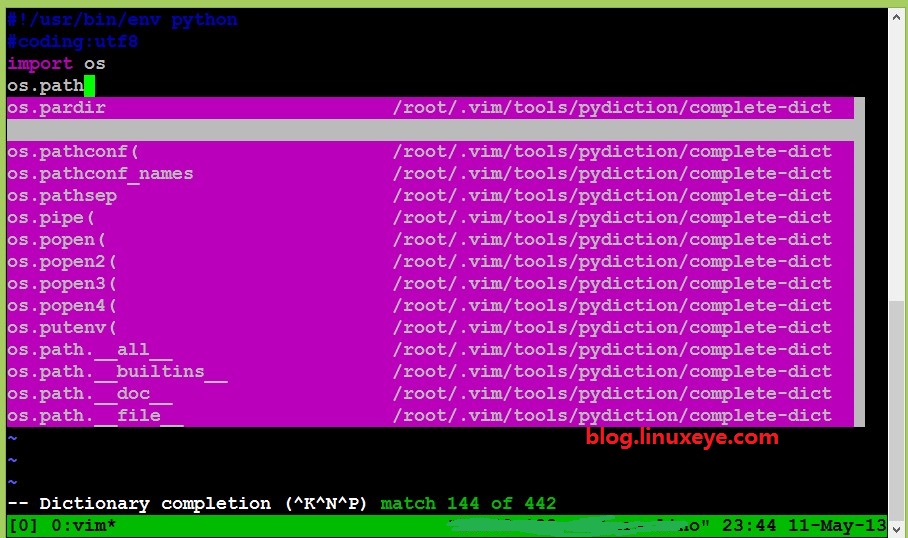
用vim编辑一个py文件,import os.,这时候应该出现提示,证明成功,如下图
二、python交互模式下Tab自动补齐
创建文件如下:
# cat ~/.pythonstartup
# python startup file
#!/usr/bin/env python
import sys
import readline
import rlcompleter
import atexit
import os
# tab completion
readline.parse_and_bind('tab: complete')
# history file
histfile = os.path.join(os.environ['HOME'], '.pythonhistory')
try:
  readline.read_history_file(histfile)
except IOError:
  pass
atexit.register(readline.write_history_file, histfile)

del os, histfile, readline, rlcompleter
1

echo 'export PYTHONSTARTUP=~/.pythonstartup' >> ~/.bash_profile
重新登陆shell,输入python命令进入交互模式,就可以用Tab键进行补全。如下图: