Python实现将xml导入至excel
最近在使用Testlink时,发现导入的用例是xml格式,且没有合适的工具转成excel格式,xml使用excel打开显示的东西也太多,网上也有相关工具转成csv格式的,结果也不合人意。
那求人不如尔己,自己写一个吧
需要用到的模块有:xml.dom.minidom(python自带)、xlwt
使用版本:
python:2.7.5
xlwt:1.0.0
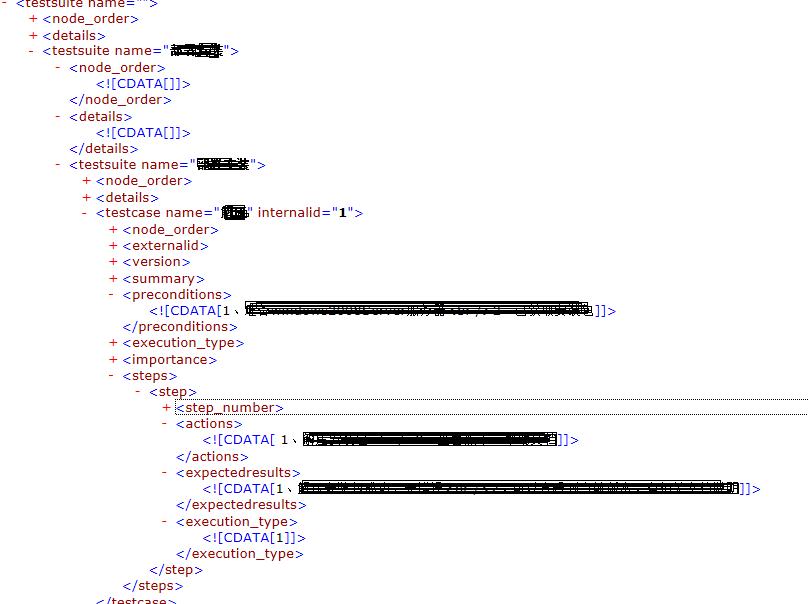
一、先分析Testlink XML格式:

这是一个有两级testusuit的典型的testlink用例结构,我们只需要取testsuite name,testcase name,preconditions,actions,expectedresults
二、程序如下:
#coding:utf-8
'''
Created on 2015-8-20

@author: Administrator
'''
'''
'''
import xml.etree.cElementTree as ET
import xml.dom.minidom as xx
import os,xlwt,datetime

workbook=xlwt.Workbook(encoding="utf-8")
#
booksheet=workbook.add_sheet(u'sheet_1')
booksheet.col(0).width= 5120
booksheet.col(1).width= 5120
booksheet.col(2).width= 5120
booksheet.col(3).width= 5120
booksheet.col(4).width= 5120
booksheet.col(5).width= 5120

dom=xx.parse(r'D:\\Python27\test.xml')
root = dom.documentElement
row=1
col=1

borders=xlwt.Borders()
borders.left=1
borders.right=1
borders.top=1
borders.bottom=1


style = xlwt.easyxf('align: wrap on,vert centre, horiz center') #自动换行、水平居中、垂直居中
#设置标题的格式,字体方宋、加粗、背景色:菊黄
#测试项的标题

title=xlwt.easyxf(u'font:name 仿宋,height 240 ,colour_index black, bold on, italic off; align: wrap on, vert centre, horiz center;pattern: pattern solid, fore_colour light_orange;')
item='测试项'
Subitem='测试分项'
CaseTitle='测试用例标题'
Condition='预置条件'
actions='操作步骤'
Result='预期结果'
booksheet.write(0,0,item,title)
booksheet.write(0,1,Subitem,title)
booksheet.write(0,2,CaseTitle,title)
booksheet.write(0,3,Condition,title)
booksheet.write(0,4,actions,title)
booksheet.write(0,5,Result,title)
#冻结首行
booksheet.panes_frozen=True
booksheet.horz_split_pos= 1


#一级目录
for i in root.childNodes:
  testsuite=i.getAttribute('name').strip()
  #print testsuite
  #print testsuite
  '''
  写测试项
  '''
  print "row is :",row
  booksheet.write(row,col,testsuite,style)


  #二级目录
  for dd in i.childNodes:
    print "    %s" % dd.getAttribute('name')
    testsuite2=dd.getAttribute('name')
    if not dd.getElementsByTagName('testcase'):
      print "Testcase is %s" % testsuite2
      row=row+1
      booksheet.write(row,2,testsuite2,style)  #写测试分项

    row=row+1

    booksheet.write(row,1,testsuite2,style)
    itemlist=dd.getElementsByTagName('testcase')

    for subb in itemlist:
      #print "         %s" % subb.getAttribute('name')
      testcase=subb.getAttribute('name')

      row=row+1
      booksheet.write(row,2,testcase,style)

      ilist=subb.getElementsByTagName('preconditions')
      for ii in ilist:
        preconditions=ii.firstChild.data.replace("<br />"," ")
        col=col+1
        booksheet.write(row,3,preconditions,style)
      steplist=subb.getElementsByTagName('actions')
      #print steplist
      for step in steplist:
        actions=step.firstChild.data.replace("<br />"," ")
        col=col+1
        booksheet.write(row,4,actions,style)
      #print "测试步骤:",steplist[0].firstChild.data.replace("<br />"," ")
      expectlist=subb.getElementsByTagName('expectedresults')

      for expect in expectlist:
        result=expect.childNodes[0].nodeValue.replace("<br />","" )
        booksheet.write(row,5,result,style)


  row=row+1

workbook.save('demo.xls')
写入excel的效果如下:

我们再来看个实例:
需要下载一个module:xlwt,如下是source code
import xml.dom.minidom
import xlwt
import sys

col = 0
row = 0


def handle_xml_report(xml_report, excel):
  problems = xml_report.getElementsByTagName("problem")
  handle_problems(problems, excel)


def handle_problems(problems, excel):
  for problem in problems:
    handle_problem(problem, excel)


def handle_problem(problem, excel):
  global row
  global col
  code = problem.getElementsByTagName("code")
  file = problem.getElementsByTagName("file")
  line = problem.getElementsByTagName("line")
  message  = problem.getElementsByTagName("message")

  for node in code:
    excel.write(row, col, node.firstChild.data)
    col = col + 1
  for node in file:
    excel.write(row, col, node.firstChild.data)
    col = col + 1
  for node in line:
    excel.write(row, col, node.firstChild.data)
    col = col + 1
  for node in message:
    excel.write(row, col, node.firstChild.data)
    col = col + 1
  row = row+1
  col = 0

if __name__ == '__main__':
  if(len(sys.argv) <= 1):
    print ("usage: xml2xls src_file [dst_file]")
    exit(0)
  #the 1st argument is XML report ; the 2nd is XLS report
  if(len(sys.argv) == 2):
    xls_report = sys.argv[1][:-3] + 'xls'
  #if there are more than 2 arguments, only the 1st & 2nd make sense
  else:
    xls_report = sys.argv[2]
  xmldoc = xml.dom.minidom.parse(sys.argv[1])
  wb = xlwt.Workbook()
  ws = wb.add_sheet('MOLint')
  ws.write(row, col, 'Error Code')
  col = col + 1
  ws.write(row, col, 'file')
  col = col + 1
  ws.write(row, col, 'line')
  col = col + 1
  ws.write(row, col, 'Description')
  row = row + 1
  col = 0
  handle_xml_report(xmldoc, ws)
  wb.save(xls_report)
