python实现发送邮件功能
本文实例为大家分享了python实现发送邮件功能的具体代码,供大家参考,具体内容如下
依赖:
Python代码实现发送邮件,使用的模块是smtplib、MIMEText,实现代码之前需要导入包:
import smtplib
from email.mime.text import MIMEText
使用163邮件发送邮件,具体代码实现如下:
import smtplib
from email.mime.text import MIMEText
'''
发送邮件函数,默认使用163smtp
:param mail_host: 邮箱服务器,16邮箱host: smtp.163.com
:param port: 端口号,163邮箱的默认端口是 25
:param username: 邮箱账号 xx@163.com
:param passwd: 邮箱密码(不是邮箱的登录密码,是邮箱的授权码)
:param recv: 邮箱接收人地址,多个账号以逗号隔开
:param title: 邮件标题
:param content: 邮件内容
:return:
'''

def send_mail(username, passwd, recv, title, content, mail_host='smtp.163.com', port=25):
  msg = MIMEText(content)  # 邮件内容
  msg['Subject'] = title   # 邮件主题
  msg['From'] = username   # 发送者账号
  msg['To'] = recv      # 接收者账号列表
  smtp = smtplib.SMTP(mail_host, port=port)   # 连接邮箱,传入邮箱地址,和端口号,smtp的端口号是25
  smtp.login(username, passwd)          # 登录发送者的邮箱账号,密码
  # 参数分别是 发送者,接收者,第三个是把上面的发送邮件的 内容变成字符串
  smtp.sendmail(username, recv, msg.as_string())
  smtp.quit() # 发送完毕后退出smtp
  print('email send success.')

if __name__ == '__main__':
  email_user = 'xxxx@163.com' # 发送者账号
  email_pwd = 'xxxxx' # 发送者密码,授权码
  maillist = 'xxxx@qq.com'
  title = '测试邮件标题'
  content = '这里是邮件内容'
  send_mail(email_user, email_pwd, maillist, title, content)
163邮箱的授权码获取方法如下:
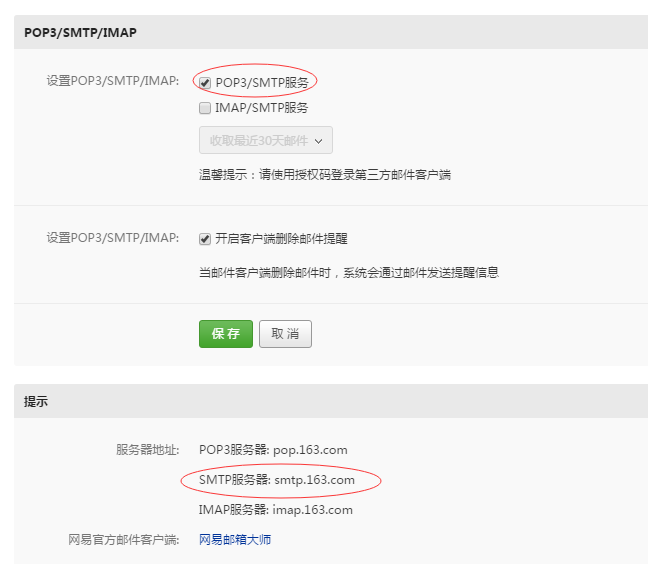
1. 登录163邮箱,点击设置-POP3/SMTP/IMAP,如下:

2. 开启SMTP服务且可以查询SMTP的host地址:

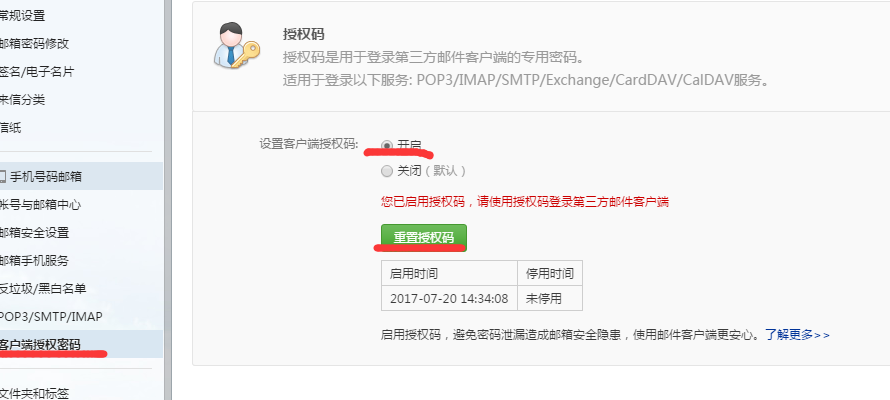
3. 点击客户端授权密码,可以重置授权码:

使用QQ邮件发送邮件,具体代码实现如下:
import smtplib
from email.mime.text import MIMEText
'''
发送邮件函数,默认使用163smtp
:param mail_host: 邮箱服务器,qq邮箱host: smtp.qq.com
:param port: 端口号,qq邮箱的默认端口是: 456
:param username: 邮箱账号 xx@163.com
:param passwd: 邮箱密码(不是邮箱的登录密码,是邮箱的授权码)
:param recv: 邮箱接收人地址,多个账号以逗号隔开
:param title: 邮件标题
:param content: 邮件内容
:return:
'''
#qq邮箱发送邮件
def send_mail(username, passwd, recv, title, content, mail_host='smtp.qq.com', port=456):
  msg = MIMEText(content)  # 邮件内容
  msg['Subject'] = title   # 邮件主题
  msg['From'] = username   # 发送者账号
  msg['To'] = recv      # 接收者账号列表
  smtp = smtplib.SMTP_SSL(mail_host, port=port)   # 连接邮箱,传入邮箱地址,和端口号,smtp的端口号是25
  smtp.login(username, passwd)          # 登录发送者的邮箱账号,密码
  # 参数分别是 发送者,接收者,第三个是把上面的发送邮件的 内容变成字符串
  smtp.sendmail(username, recv, msg.as_string())
  smtp.quit() # 发送完毕后退出smtp
  print('email send success.')

if __name__ == '__main__':
  email_user = 'xxx@qq.com' # 发送者账号
  email_pwd = 'WOSHINIGE123' # 发送者密码,授权码
  maillist = 'xxxx@qq.com'
  title = '测试邮件标题'
  content = '这里是邮件内容'
  send_mail(email_user, email_pwd, maillist, title, content)
多个 收件人且带附件:
# import smtplib
# from email.mime.text import MIMEText
# '''
# 发送邮件函数,默认使用163smtp
# :param mail_host: 邮箱服务器,qq邮箱host: smtp.163.com
# :param port: 端口号,qq邮箱的默认端口是: 25
# :param username: 邮箱账号 xx@163.com
# :param passwd: 邮箱密码(不是邮箱的登录密码,是邮箱的授权码)
# :param recv: 邮箱接收人地址,多个账号以逗号隔开
# :param title: 邮件标题
# :param content: 邮件内容
# :return:
# '''
import smtplib
from email.mime.text import MIMEText
from email.mime.multipart import MIMEMultipart

#邮箱服务器地址
email_host = 'smtp.163.com'
#发送者
email_user = 'xxxx@163.com'
#授权码
email_pwd = 'WOSHINIGE123'
#多个收件人,使用分号分隔
maillist ='xxxx@qq.com;aaaa@qq.com'
#对多个收件人进行分割,以;为标准,返回结果是list['xxxx@qq.com','aaaa@qq.com']
email_info = maillist.split(';')
#构造一个发附件的邮件内容对象
new_msg = MIMEMultipart()
#邮件正文内容
new_msg.attach(MIMEText('test email.....'))
#邮件主题
new_msg['Subject'] = 'test email'
#邮件发送者
new_msg['From'] = email_user
#邮件接收者,多个收件人的账号使用,连接,传入类型是str
new_msg['To'] = ','.join(email_info)
#打开a.txt读取文本内容
att = MIMEText(open('a.txt').read())
att["Content-Type"] = 'application/octet-stream'
# 发送附件就得这么写,固定格式,filename指定附件的名字
att["Content-Disposition"] = 'attachment; filename="haha.txt"'
new_msg.attach(att)
# 连接邮箱,传入邮箱地址,和端口号,smtp的端口号是25
smtp = smtplib.SMTP(email_host, port=25)
# 发送者的邮箱账号,密码,先登录
smtp.login(email_user, email_pwd)
smtp.sendmail(email_user, email_info, new_msg.as_string())
smtp.quit()
print('email send success.')
多个收件人时账号之间使用分号;分割,进行smtp.sendmail(传入的多个收件人类型是list);new_msg['TO'] = recv,接收的类型是str
使用类实现邮件的发送,即可发送多人也可发送附件:
import smtplib
from email.mime.text import MIMEText
from email.mime.multipart import MIMEMultipart

class SendMail(object):
 def __init__(self, username, passwd, recv, title, content, file=None, email_host='smtp.163.com', port=25):
  self.username = username
  self.passwd = passwd
  self.recv = recv
  self.title = title
  self.content = content
  self.file = file
  self.email_host = email_host
  self.port = port

 def send_mail(self):
  msg = MIMEMultipart()
  #发送内容的对象
  if self.file:#处理附件的
   att = MIMEText(open(self.file, encoding='utf-8').read())
   att["Content-Type"] = 'application/octet-stream'
   att["Content-Disposition"] = 'attachment; filename="%s"'%self.file
   msg.attach(att)
  msg.attach(MIMEText(self.content))#邮件正文的内容
  msg['Subject'] = self.title # 邮件主题
  msg['From'] = self.username # 发送者账号
  #将多个账号'aaa.@qq.com;bbbb@163.com' 以分号分割,分割为list
  self.recv = self.recv.split(';')
  if isinstance(self.recv, list):
   msg['To'] = ','.join(self.recv)
  else:
   msg['To'] = self.recv # 接收者账号列表
  if self.username.endswith('qq.com'): #如果发送者是qq邮箱
   self.smtp = smtplib.SMTP_SSL(self.email_host, port=self.port)
  else:
   self.smtp = smtplib.SMTP(self.email_host, port=self.port)
  #发送邮件服务器的对象
  self.smtp.login(self.username, self.passwd)
  try:
   self.smtp.sendmail(self.username, self.recv, msg.as_string())
  except Exception as e:
   print('出错了。。', e)
  else:
   print('发送成功!')
  self.smtp.quit()

if __name__ == '__main__':
 m = SendMail(
  username='zzzzz@163.com', passwd='xxxxxxx',file='a.txt', recv='xxxxxx@qq.com;xxxxxx@qq.com',
  title='多个收件人', content='哈哈哈啊哈哈哈哈', email_host='smtp.163.com', port=25
 )
 m.send_ma
以上就是本文的全部内容,希望对大家的学习有所帮助,也希望大家多多支持【听图阁-专注于Python设计】。

