Python基于matplotlib绘制栈式直方图的方法示例
本文实例讲述了Python基于matplotlib绘制栈式直方图的方法。分享给大家供大家参考,具体如下:
平时我们只对一组数据做直方图统计,这样我们只要直接画直方图就可以了。
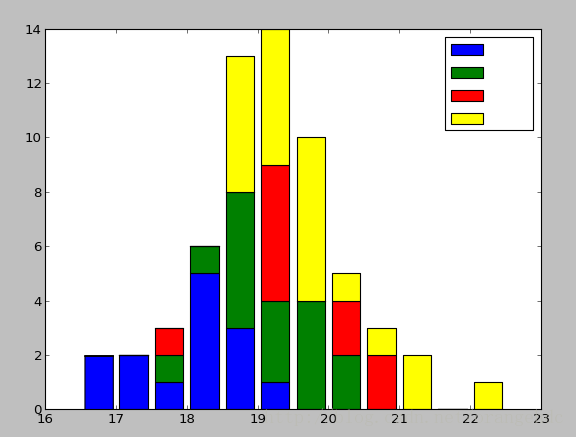
但有时候我们同时画多组数据的直方图(比如说我大一到大四跑大学城内环的用时的分布),大一到大四用不同颜色的直方图,显示在一张图上,这样会很直观。
#!/usr/bin/env python
# -*- coding: utf-8 -*-
#//www.jb51.net/article/100363.htm
# numpy array intorduction
#http://matplotlib.org/examples/statistics/histogram_demo_multihist.html
import numpy as np
import pylab as P
import matplotlib
d1=np.array([18.46,19.15,18.13 ,18.30 ,18.07 ,18.24 ,18.26 ,
     17.14 ,18.44 ,18.06 ,17.44 ,16.57 ,16.34 ,17.21 ])
d1=d1//1+(d1-d1//1)/0.6
d2=np.array([19.33 ,19.06 ,18.10 ,17.55 ,19.55 ,19.13 ,18.54 ,
     18.30 ,18.36 ,19.59 ,20.01 ,19.17 ,19.30 ,18.54 ,18.35 ,20.04 ])
d2=d2//1+(d2-d2//1)/0.6
d3=np.array([20.52 ,20.41 ,19.20 ,19.04 ,19.09 ,19.01 ,17.49 ,19.18 ,20.01 ,20.11 ])
d3=d3//1+(d3-d3//1)/0.6
d4=np.array([22.02 ,21.03,21.06 ,20.46 ,19.46 ,20.15 ,19.49 ,19.43 ,
       19.51 ,19.39 ,19.33 ,19.18 ,19.13 ,19.22 ,18.46 ,19.07 ,
       18.57 ,18.45 ,19.17 ,18.41 ,18.30 ])
d4=d4//1+(d4-d4//1)/0.6
x=([d1,d2,d3,d4])
P.figure()
#normed is False is good
n, bins, patches = P.hist(x, 12, [16.5, 22.5],normed=0, histtype='barstacked',
              color=['blue', 'green', 'red','yellow'],
             label=['   ', '   ', '   ','   '])
print type(x)
P.legend()#legend should be signed after set down the information
P.show()

以上图为例,很明显看到蓝色直方图(大一)跑得最快,黄色(大四)直方图跑得最慢。
更多关于Python相关内容感兴趣的读者可查看本站专题:《Python图片操作技巧总结》、《Python数据结构与算法教程》、《Python函数使用技巧总结》、《Python字符串操作技巧汇总》、《Python入门与进阶经典教程》及《Python文件与目录操作技巧汇总》
希望本文所述对大家Python程序设计有所帮助。

