Python语言实现将图片转化为html页面
PIL 图像处理库
PIL(Python Imaging Library) 是 Python 平台的图像处理标准库。不过 PIL 暂不支持 Python3,可以用 Pillow 代替,API是相同的。
安装 PIL 库
如果你安装了 pip 的话可以直接输入 pip install PIL 命令安装 Pillow。
或者在 PyCharm 中打开 [File] >> [settings] >> [project github] >> [project interpreter] 添加标准库:
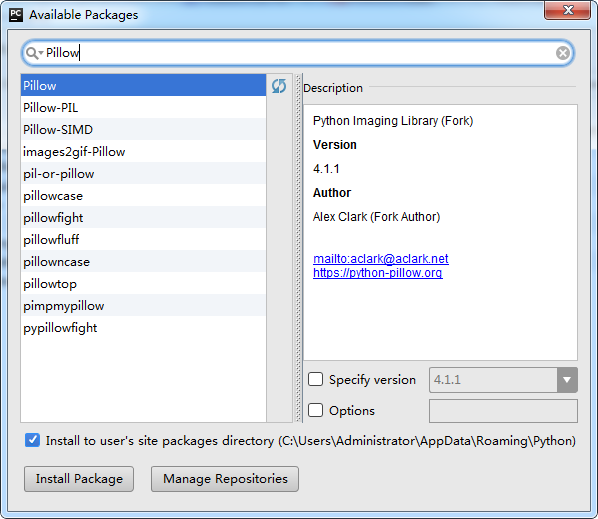
↑ 搜索 Pillow 包,选中 Pillow,点击 Install Package 安装
PIL 使用方法
from PIL import Image

img = Image.open('source.jpg') # 打开图片
width, height = img.size # 图片尺寸

img.thumbnail((width / 2, height / 2)) # 缩略图
img = img.crop((0, 0, width / 2, width / 2)) # 图片裁剪
img = img.convert(mode='L') # 图片转换
img = img.rotate(180) # 图片旋转
img.save('output.jpg') # 保存图片
↑ PIL 常用模块:Image, ImageFilter, ImageDraw, ImageFont, ImageEnhance, ImageFilter...
图片处理过程
图片转换成网页的过程,可以分成五个步骤。首先要选择一个合适的HTML模板,控制好字体的大小和字符间的间距。
然后通过 Python 的 网络访问模块,根据URL获取图片。接着使用 PIL 模块载入二进制图片,将图片压缩到合适的尺寸。
遍历图片的每一个像素,得到该像素的颜色值,应用到HTML的标签上。最后把字符串信息输出到文件中,生成HTML文档。
定制模板
TEMPLATE = '''
<!DOCTYPE html>
<html>
<head>
  <meta charset="UTF-8">
  <title>{title}</title>
  <style>
    body {{
      line-height: 1em;
      letter-spacing: 0;
      font-size: 0.6rem;
      background: black;
      text-align: center;
    }}
  </style>
</head>
<body>
  {body}
</body>
</html>
'''
↑ 大括号代表一个占位符,最后会被替换成实际内容,双大括号中的内容则不会被替换。
获取图片
from urllib import request
url = 'https://pic.cnblogs.com/avatar/875028/20160405220401.png'
binary = request.urlopen(url).read()
↑ 通过 URL 得到 byte 数组形式的图片。
处理图片
from PIL import Image
from io import BytesIO
img = Image.open(BytesIO(binary))
img.thumbnail((100, 100)) # 图片压缩
↑ byte 类型的 图片需要通过 BytesIO 转换为 string 类型,才能被 PIL 处理。
生成HTML
piexl = img.load() # 获取像素信息
width, height = img.size # 获取图像尺寸
body, word = '', '博客园'
font = '<font color="{color}">{word}</font>'
for y in range(height):
  for x in range(width):
    r, g, b = piexl[x, y] # 获取像素RGB值
    body += font.format(
      color='#{:02x}{:02x}{:02x}'.format(r, g, b),
      word=word[((y * width + x) % len(word))]
    )
  body += '\n<br />\n'
↑ 使用<font>标签包裹文字,并根据相应像素的RGB值,设置<font>标签的color属性。
导出网页
html = TEMPLATE.format(title=word, body=body)
fo = open('index.html', 'w', encoding='utf8')
fo.write(html)
fo.close()
↑向HTML模板中填充处理完成的数据,使用文件流将字符串以utf8格式输出到文档。
img2html
wo把上面五个步骤封装了起来,这样一来就可以很方便的调用了。
from io import BytesIO
from PIL import Image
from PIL import ImageFilter
from urllib import request

TEMPLATE = '''
<!DOCTYPE html>
<html>
<head>
  <meta charset="UTF-8">
  <title>{title}</title>
  <style>
    body {{
      line-height: 1em;
      letter-spacing: 0;
      font-size: 0.6rem;
      background: black;
      text-align: center;
      min-width: {size}em;
    }}
  </style>
</head>
<body>
  {body}
</body>
</html>
'''
class Converter(object):
  def __init__(self, word='田', size=100):
    self.word, self.size = word, size
    self.font = '<font color="{color}">{word}</font>'

  # 读取url内容
  def __network(self, url):
    return request.urlopen(url).read()

  # 处理图片信息
  def __handle(self, binary):
    img = Image.open(BytesIO(binary)) # 打开制图片
    img.thumbnail((self.size, self.size)) # 压缩图片
    img.filter(ImageFilter.DETAIL) # 图片增强
    return img

  # 分析图片像素
  def __analysis(self, img):
    body = ''
    piexls = img.load()
    width, height = img.size
    for y in range(height):
      for x in range(width):
        r, g, b = piexls[x, y]
        body += self.font.format(
          color='#{:02x}{:02x}{:02x}'.format(r, g, b),
          word=self.word[((y * width + x) % len(self.word))]
        )
      body += '\n<br />\n'
    return body
  # 写入文件内容
  def __writefile(self, file, str):
    fo = open(file, 'w', encoding='utf8')
    try:
      fo.write(str)
    except IOError:
      raise Exception
    finally:
      fo.close()

  # 生成html文档
  def buildDOC(self, url, output):
    try:
      binary = self.__network(url)
      img = self.__handle(binary)
      html = TEMPLATE.format(
        title=self.word,
        body=self.__analysis(img),
        size=self.size
      ) # 向模板中填充数据
      self.__writefile(output, html)
    except Exception as err:
      print('Error:', err)
      return False
    else:
      print('Successful!')
      return True
导入 img2html.Converter,调用 buildDOC(url, out) 方法
from img2html import Converter
conv = Converter('卷福', 120)
url = 'http://www.sznews.com/ent/images/attachement/jpg/site3/20140215/001e4f9d7bf91469078115.jpg'
out = 'index.html'
conv.buildDOC(url, out)
↑ 程序会在当前目录生成 index.html 文件,需要用浏览器打开后才可以看到效果。
转换效果
| 原始图片 | 输出HTML |
 |
 |
总结
以上就是本文关于Python实现将图片转化为html页面的全部内容,希望对大家有所帮助。感兴趣的朋友可以继续参阅本站其他相关专题,如有不足之处,欢迎留言指出。感谢朋友们对本站的支持!