基于Python的文件类型和字符串详解
1. Python的文件类型
1. 源代码--直接由Python解析
vi 1.py
#!/usr/bin/python
print 'hello world'
这里的1.py就是源代码
执行方式和shell脚本类似:
chmod +x 后,./1.py
Python 1.py
2. 字节代码
Python源码文件经编译后生成的扩展名为pyc的文件
编译方法:
[root@t1 py]# cat 2.py
#!/usr/bin/python
import py_compile
py_compile.compile('1.py')
写一个2.py脚本,执行,界面没有输出,但是看下文件列表,多了一个1.pyc
[root@t1 py]# python 2.py
[root@t1 py]# ll
总用量 12
-rw-r--r-- 1 root root 38 12月 20 21:06 1.py
-rw-r--r-- 1 root root 112 12月 20 21:10 1.pyc
-rw-r--r-- 1 root root 66 12月 20 21:09 2.py
怎么执行?还是python 2.py。
而且,如果源码文件1.py不在了,2.py照样可以执行
3. 优化代码
经过优化的源码文件,扩展名为pyo
python –O –m py_compile 1.py
[root@t1 py]# python -O -m py_compile 1.py
[root@t1 py]# ls
1.py 1.pyc 1.pyo 2.py
执行优化代码后,生成1.pyo。执行1.pyo
[root@t1 py]# python 1.pyo
hello world
2.python的变量
变量是计算机内存中的一块区域,变量可以存储规定范围内的值,而且值可以改变。
Python下变量是对一个数据的引用
变量的命名
变量名由字母、数字、下划线组成。
变量不能以数字开头
不可以使用关键字
a a1 _a
变量的赋值
是变量的声明和定义的过程
a = 1
id(a) #id显示a在内存的位置号
In [1]: a = 123
In [2]: id(a)
Out[2]: 25933904
In [3]: a = 456
In [4]: id(a)
Out[4]: 33594056
In [5]: x = 'abc'
In [6]: x = abc
---------------------------------------------------------------------------
NameError                 Traceback (most recent call last)
<ipython-input-6-c455442c5ffd> in <module>()
----> 1 x = abc
NameError: name 'abc' is not defined
上面报错的解释,默认情况下:
数字直接写表示数字
数字带引号表示字符串
字符带引号表示字符串
字符不带引号表示变量
Python不需要事先声明变量的类型,自动判断
In [7]: a = 456
In [8]: type(a)
Out[8]: int
type查出a的变量类型是整数int
In [9]: a = '456'
In [10]: type(a)
Out[10]: str
type查出a的变量类型是字符串str
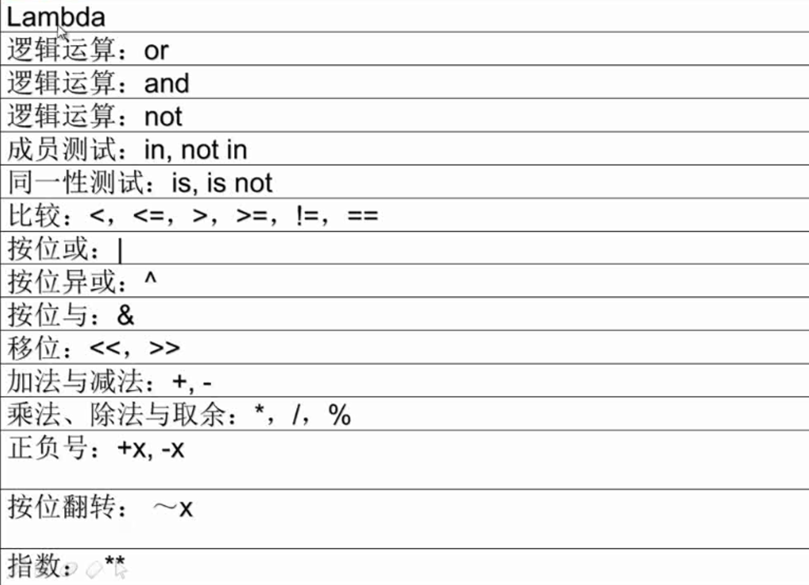
Python运算符包括
1.赋值运算符
=:   x = 3,  y = ‘abcd'   #等于
+=:  x += 2   #x=x+2
-=:  x -= 2   #x=x-2
*=:  x *= 2   #x=x*2
/=:  x /= 2   #x=x/2
%=:  x %= 2   #取余数
2.算术运算符
+
-
*
/
//
%
**
举例1:
In [20]: a = 1 ;b = 2
In [21]: a+b
Out[21]: 3
In [22]: 'a' + 'b'
Out[22]: 'ab'
ab赋值后,a+b是数字。直接加两个字符就是合在一起的字符串
举例2:
In [24]: 4 / 3
Out[24]: 1
In [25]: 4.0 / 3
Out[25]: 1.3333333333333333
4直接除3,因为默认是整数,所以结果取整数1
要想得到小数,将4变成浮点数4.0
特别的,//表示强制取整
In [26]: 4.0 // 3
Out[26]: 1.0
举例3:
In [27]: 2 ** 3
Out[27]: 8
In [28]: 2 * 3
Out[28]: 6
一个*是乘,两个**是幂
3.关系运算符
> :  1 > 2
< :  2 < 3
>=:  1 >= 1
<=:  2 <= 2
==:  2 == 2
!=:  1 != 2
In [33]: 1 > 2
Out[33]: False
In [34]: 1 < 2
Out[34]: True
成立就是true,不成立false
4.逻辑运算符
and逻辑与: True and False
or逻辑或: False or True
not逻辑非: not True
举例:
In [35]: 1 < 2 and 1 >2
Out[35]: False
In [36]: 1 < 2 or 1 >2
Out[36]: True
In [37]: not 1 > 2
Out[37]: True
运算优先顺序:

input和raw_input
input适合数字,raw_input适合字符
In [41]: input("input num:")
input num:123
Out[41]: 123
In [42]: input("input num:")
input num:abc
---------------------------------------------------------------------------
NameError                 Traceback (most recent call last)
<ipython-input-42-3cd60768312e> in <module>()
----> 1 input("input num:")
<string> in <module>()
NameError: name 'abc' is not defined
In [43]: input("input num:")
input num:'abc'
Out[43]: 'abc'
In [44]: raw_input("input num:")
input num:abc
Out[44]: 'abc'
有上面可以看出在input下面,直接输入abc报错,但是raw_input正常显示。
由此可以写一个计算脚本
[root@t1 py]# cat cal.py
!/sur/bin/python
num1 = input("please input a num :")
num2 = input("please input a num :")
print "%s + %s = %s" % (num1,num2,num1+num2)
print "%s - %s = %s" % (num1,num2,num1-num2)
print "%s * %s = %s" % (num1,num2,num1*num2)
print "%s / %s = %s" % (num1,num2,num1/num2)
%s分别对应后面的数值
执行脚本
[root@t1 py]# python cal.py
please input a num :5
please input a num :6
5 + 6 = 11
5 - 6 = -1
5 * 6 = 30
5 / 6 = 0
### 3.Python的数值和字符串
数值类型:
- [ ] 整形int
整型int可以存储2^32个数字,范围-2,147,483,648到2147483647
  例如:0,100,-100
- [ ] 长整型long
Long的范围很大,几乎可以说任意大的整数均可以存储。
为了区分普通整型,需要在整数后加L或l。
例如: 2345L,0x34al

- [ ] 浮点float
例如:0.0,12.0,-18.8,3e+7等
- [ ] 复数型complex
Python对复数提供内嵌支持,这是其他大部分软件所没有的。
复数例子:- 3.14j,8.32e-36j

- [ ] 字符串 string
有三种方法定义字符串类型
  - str = ‘this is a string' #普通字符串
  - str = “this is a string” #能够解析\n等特殊字符
  - str = ‘'‘this is a string'‘' #可以略去\n
三重引号(docstring)除了能定义字符串还可以用作注释。
举例:
In [3]: a = '''hello
...: world'''
In [4]: a
Out[4]: 'hello\nworld'
In [5]: print a
hello
world
- 字符串索引,0开始,-1表示最后一个,-2倒数第二个,类推
In [6]: a = 'abcde'
In [7]: a[0:2]
Out[7]: 'ab'
a[]表示取索引指定的字符,[0:2]可以类比数学中的0<=a<2,即0<=a<=1,就是取第一个和第二个,不包括第三个
In [8]: a[:2]
Out[8]: 'ab'
In [9]: a[:]
Out[9]: 'abcde'
0或者-1可以省略
- 字符串切片
In [11]: a[0:3:2]
Out[11]: 'ac'
只取a和c,首先应该是a[0:3],但是这样的结果是abc,a[0:3:2]的2表示步进2个,跳过b。同理,如果是a[0:3:3]表示步进3。
**如果要将整个字符串倒过来,需要用-1
In [17]: a[::-1]
Out[17]: 'edcba'
可以类比下面的
In [16]: a[:-1]
Out[16]: 'abcd'
来个更加直观的
In [13]: a[-2:-4:-1]
Out[13]: 'dc'
取倒数第2个和倒数第三个,而且倒序显示

### 4.作业
将 “123” 转换成整数
将 “9999999999999999999” 转换成长整数
将 “3.1415926” 转换成一个浮点数
将 123 转换成一个字符串
现有以下字符串
字符串1:" abc deFGh&ijkl opq mnrst((uvwxyz "
字符串2:" ABC#DEF GH%IJ MNOPQ KLRS&&TUVWX(&YZ "
使用字符串的各种方法转换成如下方式
ABCDEFGHIJKLMNOPQRSTUVWXYZzyxwvutsrqponmlkjihgfedcba
解答:
1.将 “123” 转换成整数
num = int(123)
print num
2.将 “9999999999999999999” 转换成长整数
num = long(9999999999999999999)
print num
3.将 “3.1415926” 转换成一个浮点数
num = float(3.1415926)
print num
4.将 123 转换成一个字符串
num = str(123)
print num
5.最后一题
分析思路:两个字符串都要剔除首尾空格,特殊字符,转换大小写,切片,相加
- [ ] 剔除首尾空格,特殊字符
str1 = " abc deFGh&ijkl opq mnrst((uvwxyz "
str2 = " ABC#DEF GH%IJ MNOPQ KLRS&&TUVWX(&YZ "
str1 = str1.strip()
str2 = str2.strip()
print str1
print str2
strip()剔除首尾分隔符,默认是空格,可以自定义,自定义用'XX'例子见图示  执行结果
C:\Users\chawn\PycharmProjects\171220\venv\Scripts\python.exe C:/Users/chawn/.PyCharmCE2017.3/config/scratches/scratch.py
abc deFGh&ijkl opq mnrst((uvwxyz
ABC#DEF GH%IJ MNOPQ KLRS&&TUVWX(&YZ
还可以用替换来剔除空格、其他字符
str1 = " abc deFGh&ijkl opq mnrst((uvwxyz "
str2 = " ABC#DEF GH%IJ MNOPQ KLRS&&TUVWX(&YZ "
str1 = str1.replace(' ','').replace('&','').replace('((','')
str2 = str2.replace(' ','').replace('#','').replace('%','').replace('&&','').replace('(&','')
print str1
print str2
replace可以替换任意位置的空格,还有字符
- [ ] 大小写转换+切片
str1 = " abc deFGh&ijkl opq mnrst((uvwxyz "
str2 = " ABC#DEF GH%IJ MNOPQ KLRS&&TUVWX(&YZ "
str1 = str1.replace(' ','').replace('&','').replace('((','')
str2 = str2.replace(' ','').replace('#','').replace('%','').replace('&&','').replace('(&','')
str1 = str1.lower()
str1 = str1[0:12]+str1[15:17]+str1[12:15]+str1[17:]
str2 = str2[0:10]+str2[10:15]+str2[15:17]+str2[17:]
print str2 + str1[::-1]
执行结果
C:\Users\chawn\PycharmProjects\171220\venv\Scripts\python.exe C:/Users/chawn/.PyCharmCE2017.3/config/scratches/scratch.py
ABCDEFGHIJMNOPQKLRSTUVWXYZzyxwvutsrqponmlkjihgfedcba
以上这篇基于Python的文件类型和字符串详解就是小编分享给大家的全部内容了,希望能给大家一个参考,也希望大家多多支持【听图阁-专注于Python设计】。