python通过elixir包操作mysql数据库实例代码
本文研究的主要是python通过elixir包操作mysql数据库的相关实例,具体如下。
python操作数据库有很多方法,下面介绍elixir来操作数据库。elixir是对sqlalchemy lib的一个封装,classes和tables是一一对应的,能够一步定义classes,tables和mappers,支持定义多个primary key。
定义model.py
from elixir import sqlalchemy
from elixir import *

engine =sqlalchemy.create_engine('mysql://root:root@localhost/') #the first root is the user, and the sencond root is the password
#engine.execute("DROP DATABASE IF EXISTS elixir")
engine.execute("CREATE DATABASE IF NOT EXISTS elixir")


metadata.bind='mysql://root:root@localhost:3306/elixir'
#metadata.bind.echo =True
class Movie(Entity):
  using_options(tablename='movies')

  title = Field(Unicode(30),primary_key = True)
  year = Field(Integer, primary_key = True)
  description = Field(UnicodeText)
  director = ManyToOne('Director')
  genres = ManyToMany('Genre')
  actor = ManyToMany('Actor')

  def __repr__(self):
    return '<Move "%s" (%d)>' % (self.title, self.year)

class Person(Entity):
  using_options(inheritance='multi')
  using_options(tablename='person')

  name = Field(Unicode(60))

  def __repr__(self):
    return '<Person "%s">' % self.name


class Director(Person):
  using_options(inheritance='multi')
  using_options(tablename='director')

  movies = OneToMany('Movie')

  def __repr__(self):
    return '<Director "%s">' % self.name

class Genre(Person):
  using_options(inheritance='multi')
  using_options(tablename='genre')

  movies = ManyToMany('Movie')

  def __repr__(self):
    return '<Genre "%s">' % self.name

class Actor(Person):
  using_options(inheritance='multi')
  using_options(tablename='actor')

  movies = ManyToMany('Movie')

  def __repr__(self):
    return '<Actor "%s">' % self.name
model_test.py
from model import *

# setup_all(True) is equal to the following two staps:
setup_all() # create sqlalchemy table object as mapper object for the class
create_all() # take all table objcts and create real tables by issuing SQL statements on the databse.

Actor1 = Actor(name=u"lvliang")
scifi = Genre(name = u"Science-Fiction")
rscott = Director(name = u"Ridley Scott")
glucas = Director(name = u"George Lucas")
alien = Movie(title = u"Alien", year = 1979, director=rscott, genres=[scifi, Genre(name=u"Horror")], actor = [Actor1])
brunner = Movie(title = u"Blade Runner", year = 1982, director = rscott, genres=[scifi])
swars = Movie(title = u"Star Wars", year = 1977, director = glucas, genres=[scifi])
session.commit()


m1 = Movie.query.filter_by(title=u"Alien").one()
m2 = Movie.query.filter(Movie.year>1980).all()
m3 = Movie.query.filter(Movie.director.has(name = u"Ridley Scott")).all()
m4 = Movie.query.filter(Movie.director.has(Director.name.endswith(u"Scott"))).all()
m5 = Movie.query.filter(Movie.genres.any(name = u"Horror")).all()

print m1
print m2
print m3
print m4
print m5

d = Director.get_by(name = u"Ridley Scott") # Class.get_by(xxx) is a shortcut for Class.query.filter_by(xxx).first
q = Movie.query.filter_by(director = d) #get all movies directed by director d
m = q.filter_by(year = 1979).all()
print "Movie direct by %s in year 1979 are " %(d.name)
print m

movies = q.order_by(sqlalchemy.desc(Movie.year)).all()
print movies
fro m in movies:
  m.delete()
session.commit()
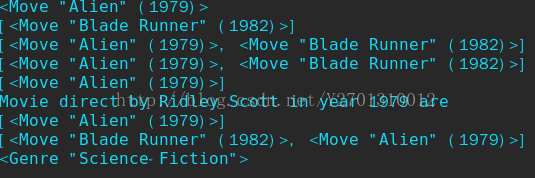
执行model.py,结果为:
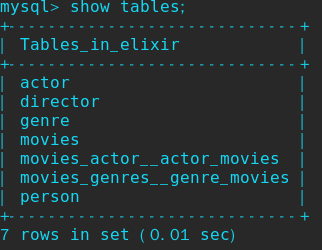
查看数据库,结果为:
总结
以上就是本文关于python通过elixir包操作mysql数据库实例代码的全部内容,希望对大家有所帮助。感兴趣的朋友可以继续参阅本站其他相关专题,如有不足之处,欢迎留言指出。感谢朋友们对本站的支持!