pandas apply 函数 实现多进程的示例讲解
前言: 在进行数据处理的时候,我们经常会用到 pandas 。但是 pandas 本身好像并没有提供多进程的机制。本文将介绍如何来自己实现 pandas (apply 函数)的多进程执行。其中,我们主要借助 joblib 库,这个库为python 提供了一个非常简洁方便的多进程实现方法。
所以,本文将按照下面的安排展开,前面可能比较啰嗦,若只是想知道怎么用可直接看第三部分:
- 首先简单介绍 pandas 中的分组聚合操作 groupby。
- 然后简单介绍 joblib 的使用方法。
- 最后,通过一个去停用词的实验详细介绍如何实现 pandas 中 apply 函数多进程执行。
注意:本文说的都是多进程而不是多线程。
1. DataFrame.groupby 分组聚合操作
# groupby 操作
df1 = pd.DataFrame({'a':[1,2,1,2,1,2], 'b':[3,3,3,4,4,4], 'data':[12,13,11,8,10,3]})
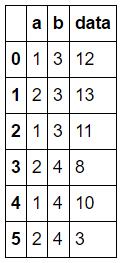
df1

按照某列分组
grouped = df1.groupby('b')
# 按照 'b' 这列分组了,name 为 'b' 的 key 值,group 为对应的df_group
for name, group in grouped:
 print name, '->'
 print group
3 ->
 a b data
0 1 3 12
1 2 3 13
2 1 3 11
4 ->
 a b data
3 2 4  8
4 1 4 10
5 2 4  3
按照多列分组
grouped = df1.groupby(['a','b'])
# 按照 'b' 这列分组了,name 为 'b' 的 key 值,group 为对应的df_group
for name, group in grouped:
 print name, '->'
 print group
(1, 3) ->
 a b data
0 1 3 12
2 1 3 11
(1, 4) ->
 a b data
4 1 4 10
(2, 3) ->
 a b data
1 2 3 13
(2, 4) ->
 a b data
3 2 4  8
5 2 4  3
若 df.index 为[1,2,3…]这样一个 list, 那么按照 df.index分组,其实就是每组就是一行,在后面去停用词实验中,我们就用这个方法把 df_all 处理成每行为一个元素的 list, 再用多进程处理这个 list。
grouped = df1.groupby(df1.index)
# 按照 index 分组,其实每行就是一个组了
print len(grouped), type(grouped)
for name, group in grouped:
 print name, '->'
 print group
6 <class 'pandas.core.groupby.DataFrameGroupBy'>
0 ->
 a b data
0 1 3 12
1 ->
 a b data
1 2 3 13
2 ->
 a b data
2 1 3 11
3 ->
 a b data
3 2 4  8
4 ->
 a b data
4 1 4 10
5 ->
 a b data
5 2 4  3
2. joblib 用法
refer: https://pypi.python.org/pypi/joblib
# 1. Embarrassingly parallel helper: to make it easy to write readable parallel code and debug it quickly:
from joblib import Parallel, delayed
from math import sqrt
处理小任务的时候,多进程并没有体现出优势。
%time result1 = Parallel(n_jobs=1)(delayed(sqrt)(i**2) for i in range(10000))
%time result2 = Parallel(n_jobs=8)(delayed(sqrt)(i**2) for i in range(10000))
CPU times: user 316 ms, sys: 0 ns, total: 316 ms
Wall time: 309 ms
CPU times: user 692 ms, sys: 384 ms, total: 1.08 s
Wall time: 1.03 s
当需要处理大量数据的时候,并行处理就体现出了它的优势
%time result = Parallel(n_jobs=1)(delayed(sqrt)(i**2) for i in range(1000000))
CPU times: user 3min 43s, sys: 5.66 s, total: 3min 49s
Wall time: 3min 33s
%time result = Parallel(n_jobs=8)(delayed(sqrt)(i**2) for i in range(1000000))
CPU times: user 50.9 s, sys: 12.6 s, total: 1min 3s
Wall time: 52 s
3. apply 函数的多进程执行(去停用词)
多进程的实现主要参考了 stack overflow 的解答: Parallelize apply after pandas groupby

上图中,我们要把 AbstractText 去停用词, 处理成 AbstractText1 那样。首先,导入停用词表。
# 读入所有停用词
with open('stopwords.txt', 'rb') as inp:
 lines = inp.read()
stopwords = re.findall('"(.*?)"', lines)
print len(stopwords)
print stopwords[:10]
692
['a', "a's", 'able', 'about', 'above', 'according', 'accordingly', 'across', 'actually', 'after']
# 对 AbstractText 去停用词
# 方法一:暴力法,对每个词进行判断
def remove_stopwords1(text):
 words = text.split(' ')
 new_words = list()
 for word in words:
  if word not in stopwords:
   new_words.append(word)
 return new_words
# 方法二:先构建停用词的映射
for word in stopwords:
 if word in words_count.index:
  words_count[word] = -1
def remove_stopwords2(text):
 words = text.split(' ')
 new_words = list()
 for word in words:
  if words_count[word] != -1:
   new_words.append(word)
 return new_words
%time df_all['AbstractText1'] = df_all['AbstractText'].apply(remove_stopwords1)
%time df_all['AbstractText2'] = df_all['AbstractText'].apply(remove_stopwords2)
CPU times: user 8min 56s, sys: 2.72 s, total: 8min 59s
Wall time: 8min 48s
CPU times: user 1min 2s, sys: 4.12 s, total: 1min 6s
Wall time: 1min 2s
上面我尝试了两种不同的方法来去停用词:
方法一中使用了比较粗暴的方法:首先用一个 list 存储所有的 stopwords,然后对于每一个 text 中的每一个 word,我们判断它是否出现在 stopwords 的list中(复杂度 O(n)O(n) ), 若为 stopword 则去掉。
方法二中我用 一个Series(words_count) 对所有的词进行映射,如果该词为 stopword, 则把它的值修改为 -1。这样,对于 text 中的每个词 ww, 我们只需要判断它的值是否为 -1 即可判定是否为 stopword (复杂度 O(1)O(1))。
所以,在这两个方法中,我们都是采用单进程来执行,方法二的速度(1min 2s)明显高于方法一(8min 48s)。
from joblib import Parallel, delayed
import multiprocessing
# 方法三:对方法一使用多进程
def tmp_func(df):
 df['AbstractText3'] = df['AbstractText'].apply(remove_stopwords1)
 return df
def apply_parallel(df_grouped, func):
 """利用 Parallel 和 delayed 函数实现并行运算"""
 results = Parallel(n_jobs=-1)(delayed(func)(group) for name, group in df_grouped)
 return pd.concat(results)
if __name__ == '__main__':
 time0 = time.time()
 df_grouped = df_all.groupby(df_all.index)
 df_all =applyParallel(df_grouped, tmp_func)
 print 'time costed {0:.2f}'.format(time.time() - time0)
time costed 150.81
# 方法四:对方法二使用多进程
def tmp_func(df):
 df['AbstractText3'] = df['AbstractText'].apply(remove_stopwords2)
 return df
def apply_parallel(df_grouped, func):
 """利用 Parallel 和 delayed 函数实现并行运算"""
 results = Parallel(n_jobs=-1)(delayed(func)(group) for name, group in df_grouped)
 return pd.concat(results)
if __name__ == '__main__':
 time0 = time.time()
 df_grouped = df_all.groupby(df_all.index)
 df_all =applyParallel(df_grouped, tmp_func)
 print 'time costed {0:.2f}'.format(time.time() - time0)
time costed 123.80
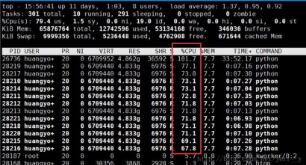
上面方法三和方法四分别对应于前面方法一和方法二,但是都是用了多进程操作。结果是方法一使用多进程以后,速度一下子提高了好几倍,但是方法二的多进程速度不升反降。这是不是有问题?的确,但是首先可以肯定,我们的代码没有问题。下图显示了我用 top 命令看到各个方法的进程执行情况。可以看出,在方法三和方法四中,的的确确是 12 个CPU核都跑起来了。只是在方法四中,每个核占用的比例都是比较低的。

fig1. 单进程 cpu 使用情况

fig2. 方法三 cpu 使用情况

fig3. 方法四 cpu 使用情况
一个直观的解释就是,当我们开启多进程的时候,进程开启和最后结果合并,进程结束,这些操作都是要消耗时间的。如果我们执行的任务比较小,那么进程开启等操作所消耗的时间可能就要比执行任务本身消耗的时间还多。这样就会出现多进程的方法四比单进程的方法二耗时更多的情况了。
所以总结来说,在处理小任务的时候没有必要开启多进程。借助joblib (Parallel, delayed 两个函数) ,我们能够很方便地实现 python 多进程。
以上这篇pandas apply 函数 实现多进程的示例讲解就是小编分享给大家的全部内容了,希望能给大家一个参考,也希望大家多多支持【听图阁-专注于Python设计】。

