使用python画个小猪佩奇的示例代码
基本原理
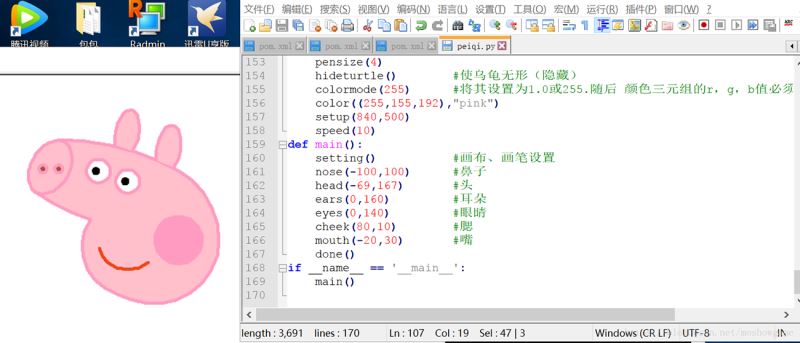
选好画板大小,设置好画笔颜色、粗细,定位好位置,依次画鼻子、头、耳朵、眼睛、腮、嘴、身体、手脚、尾巴,完事儿。
都知道,Turtle 是 Python 内置的一个比较有趣味的模块,俗称“海龟绘图”,它是基于 Tkinter 模块打造,提供一些简单的绘图工具。
在海龟作图中,我们可以编写指令让一个虚拟的(想象中的)海龟在屏幕上来回移动。这个海龟带着一只钢笔,我们可以让海龟无论移动到哪都使用这只钢笔来绘制线条。通过编写代码,以各种很酷的模式移动海龟,我们可以绘制出令人惊奇的图片。使用海龟作图,我们不仅能够只用几行代码就创建出令人印象深刻的视觉效果,而且还可以跟随海龟看看每行代码如何影响到它的移动。这能够帮助我们理解代码的逻辑。
所以,海龟作图也常被用作新手学习 Python 的一种方式。更丰富详细的功能及知识可以参考官方文档:
https://docs.python.org/3/library/turtle.html
from turtle import*
def nose(x,y):#鼻子
 penup()#提起笔
 goto(x,y)#定位
 pendown()#落笔,开始画
 setheading(-30)#将乌龟的方向设置为to_angle/为数字(0-东、90-北、180-西、270-南)
 begin_fill()#准备开始填充图形
 a=0.4
 for i in range(120):
  if 0<=i<30 or 60<=i<90:
   a=a+0.08
   left(3) #向左转3度
   forward(a) #向前走a的步长
  else:
   a=a-0.08
   left(3)
   forward(a)
 end_fill()#填充完成
 penup()
 setheading(90)
 forward(25)
 setheading(0)
 forward(10)
 pendown()
 pencolor(255,155,192)#画笔颜色
 setheading(10)
 begin_fill()
 circle(5)
 color(160,82,45)#返回或设置pencolor和fillcolor
 end_fill()
 penup()
 setheading(0)
 forward(20)
 pendown()
 pencolor(255,155,192)
 setheading(10)
 begin_fill()
 circle(5)
 color(160,82,45)
 end_fill()
def head(x,y):#头
 color((255,155,192),"pink")
 penup()
 goto(x,y)
 setheading(0)
 pendown()
 begin_fill()
 setheading(180)
 circle(300,-30)
 circle(100,-60)
 circle(80,-100)
 circle(150,-20)
 circle(60,-95)
 setheading(161)
 circle(-300,15)
 penup()
 goto(-100,100)
 pendown()
 setheading(-30)
 a=0.4
 for i in range(60):
  if 0<=i<30 or 60<=i<90:
   a=a+0.08
   lt(3) #向左转3度
   fd(a) #向前走a的步长
  else:
   a=a-0.08
   lt(3)
   fd(a)
 end_fill()
def ears(x,y): #耳朵
 color((255,155,192),"pink")
 penup()
 goto(x,y)
 pendown()
 begin_fill()
 setheading(100)
 circle(-50,50)
 circle(-10,120)
 circle(-50,54)
 end_fill()
 penup()
 setheading(90)
 forward(-12)
 setheading(0)
 forward(30)
 pendown()
 begin_fill()
 setheading(100)
 circle(-50,50)
 circle(-10,120)
 circle(-50,56)
 end_fill()
def eyes(x,y):#眼睛
 color((255,155,192),"white")
 penup()
 setheading(90)
 forward(-20)
 setheading(0)
 forward(-95)
 pendown()
 begin_fill()
 circle(15)
 end_fill()
 color("black")
 penup()
 setheading(90)
 forward(12)
 setheading(0)
 forward(-3)
 pendown()
 begin_fill()
 circle(3)
 end_fill()
 color((255,155,192),"white")
 penup()
 seth(90)
 forward(-25)
 seth(0)
 forward(40)
 pendown()
 begin_fill()
 circle(15)
 end_fill()
 color("black")
 penup()
 setheading(90)
 forward(12)
 setheading(0)
 forward(-3)
 pendown()
 begin_fill()
 circle(3)
 end_fill()
def cheek(x,y):#腮
 color((255,155,192))
 penup()
 goto(x,y)
 pendown()
 setheading(0)
 begin_fill()
 circle(30)
 end_fill()
def mouth(x,y): #嘴
 color(239,69,19)
 penup()
 goto(x,y)
 pendown()
 setheading(-80)
 circle(30,40)
 circle(40,80)
def setting():   #参数设置
 pensize(4)
 hideturtle()  #使乌龟无形(隐藏)
 colormode(255)  #将其设置为1.0或255.随后 颜色三元组的r,g,b值必须在0 .. cmode范围内
 color((255,155,192),"pink")
 setup(840,500)
 speed(10)
def main():
 setting()   #画布、画笔设置
 nose(-100,100)  #鼻子
 head(-69,167)  #头
 ears(0,160)   #耳朵
 eyes(0,140)   #眼睛
 cheek(80,10)  #腮
 mouth(-20,30)  #嘴
 done()
if __name__ == '__main__':
 main()
总结
以上所述是小编给大家介绍的使用python画个小猪佩奇的示例代码,希望对大家有所帮助,如果大家有任何疑问请给我留言,小编会及时回复大家的。在此也非常感谢大家对【听图阁-专注于Python设计】网站的支持!