python xlsxwriter创建excel图表的方法
本文实例为大家分享了python xlsxwriter创建excel图表的具体代码,供大家参考,具体内容如
#coding=utf-8
import xlsxwriter
from xlsxwriter.workbook import Workbook
from xlrd.sheet import Sheet

def demo1():
 import xlsxwriter


 # 创建excel文件
 workbook = xlsxwriter.Workbook('demo.xlsx')
#  添加worksheet,也可以指定名字
 worksheet = workbook.add_worksheet()
 worksheet = workbook.add_worksheet('Test')

 #设置第一列的宽度
 worksheet.set_column('A:A', len('hello ')+1)

 #添加一个加粗格式方便后面使用
 bold = workbook.add_format({'bold': True})

 #在A1单元格写入纯文本
 worksheet.write('A1', 'Hello')

 #在A2单元格写入带格式的文本
 worksheet.write('A2', 'World', bold)

 #指定行列写入数字,下标从0开始
 worksheet.write(2, 0, 123)
 worksheet.write(3, 0, 123.456)

 #在B5单元格插入图片
 worksheet.insert_image('B5', 'python-logo.png')


 workbook.close()


def charts():
 workbook = xlsxwriter.Workbook('chart_column.xlsx')
 worksheet = workbook.add_worksheet()
 bold = workbook.add_format({'bold': 1})

 # 这是个数据table的列
 headings = ['Number', 'Batch 1', 'Batch 2']
 data = [
  [2, 3, 4, 5, 6, 7],
  [10, 40, 50, 20, 10, 50],
  [30, 60, 70, 50, 40, 30],
 ]
 #写入一行
 worksheet.write_row('A1', headings, bold)
 #写入一列
 worksheet.write_column('A2', data[0])
 worksheet.write_column('B2', data[1])
 worksheet.write_column('C2', data[2])


 ############################################
 #创建一个图表,类型是column
 chart1 = workbook.add_chart({'type': 'column'})

 # 配置series,这个和前面worksheet是有关系的。
#  指定图表的数据范围
 chart1.add_series({
  'name':  '=Sheet1!$B$1',
  'categories': '=Sheet1!$A$2:$A$7',
  'values':  '=Sheet1!$B$2:$B$7',
 })
 chart1.add_series({
  'name':  "=Sheet1!$C$1",
  'categories': '=Sheet1!$A$2:$A$7',
  'values':  '=Sheet1!$C$2:$C$7',
 })
# 配置series的另一种方法
#  #  [sheetname, first_row, first_col, last_row, last_col]
#  chart1.add_series({
#   'name':   ['Sheet1',0,1],
#   'categories': ['Sheet1',1,0,6,0],
#   'values':  ['Sheet1',1,1,6,1],
#      })
#
#
#
#  chart1.add_series({
#   'name':  ['Sheet1', 0, 2],
#   'categories': ['Sheet1', 1, 0, 6, 0],
#   'values':  ['Sheet1', 1, 2, 6, 2],
#  })


#  添加图表标题和标签
 chart1.set_title ({'name': 'Results of sample analysis'})
 chart1.set_x_axis({'name': 'Test number'})
 chart1.set_y_axis({'name': 'Sample length (mm)'})

 # 设置图表风格
 chart1.set_style(11)

 # 在D2单元格插入图表(带偏移)
 worksheet.insert_chart('D2', chart1, {'x_offset': 25, 'y_offset': 10})

 #######################################################################
 #
 # 创建一个叠图子类型
 chart2 = workbook.add_chart({'type': 'column', 'subtype': 'stacked'})

 # Configure the first series.
 chart2.add_series({
  'name':  '=Sheet1!$B$1',
  'categories': '=Sheet1!$A$2:$A$7',
  'values':  '=Sheet1!$B$2:$B$7',
 })

 # Configure second series.
 chart2.add_series({
  'name':  '=Sheet1!$C$1',
  'categories': '=Sheet1!$A$2:$A$7',
  'values':  '=Sheet1!$C$2:$C$7',
 })

 # Add a chart title and some axis labels.
 chart2.set_title ({'name': 'Stacked Chart'})
 chart2.set_x_axis({'name': 'Test number'})
 chart2.set_y_axis({'name': 'Sample length (mm)'})

 # Set an Excel chart style.
 chart2.set_style(12)

 # Insert the chart into the worksheet (with an offset).
 worksheet.insert_chart('D18', chart2, {'x_offset': 25, 'y_offset': 10})

 #######################################################################
 #
 # Create a percentage stacked chart sub-type.
 #
 chart3 = workbook.add_chart({'type': 'column', 'subtype': 'percent_stacked'})

 # Configure the first series.
 chart3.add_series({
  'name':  '=Sheet1!$B$1',
  'categories': '=Sheet1!$A$2:$A$7',
  'values':  '=Sheet1!$B$2:$B$7',
 })

 # Configure second series.
 chart3.add_series({
  'name':  '=Sheet1!$C$1',
  'categories': '=Sheet1!$A$2:$A$7',
  'values':  '=Sheet1!$C$2:$C$7',
 })

 # Add a chart title and some axis labels.
 chart3.set_title ({'name': 'Percent Stacked Chart'})
 chart3.set_x_axis({'name': 'Test number'})
 chart3.set_y_axis({'name': 'Sample length (mm)'})

 # Set an Excel chart style.
 chart3.set_style(13)

 # Insert the chart into the worksheet (with an offset).
 worksheet.insert_chart('D34', chart3, {'x_offset': 25, 'y_offset': 10})
 #生成圆饼图
 chart4 = workbook.add_chart({'type':'pie'})
 #定义数据
 data = [
   ['Pass','Fail','Warn','NT'],
   [333,11,12,22],
   ]
 #写入数据
 worksheet.write_row('A51',data[0],bold)
 worksheet.write_row('A52',data[1])

 chart4.add_series({
  'name':   '接口测试报表图',
  'categories': '=Sheet1!$A$51:$D$51',
  'values':  '=Sheet1!$A$52:$D$52',
  'points':[
   {'fill':{'color':'#00CD00'}},
   {'fill':{'color':'red'}},
   {'fill':{'color':'yellow'}},
   {'fill':{'color':'gray'}},
     ],
 })
 # Add a chart title and some axis labels.
 chart4.set_title ({'name': '接口测试统计'})
 chart4.set_style(3)
#  chart3.set_y_axis({'name': 'Sample length (mm)'})

 worksheet.insert_chart('E52', chart4, {'x_offset': 25, 'y_offset': 10})
 workbook.close()
if __name__ == '__main__':
#  demo1()
 charts()
 print('finished...')
 pass
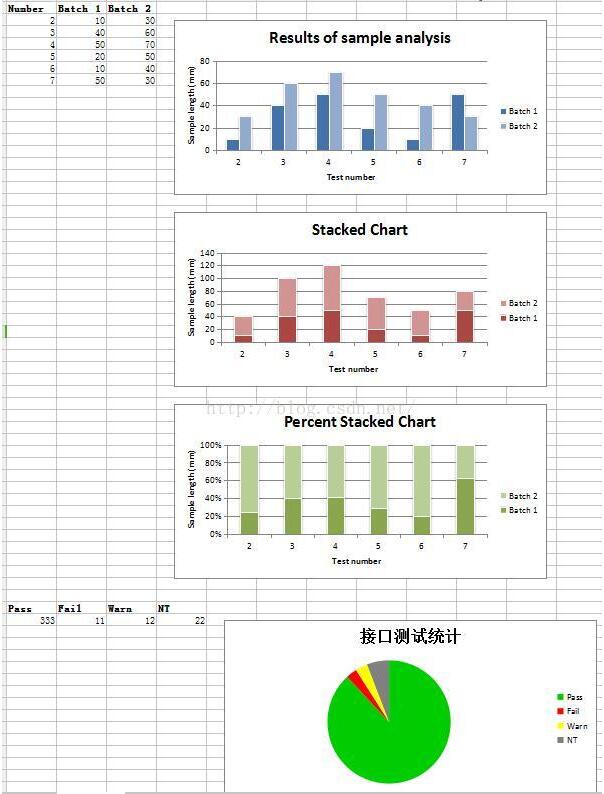
效果如下

参考文档:
https://pypi.python.org/pypi/XlsxWriter
python使用xlsxwriter打造excel周报日周的统计图表
以上就是本文的全部内容,希望对大家的学习有所帮助,也希望大家多多支持【听图阁-专注于Python设计】。
