Django实战之用户认证(用户登录与注销)
上一篇中,我们已经打开了Django自带的用户认证模块,并配置了数据库连接,创建了相应的表,本篇我们将在Django自带的用户认证的基础上,实现自己个性化的用户登录和注销模块。
首先,我们自己定义一个用户登录表单(forms.py):
from django import forms
from django.contrib.auth.models import User
from bootstrap_toolkit.widgets import BootstrapDateInput, BootstrapTextInput, BootstrapUneditableInput

class LoginForm(forms.Form):
  username = forms.CharField(
    required=True,
    label=u"用户名",
    error_messages={'required': '请输入用户名'},
    widget=forms.TextInput(
      attrs={
        'placeholder':u"用户名",
      }
    ),
  )
  password = forms.CharField(
    required=True,
    label=u"密码",
    error_messages={'required': u'请输入密码'},
    widget=forms.PasswordInput(
      attrs={
        'placeholder':u"密码",
      }
    ),
  )
  def clean(self):
    if not self.is_valid():
      raise forms.ValidationError(u"用户名和密码为必填项")
    else:
      cleaned_data = super(LoginForm, self).clean()
我们定义的用户登录表单有两个域username和password,这两个域都为必填项。
接下来,我们定义用户登录视图(views.py),在该视图里实例化之前定义的用户登录表单
from django.shortcuts import render_to_response,render,get_object_or_404
from django.http import HttpResponse, HttpResponseRedirect
from django.contrib.auth.models import User
from django.contrib import auth
from django.contrib import messages
from django.template.context import RequestContext

from django.forms.formsets import formset_factory
from django.core.paginator import Paginator, PageNotAnInteger, EmptyPage

from bootstrap_toolkit.widgets import BootstrapUneditableInput
from django.contrib.auth.decorators import login_required

from .forms import LoginForm

def login(request):
  if request.method == 'GET':
    form = LoginForm()
    return render_to_response('login.html', RequestContext(request, {'form': form,}))
  else:
    form = LoginForm(request.POST)
    if form.is_valid():
      username = request.POST.get('username', '')
      password = request.POST.get('password', '')
      user = auth.authenticate(username=username, password=password)
      if user is not None and user.is_active:
        auth.login(request, user)
        return render_to_response('index.html', RequestContext(request))
      else:
        return render_to_response('login.html', RequestContext(request, {'form': form,'password_is_wrong':True}))
    else:
      return render_to_response('login.html', RequestContext(request, {'form': form,}))
该视图实例化了之前定义的LoginForm,它的主要业务逻辑是:
1. 判断必填项用户名和密码是否为空,如果为空,提示"用户名和密码为必填项”的错误信息
2. 判断用户名和密码是否正确,如果错误,提示“用户名或密码错误"的错误信息
3. 登陆成功后,进入主页(index.html)
其中,登录页面的模板(login.html)定义如下:
<!DOCTYPE html>
{% load bootstrap_toolkit %}
{% load url from future %}
<html lang="en">
<head>
  <meta charset="utf-8">
  <title>数据库脚本发布系统</title>
  <meta name="description" content="">
  <meta name="author" content="朱显杰">
  {% bootstrap_stylesheet_tag %}
  {% bootstrap_stylesheet_tag "responsive" %}
  <style type="text/css">
    body {
      padding-top: 60px;
    }
  </style>
  <!--[if lt IE 9]>
  <script src="//html5shim.googlecode.com/svn/trunk/html5.js"></script>
  <![endif]-->
  <script src="//ajax.googleapis.com/ajax/libs/jquery/1.9.0/jquery.min.js"></script>
  {% bootstrap_javascript_tag %}
  {% block extra_head %}{% endblock %}
</head>

<body>

  {% if password_is_wrong %}
    <div class="alert alert-error">
      <button type="button" class="close" data-dismiss="alert">×</button>
      <h4>错误!</h4>用户名或密码错误
    </div>
  {% endif %}
  <div class="well">
    <h1>数据库脚本发布系统</h1>
    <p> </p>
    <form class="form-horizontal" action="" method="post">
      {% csrf_token %}
      {{ form|as_bootstrap:"horizontal" }}
      <p class="form-actions">
        <input type="submit" value="登录" class="btn btn-primary">
        <a href="/contactme/" rel="external nofollow" rel="external nofollow" ><input type="button" value="忘记密码" class="btn btn-danger"></a>
        <a href="/contactme/" rel="external nofollow" rel="external nofollow" ><input type="button" value="新员工?" class="btn btn-success"></a>
      </p>
    </form>
  </div>

</body>
</html>
最后还需要在urls.py里添加:
(r'^accounts/login/$', 'dbrelease_app.views.login'),
最终的效果如下:
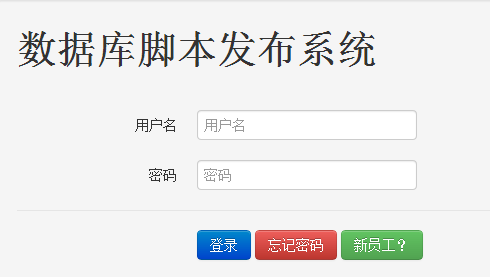
1)当在浏览器里输入http://192.168.1.16:8000/accounts/login/,出现如下登陆界面:

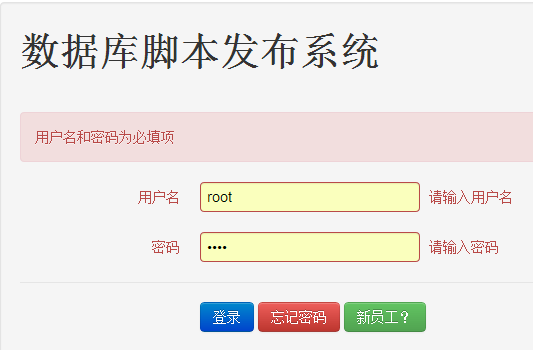
2)当用户名或密码为空时,提示”用户名和密码为必填项",如下所示:

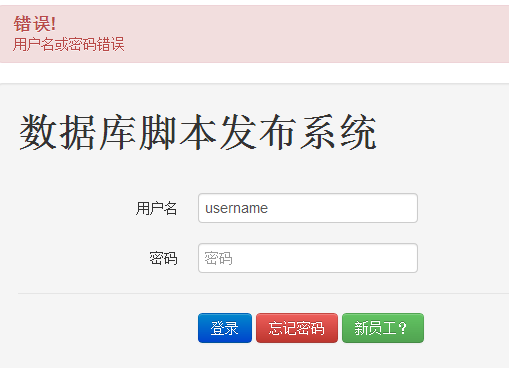
3)当用户名或密码错误时,提示“用户名或密码错误",如下所示:

4)如果用户名和密码都正确,进入主页(index.html)。
既然有login,当然要有logout,logout比较简单,直接调用Django自带用户认证系统的logout,然后返回登录界面,具体如下(views.py):
@login_required
def logout(request):
  auth.logout(request)
  return HttpResponseRedirect("/accounts/login/")
上面@login_required表示只有用户在登录的情况下才能调用该视图,否则将自动重定向至登录页面。
urls.py里添加:
(r'^accounts/logout/$', 'dbrelease_app.views.logout'),
以上就是本文的全部内容,希望对大家的学习有所帮助,也希望大家多多支持【听图阁-专注于Python设计】。
