python opencv实现旋转矩形框裁减功能
本文实例为大家分享了python opencv实现旋转矩形框裁减的具体代码,供大家参考,具体内容如下
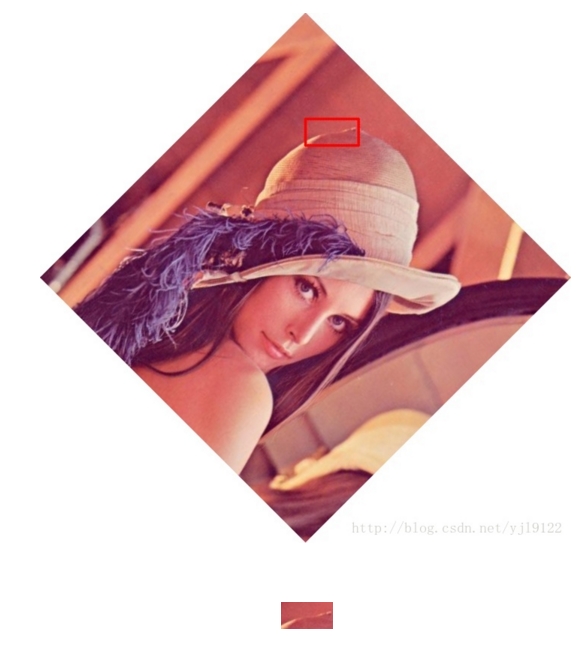
经常遇见旋转矩形框的裁减问题,那么思路是,将矩形框旋转正然后再裁减
# -*- coding:gb2312 -*-
import cv2
from math import *
import numpy as np
import time

def rotateImage(img,degree,pt1,pt2,pt3,pt4):
  height,width=img.shape[:2]
  heightNew = int(width * fabs(sin(radians(degree))) + height * fabs(cos(radians(degree))))
  widthNew = int(height * fabs(sin(radians(degree))) + width * fabs(cos(radians(degree))))
  matRotation=cv2.getRotationMatrix2D((width/2,height/2),degree,1)
  matRotation[0, 2] += (widthNew - width) / 2
  matRotation[1, 2] += (heightNew - height) / 2
  imgRotation = cv2.warpAffine(img, matRotation, (widthNew, heightNew), borderValue=(255, 255, 255))
  pt1 = list(pt1)
  pt3 = list(pt3)
  [[pt1[0]], [pt1[1]]] = np.dot(matRotation, np.array([[pt1[0]], [pt1[1]], [1]]))
  [[pt3[0]], [pt3[1]]] = np.dot(matRotation, np.array([[pt3[0]], [pt3[1]], [1]]))
  imgOut=imgRotation[int(pt1[1]):int(pt3[1]),int(pt1[0]):int(pt3[0])]
  cv2.imshow("imgOut",imgOut) #裁减得到的旋转矩形框
  cv2.imwrite("imgOut.jpg",imgOut)
  # pt2 = list(pt2)
  # pt4 = list(pt4)
  # [[pt2[0]], [pt2[1]]] = np.dot(matRotation, np.array([[pt2[0]], [pt2[1]], [1]]))
  # [[pt4[0]], [pt4[1]]] = np.dot(matRotation, np.array([[pt4[0]], [pt4[1]], [1]]))
  # pt1 = (int(pt1[0]), int(pt1[1]))
  # pt2 = (int(pt2[0]), int(pt2[1]))
  # pt3 = (int(pt3[0]), int(pt3[1]))
  # pt4 = (int(pt4[0]), int(pt4[1]))
  # drawRect(imgRotation,pt1,pt2,pt3,pt4,(255,0,0),2)
  return imgRotation

def drawRect(img,pt1,pt2,pt3,pt4,color,lineWidth):
  cv2.line(img, pt1, pt2, color, lineWidth)
  cv2.line(img, pt2, pt3, color, lineWidth)
  cv2.line(img, pt3, pt4, color, lineWidth)
  cv2.line(img, pt1, pt4, color, lineWidth)


if __name__=="__main__":
  startTime=time.time()
  imgSrc=cv2.imread('E:\桌面\lena.jpg')
  imgResize=cv2.resize(imgSrc,(500,500))
  pt1=(100,100)
  pt2=(150,50)
  pt3=(175,75)
  pt4=(125,125)
  # drawRect(imgResize,pt1,pt2,pt3,pt4,(0,0,255),2)
  imgRotation=rotateImage(imgResize,-degrees(atan2(50,50)),pt1,pt2,pt3,pt4)
  endTime = time.time()
  print endTime-startTime
  cv2.imshow("imgRotation",imgRotation)
  cv2.imwrite("imgRotation.jpg",imgRotation)
  cv2.waitKey(0)
效果图:
以上就是本文的全部内容,希望对大家的学习有所帮助,也希望大家多多支持【听图阁-专注于Python设计】。
