基于随机梯度下降的矩阵分解推荐算法(python)
SVD是矩阵分解常用的方法,其原理为:矩阵M可以写成矩阵A、B与C相乘得到,而B可以与A或者C合并,就变成了两个元素M1与M2的矩阵相乘可以得到M。
矩阵分解推荐的思想就是基于此,将每个user和item的内在feature构成的矩阵分别表示为M1与M2,则内在feature的乘积得到M;因此我们可以利用已有数据(user对item的打分)通过随机梯度下降的方法计算出现有user和item最可能的feature对应到的M1与M2(相当于得到每个user和每个item的内在属性),这样就可以得到通过feature之间的内积得到user没有打过分的item的分数。
本文所采用的数据是movielens中的数据,且自行切割成了train和test,但是由于数据量较大,没有用到全部数据。
代码如下:
# -*- coding: utf-8 -*-
"""
Created on Mon Oct 9 19:33:00 2017
@author: wjw
"""
import pandas as pd
import numpy as np
import os

def difference(left,right,on): #求两个dataframe的差集
 df = pd.merge(left,right,how='left',on=on) #参数on指的是用于连接的列索引名称
 left_columns = left.columns
 col_y = df.columns[-1] # 得到最后一列
 df = df[df[col_y].isnull()]#得到boolean的list
 df = df.iloc[:,0:left_columns.size]#得到的数据里面还有其他同列名的column
 df.columns = left_columns # 重新定义columns
 return df

def readfile(filepath): #读取文件,同时得到训练集和测试集

 pwd = os.getcwd()#返回当前工程的工作目录
 os.chdir(os.path.dirname(filepath))
 #os.path.dirname()获得filepath文件的目录;chdir()切换到filepath目录下
 initialData = pd.read_csv(os.path.basename(filepath))
 #basename()获取指定目录的相对路径
 os.chdir(pwd)#回到先前工作目录下
 predData = initialData.iloc[:,0:3] #将最后一列数据去掉
 newIndexData = predData.drop_duplicates()
 trainData = newIndexData.sample(axis=0,frac = 0.1) #90%的数据作为训练集
 testData = difference(newIndexData,trainData,['userId','movieId']).sample(axis=0,frac=0.1)
 return trainData,testData

def getmodel(train):
 slowRate = 0.99
 preRmse = 10000000.0
 max_iter = 100
 features = 3
 lamda = 0.2
 gama = 0.01 #随机梯度下降中加入,防止更新过度
 user = pd.DataFrame(train.userId.drop_duplicates(),columns=['userId']).reset_index(drop=True) #把在原来dataFrame中的索引重新设置,drop=True并抛弃

 movie = pd.DataFrame(train.movieId.drop_duplicates(),columns=['movieId']).reset_index(drop=True)
 userNum = user.count().loc['userId'] #671
 movieNum = movie.count().loc['movieId']
 userFeatures = np.random.rand(userNum,features) #构造user和movie的特征向量集合
 movieFeatures = np.random.rand(movieNum,features)
 #假设每个user和每个movie有3个feature
 userFeaturesFrame =user.join(pd.DataFrame(userFeatures,columns = ['f1','f2','f3']))
 movieFeaturesFrame =movie.join(pd.DataFrame(movieFeatures,columns= ['f1','f2','f3']))
 userFeaturesFrame = userFeaturesFrame.set_index('userId')
 movieFeaturesFrame = movieFeaturesFrame.set_index('movieId') #重新设置index

 for i in range(max_iter):
  rmse = 0
  n = 0
  for index,row in user.iterrows():
   uId = row.userId
   userFeature = userFeaturesFrame.loc[uId] #得到userFeatureFrame中对应uId的feature

   u_m = train[train['userId'] == uId] #找到在train中userId点评过的movieId的data
   for index,row in u_m.iterrows():
    u_mId = int(row.movieId)
    realRating = row.rating
    movieFeature = movieFeaturesFrame.loc[u_mId]

    eui = realRating-np.dot(userFeature,movieFeature)
    rmse += pow(eui,2)
    n += 1
    userFeaturesFrame.loc[uId] += gama * (eui*movieFeature-lamda*userFeature)
    movieFeaturesFrame.loc[u_mId] += gama*(eui*userFeature-lamda*movieFeature)
  nowRmse = np.sqrt(rmse*1.0/n)
  print('step:%f,rmse:%f'%((i+1),nowRmse))
  if nowRmse<preRmse:
   preRmse = nowRmse
  elif nowRmse<0.5:
   break
  elif nowRmse-preRmse<=0.001:
   break
  gama*=slowRate
 return userFeaturesFrame,movieFeaturesFrame

def evaluate(userFeaturesFrame,movieFeaturesFrame,test):
 test['predictRating']='NAN' # 新增一列

 for index,row in test.iterrows():

  print(index)
  userId = row.userId
  movieId = row.movieId
  if userId not in userFeaturesFrame.index or movieId not in movieFeaturesFrame.index:
   continue
  userFeature = userFeaturesFrame.loc[userId]
  movieFeature = movieFeaturesFrame.loc[movieId]
  test.loc[index,'predictRating'] = np.dot(userFeature,movieFeature) #不定位到不能修改值

 return test

if __name__ == "__main__":
 filepath = r"E:\学习\研究生\推荐系统\ml-latest-small\ratings.csv"
 train,test = readfile(filepath)
 userFeaturesFrame,movieFeaturesFrame = getmodel(train)
 result = evaluate(userFeaturesFrame,movieFeaturesFrame,test)
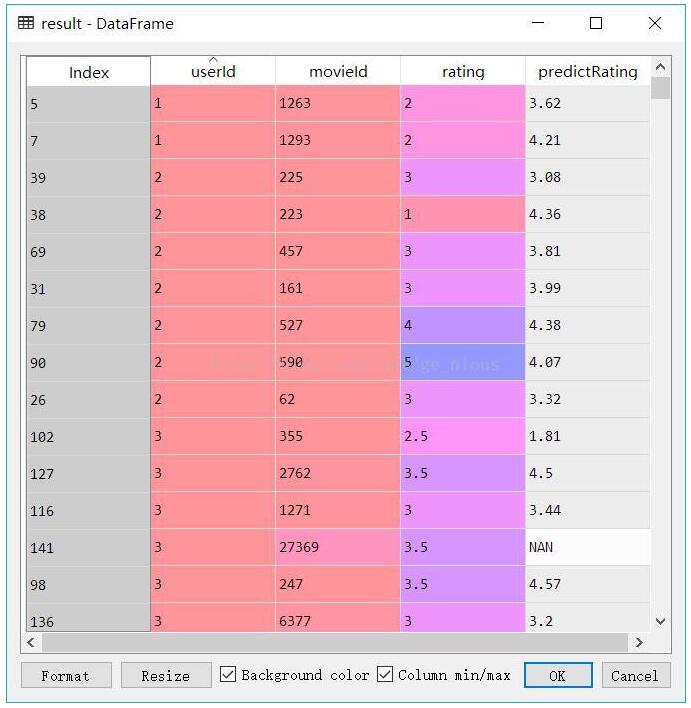
在test中得到的结果为:

NAN则是训练集中没有的数据
以上就是本文的全部内容,希望对大家的学习有所帮助,也希望大家多多支持【听图阁-专注于Python设计】。

