使用Scrapy爬取动态数据
对于动态数据的爬取,可以选择selenium和PhantomJS两种方式,本文选择的是PhantomJS。
网址:
1.首先第一步,对中间件的设置。
进入pipelines.py文件中:
from selenium import webdriver
from scrapy.http.response.html import HtmlResponse
from scrapy.http.response import Response
class SeleniumSpiderMiddleware(object):
  def __init__(self):
    self.driver = webdriver.PhantomJS()
  def process_request(self ,request ,spider):
    # 当引擎从调度器中取出request进行请求发送下载器之前
    # 会先执行当前的爬虫中间件 ,在中间件里面使用selenium
    # 请求这个request ,拿到动态网站的数据 然后将请求
    # 返回给spider爬虫对象
    if spider.name == 'taobao':
      # 使用爬虫文件的url地址
      spider.driver.get(request.url)
      for x in range(1 ,12 ,2):
        i = float(x) / 11
        # scrollTop 从上往下的滑动距离
        js = 'document.body.scrollTop=document.body.scrollHeight * %f' % i
        spider.driver.execute_script(js)
      response = HtmlResponse(url=request.url,
                  body=spider.driver.page_source,
                  encoding='utf-8',
                  request=request)
      # 这个地方只能返回response对象,当返回了response对象,那么可以直接跳过下载中间件,将response的值传递给引擎,引擎又传递给 spider进行解析
      return response
在设置中,要将middlewares设置打开。
进入settings.py文件中,将
DOWNLOADER_MIDDLEWARES = {
  'taobaoSpider.middlewares.SeleniumSpiderMiddleware': 543,
}
打开。
2.第二步,爬取数据
回到spider爬虫文件中。
引入:
from selenium import webdriver
自定义属性:
def __init__(self):
  self.driver = webdriver.PhantomJS()
查找数据和分析数据:
def parse(self, response):
  div_info = response.xpath('//div[@class="info-cont"]')
  print(div_info)
  for div in div_info:
    title = div.xpath('.//div[@class="title-row "]/a/text()').extract_first('')
    # title = self.driver.find_element_by_class_name("title-row").text
    print('名称:', title)
    price = div.xpath('.//div[@class="sale-row row"]/div/span[2]/strong/text()').extract_first('')
3.第三步,传送数据到item中:
在item.py文件中:
name = scrapy.Field()
price = scrapy.Field()
回到spider.py爬虫文件中:
引入:
from ..items import TaobaospiderItem
传送数据:
#创建实例化对象。
item = TaobaospiderItem()
item['name'] = title
item['price'] = price
yield item
在设置中,打开:
ITEM_PIPELINES = {
  'taobaoSpider.pipelines.TaobaospiderPipeline': 300,
}
4.第四步,写入数据库:
进入管道文件中。
引入
import sqlite3
写入数据库的代码如下:
class TaobaospiderPipeline(object):
  def __init__(self):
    self.connect = sqlite3.connect('taobaoDB')
    self.cursor = self.connect.cursor()
    self.cursor.execute('create table if not exists taobaoTable (name text,price text)')
  def process_item(self, item, spider):
    self.cursor.execute('insert into taobaoTable (name,price)VALUES ("{}","{}")'.format(item['name'],item['price']))
    self.connect.commit()
    return item
  def close_spider(self):
    self.cursor.close()
    self.connect.close()
在设置中打开:
ITEM_PIPELINES = {
  'taobaoSpider.pipelines.TaobaospiderPipeline': 300,
}
因为在上一步,我们已经将管道传送设置打开,所以这一步可以不用重复操作。
然后运行程序,打开数据库查看数据。
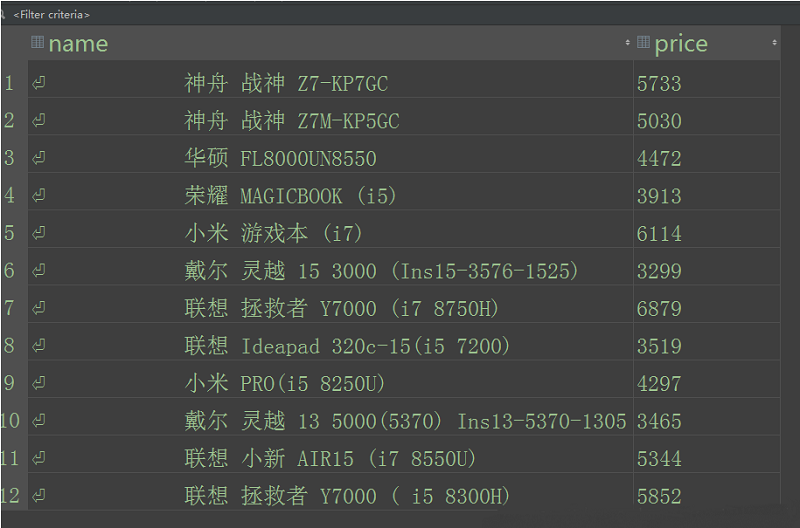
至此,程序结束。
下附spider爬虫文件所有代码:
# -*- coding: utf-8 -*-
import scrapy
from selenium import webdriver
from ..items import TaobaospiderItem
class TaobaoSpider(scrapy.Spider):
  name = 'taobao'
  allowed_domains = ['taobao.com']
  start_urls = ['https://s.taobao.com/search?q=笔记本电脑&imgfile=&commend=all&ssid=s5-e&search_type=item&sourceId=tb.index&spm=a21bo.2017.201856-taobao-item.1&ie=utf8&initiative_id=tbindexz_20170306']
  def __init__(self):
    self.driver = webdriver.PhantomJS()
  def parse(self, response):
    div_info = response.xpath('//div[@class="info-cont"]')
    print(div_info)
    for div in div_info:
      title = div.xpath('.//div[@class="title-row "]/a/text()').extract_first('')
      print('名称:', title)
      price = div.xpath('.//div[@class="sale-row row"]/div/span[2]/strong/text()').extract_first('')
      item = TaobaospiderItem()
      item['name'] = title
      item['price'] = price
      yield item
  def close(self,reason):
    print('结束了',reason)
    self.driver.quit()
关于scrapy的中文文档:http://scrapy-chs.readthedocs.io/zh_CN/latest/faq.html
总结
以上就是这篇文章的全部内容了,希望本文的内容对大家的学习或者工作具有一定的参考学习价值,谢谢大家对【听图阁-专注于Python设计】的支持。如果你想了解更多相关内容请查看下面相关链接