Django-Rest-Framework 权限管理源码浅析(小结)
在django的views中不论是用类方式还是用装饰器方式来使用rest框架,django_rest_frame实现权限管理都需要两个东西的配合: authentication_classes 和 permission_classes
# 方式1: 装饰器
from rest_framework.decorators import api_view, authentication_classes, permission_classes
from rest_framework.authentication import SessionAuthentication, BasicAuthentication
from rest_framework.permissions import AllowAny
from rest_framework.response import Response


@api_view(["GET", ])
@permission_classes([AllowAny,])
@authentication_classes([SessionAuthentication, BasicAuthentication])
def test_example(request):
 content = {
   'user': unicode(request.user), # `django.contrib.auth.User` instance.
   'auth': unicode(request.auth), # None
  }
  return Response(content)

# ------------------------------------------------------------
# 方式2: 类
from rest_framework.authentication import SessionAuthentication, BasicAuthentication
from rest_framework.permissions import AllowAny
from rest_framework.response import Response
from rest_framework.views import APIView

class ExampleView(APIView):
 authentication_classes = (SessionAuthentication, BasicAuthentication)
 permission_classes = (AllowAny,)

 def get(self, request, format=None):
  content = {
   'user': unicode(request.user), # `django.contrib.auth.User` instance.
   'auth': unicode(request.auth), # None
  }
  return Response(content)
上面给出的是权限配置的默认方案,写和不写没有区别。 rest框架有自己的settings文件 ,最原始的默认值都可以在里面找到:
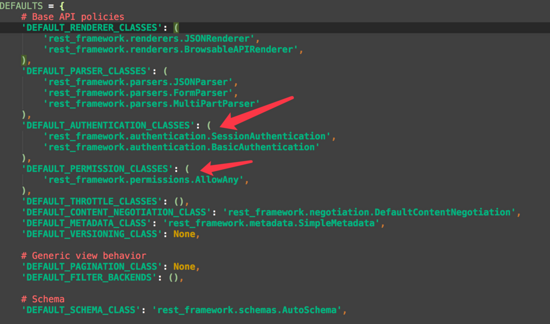
说道rest的settings文件,要覆盖其中的默认行为,特别是权限认证行为,我们只需要在 项目settings文件
中指定你自己的类即可:
REST_FRAMEWORK = {
 ...
 'DEFAULT_AUTHENTICATION_CLASSES': (
  'your_authentication_class_path',
 ),
 ...
}
在rest的settings文件中,获取属性时,会优先加载项目的settings文件中的设置,如果项目中没有的,才加载自己的默认设置:
初始化api_settings对象
api_settings = APISettings(None, DEFAULTS, IMPORT_STRINGS)
APISettings 类中获取属性时优先获取项目的settings文件中 REST_FRAMEWORK 对象的值,没有的再找自己的默认值
@property
def user_settings(self):
 if not hasattr(self, '_user_settings'):
  # _user_settings默认为加载项目settings文件中的REST_FRAMEWORK对象
  self._user_settings = getattr(settings, 'REST_FRAMEWORK', {})
 return self._user_settings

def __getattr__(self, attr):
 if attr not in self.defaults:
  raise AttributeError("Invalid API setting: '%s'" % attr)

 try:
  # Check if present in user settings
  # 优先加载user_settings,即项目的settings文件,没有就用默认
  val = self.user_settings[attr]
 except KeyError:
  # Fall back to defaults
  val = self.defaults[attr]

 # Coerce import strings into classes
 if attr in self.import_strings:
  val = perform_import(val, attr)

 # Cache the result
 self._cached_attrs.add(attr)
 setattr(self, attr, val)
 return val
在rest中settings中,能自动检测 项目settings 的改变,并重新加载自己的配置文件:

权限管理原理浅析
rest框架是如何使用 authentication_classes 和 permission_classes ,并将二者配合起来进行权限管理的呢?
使用类方式实现的时候,我们都会直接或间接的使用到rest框架中的APIVIEW,在 urls.py 中使用该类的 as_view 方法来构建router
# views.py
from rest_framework.views import APIView
from rest_framework.permissions import IsAuthenticated


class ExampleAPIView(APIView):
 permission_classes = (IsAuthenticated,)
 ...

# -----------------------------
from django.conf.urls import url, include

from .views import ExampleAPIView

urlpatterns = [
 url(r'^example/(?P<example_id>[-\w]+)/examples/?$',
  ExampleAPIView.as_view()),
]
在我们调用 APIVIEW.as_view() 的时候,该类会调用父类的同名方法:
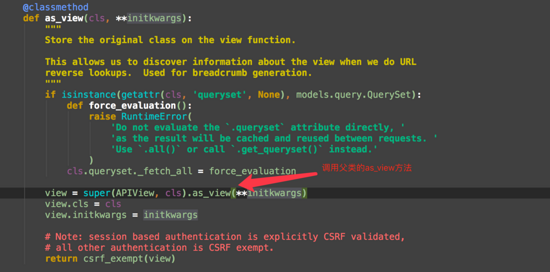
父类的同名方法中,调用了dispatch方法:
rest 重写 了该方法,在该方法中对requset做了一次服务端初始化(加入验证信息等)处理
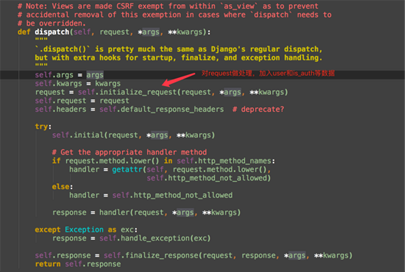
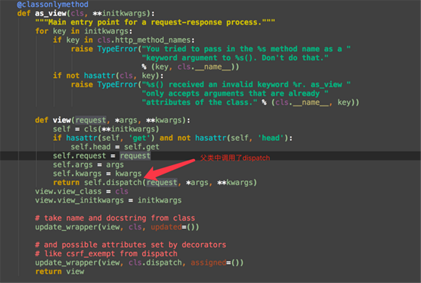
调用权限管理
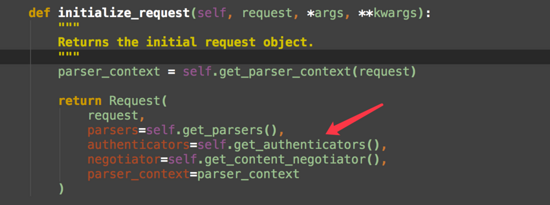
在权限管理中会使用默认的或是你指定的权限认证进行验证: 这里只是做验证并存储验证结果 ,这里操作完后authentication_classes的作用就完成了。验证结果会在后面指定的 permission_classes 中使用!
def get_authenticators(self):
  """
  Instantiates and returns the list of authenticators that this view can use.
  """
  return [auth() for auth in self.authentication_classes]
通过指定的permission_classes确定是否有当前接口的访问权限:
class IsAuthenticatedOrReadOnly(BasePermission):
 """
 The request is authenticated as a user, or is a read-only request.
 """

 def has_permission(self, request, view):
  return (
   request.method in SAFE_METHODS or
   request.user and
   request.user.is_authenticated
  )
最后,不管有没有使用permission_classes来决定是否能访问,默认的或是你自己指定的authentication_classes都会执行并将权限结果放在request中!
以上就是本文的全部内容,希望对大家的学习有所帮助,也希望大家多多支持【听图阁-专注于Python设计】。