python实现多层感知器
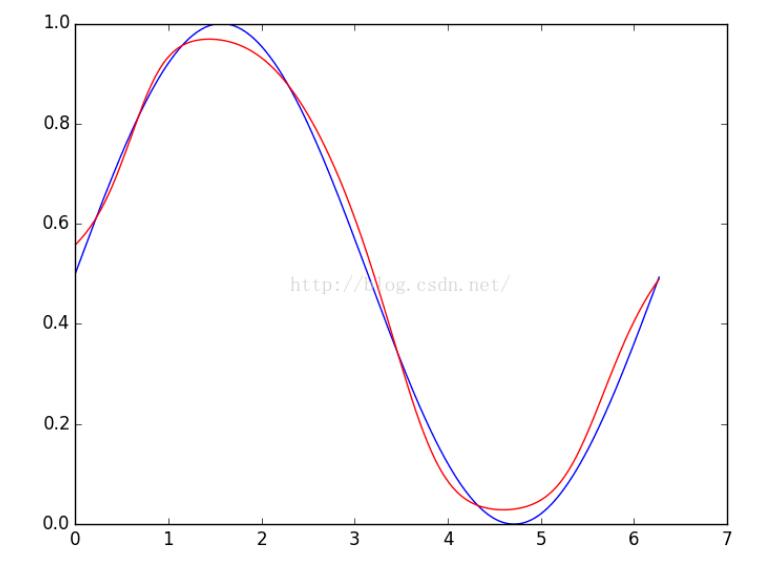
写了个多层感知器,用bp梯度下降更新,拟合正弦曲线,效果凑合。
# -*- coding: utf-8 -*-
import numpy as np
import matplotlib.pyplot as plt


def sigmod(z):
 return 1.0 / (1.0 + np.exp(-z))


class mlp(object):
 def __init__(self, lr=0.1, lda=0.0, te=1e-5, epoch=100, size=None):
  self.learningRate = lr
  self.lambda_ = lda
  self.thresholdError = te
  self.maxEpoch = epoch
  self.size = size
  self.W = []
  self.b = []
  self.init()

 def init(self):
  for i in xrange(len(self.size)-1):
   self.W.append(np.mat(np.random.uniform(-0.5, 0.5, size=(self.size[i+1], self.size[i]))))
   self.b.append(np.mat(np.random.uniform(-0.5, 0.5, size=(self.size[i+1], 1))))

 def forwardPropagation(self, item=None):
  a = [item]
  for wIndex in xrange(len(self.W)):
   a.append(sigmod(self.W[wIndex]*a[-1]+self.b[wIndex]))
  """
  print "-----------------------------------------"
  for i in a:
   print i.shape,
  print
  for i in self.W:
   print i.shape,
  print
  for i in self.b:
   print i.shape,
  print
  print "-----------------------------------------"
  """
  return a

 def backPropagation(self, label=None, a=None):
  # print "backPropagation--------------------begin"
  delta = [(a[-1]-label)*a[-1]*(1.0-a[-1])]
  for i in xrange(len(self.W)-1):
   abc = np.multiply(a[-2-i], 1-a[-2-i])
   cba = np.multiply(self.W[-1-i].T*delta[-1], abc)
   delta.append(cba)
  """
  print "++++++++++++++delta++++++++++++++++++++"
  print "len(delta):", len(delta)
  for ii in delta:
   print ii.shape,
  print "\n======================================="
  """
  for j in xrange(len(delta)):
   ads = delta[j]*a[-2-j].T
   # print self.W[-1-j].shape, ads.shape, self.b[-1-j].shape, delta[j].shape
   self.W[-1-j] = self.W[-1-j]-self.learningRate*(ads+self.lambda_*self.W[-1-j])
   self.b[-1-j] = self.b[-1-j]-self.learningRate*delta[j]
   """print "=======================================1234"
   for ij in self.b:
    print ij.shape,
   print
   """
  # print "backPropagation--------------------finish"
  error = 0.5*(a[-1]-label)**2
  return error

 def train(self, input_=None, target=None, show=10):
  for ep in xrange(self.maxEpoch):
   error = []
   for itemIndex in xrange(input_.shape[1]):
    a = self.forwardPropagation(input_[:, itemIndex])
    e = self.backPropagation(target[:, itemIndex], a)
    error.append(e[0, 0])
   tt = sum(error)/len(error)
   if tt < self.thresholdError:
    print "Finish {0}: ".format(ep), tt
    return
   elif ep % show == 0:
    print "epoch {0}: ".format(ep), tt

 def sim(self, inp=None):
  return self.forwardPropagation(item=inp)[-1]


if __name__ == "__main__":
 tt = np.arange(0, 6.28, 0.01)
 labels = np.zeros_like(tt)
 print tt.shape
 """
 for po in xrange(tt.shape[0]):
  if tt[po] < 4:
   labels[po] = 0.0
  elif 8 > tt[po] >= 4:
   labels[po] = 0.25
  elif 12 > tt[po] >= 8:
   labels[po] = 0.5
  elif 16 > tt[po] >= 12:
   labels[po] = 0.75
  else:
   labels[po] = 1.0
 """
 tt = np.mat(tt)
 labels = np.sin(tt)*0.5+0.5
 labels = np.mat(labels)
 model = mlp(lr=0.2, lda=0.0, te=1e-5, epoch=500, size=[1, 6, 6, 6, 1])
 print tt.shape, labels.shape
 print len(model.W), len(model.b)
 print
 model.train(input_=tt, target=labels, show=10)
 sims = [model.sim(tt[:, idx])[0, 0] for idx in xrange(tt.shape[1])]

 xx = tt.tolist()[0]
 plt.figure()
 plt.plot(xx, labels.tolist()[0], xx, sims, 'r')
 plt.show()
效果图:
以上就是本文的全部内容,希望对大家的学习有所帮助,也希望大家多多支持【听图阁-专注于Python设计】。