python自动发送测试报告邮件功能的实现
自动化发邮件功能也是自动化测试项目中的重要需求之一。在自动化脚本运行完成之后,邮箱就可以收到最新的测试报告结果,把这种主动的且不及时的查看变成被动且及时的查收,就方便多了。
首先我们需要一份漂亮且通俗易懂的测试报告来展示自动化测试成果, HTMLTestRunner 是 python 标准库 unittest 单元测试框架的一个扩展,它生成易于使用的HTML测试报告。
下载地址: http://tungwaiyip.info/software/HTMLTestRunner.html
这个扩展非常简单,只有一个.py文件,选中后直接下载到本地即可。安装方法也很简单,将其复制到python的安装目录下即可。
windows:将下载的文件保存在../Python35/Lib目录下
Linux(ubuntu):以root身份将HTMLTestRunner.py复制到/usr/local/Python3.7/dist-packages/ 目录下
修改HTMLTestRunner
#第 94 行
import StringIo
修改为:
import io

#第 539 行
self.outputBuffer=StringIO.StringIO()
修改为:
self.outputBuffer=io.StringIO()

#第 631 行
print >>sys.stderr, 'nTime Elapsed: %s' % (self.stopTime-self.startTime)
修改为:
print(sys.stderr, 'nTime Elapsed: %s' % (self.stopTime-self.startTime))

#第 642 行
if not rmap.has_key(cls):
修改为:
if not cls in rmap:

#第 766 行
uo=o.decode('latin-1')
修改为:
uo=o

#第 772 行
ue=e.decode('latin-1')
修改为:
ue=e
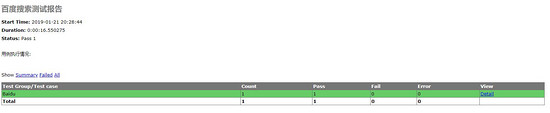
生成HTML测试报告
from selenium import webdriver
import unittest
from HTMLTestRunner import HTMLTestRunner
class Baidu(unittest.TestCase):
 def setUp(self):
  self.driver=webdriver.Firefox()
  self.driver.implicitly_wait(10)
  self.base_url="https://www.baidu.com"

 def test_baidu_search(self):
  driver=self.driver
  driver.get(self.base_url)
  driver.find_element_by_id("kw").send_keys("HTMLTestRunner")
  driver.find_element_by_id("su").click()
 def tearDown(self):
  self.driver.quit()
if __name__=="__main__":
 testunit=unittest.TestSuite()
 testunit.addTest(Baidu("test_baidu_search"))
 #定义报告存放路径
 fp=open('./result.html','wb')
 #定义测试报告
 runner=HTMLTestRunner(
  stream=fp,
  title='百度搜索测试报告',
  description='用例执行情况:'
 )
 runner.run(testunit) # 运行测试用例
 fp.close() # 关闭报告文件
代码分析
首先,将HTMLTestRunner模块用import导入进来
其次,通过open()方法以二进制写模式打开当前目录下的result.html,如果没有,则自动创建该文件。
接着,调用HTMLTestRunner模块下的HTMLTestRunner类。stream指定测试报告文件,title用于定义测试报告的标题,description用于定义测试报告的副标题。
最后,通过HTMLTestRunner的run()方法来运行测试套件中所组装的测试用例。最后通过close()关闭测试报告文件。
自动发邮件
import smtplib
from email.mime.text import MIMEText
from email.header import Header
#发送邮箱服务器
smtpserver='smtp.**.com'
#发送邮箱用户/密码
user='********@**.com'
password='********'(授权码)
#发送邮箱
sender='********@**.com'
#接收邮箱
receiver='*******@**.com'
#发送邮件主题
subject='python email'
#编写html类型的邮件正文
msg=MIMEText('<HTML><H1>你好</H1></HTML>','html','utf8')
msg['Subject']=Header(subject,'utf-8')
#连接发送邮件
smtp=smtplib.SMTP()
smtp.connect(smtpserver)
smtp.login(user,password)
smtp.sendmail(sender,receiver,msg.as_string())
smtp.quit()
发送带附件的邮件
import smtplib
from email.mime.text import MIMEText
from email.header import Header
#发送邮箱服务器
smtpserver='smtp.**.com'
#发送邮箱用户/密码
user='********@**.com'
password='********'(授权码)
#发送邮箱
sender='********@**.com'
#接收邮箱
receiver='*******@**.com'
#发送邮件主题
subject='python email'
#发送的附件
sendfile=open('D:\\test.txt','rb').read()
att=MIMEText(sendfile,'base64','utf-8')
att["Content-Type"]='application/octet-stram'
att["content-Disposition"]='attachment;filename="test.txt"'
msgRoot=MIMEMultipart('related')
msgRoot['Subject']=subject
msgRoot.attach(att)
#连接发送邮件
smtp=smtplib.SMTP()
smtp.connect(smtpserver)
smtp.login(user,password)
smtp.sendmail(sender,receiver,msg.as_string())
smtp.quit()
整合自动发邮件功能
解决了前面的问题后,现在就可以将自动发邮件功能集成到自动化测试项目中了。
import smtplib
from email.mime.text import MIMEText
from email.header import Header
from email.mime.text import MIMEText
import unittest
import time
import os
#定义发送邮件
def send_mail(file_new):
 f=open(file_new,'rb')
 mail_body=f.read()
 f.close()
 msg=MIMEText(mail_body,'html','utf-8')
 msg['Subject']=Header("自动化测试报告",'utf-8')
 smtp=smtplib.SMTP()
 smtp.connect("******.com")
 smtp.login(****@**.com,*******)
 smtp.sendmail(****@**.com,****@**.com,msg.as_string())
 smtp.quit()
 print('email has send out !')
#查找测试报告目录,找到最新生成的测试报告文件
def new_report(testreport):
 lists=os.listdir(testreport)
 lists.sort(key=lambda fn: os.path.getmtime(testreport+"\\"+fn))
 file_new=os.path.join(testreport,lists[-1])
 print(file_new)
 return file_now
if __name__=='__main__':
 test_dir='D:\\testpro\\test_case'
 test_report='D:\\testpro\\report'
 discover=unittest.defaultTestLoader.discover(test_dir,pattern='test_*.py')
 now=time.strftime("%Y-%M-%D_%H_%M_%S")
 filename=test_report+'\\'+now+'result.html'
 fp=open(filename,'wb')
 runner=HTMLTestRunner(stream=fp,title='测试报告',description='用例执行情况:')
 runner.run(discover)
 fp.close()
 new_report=new_report(test_report)
 send_mail(new_report)
整个程序的执行过程可以分为三个步骤:
- 通过unittest框架的discover()找到匹配测试用例。由HTMLTestRunner的run()方法执行测试用例并生成最新的测试报告。
- 调用new_report()函数找到测试报告目录(report)下最新生成的测试报告,返回测试报告的路径。
- 将得到的最新测试报告的完整路径传给send_mail()函数,实现发邮件功能。
以上就是本文的全部内容,希望对大家的学习有所帮助,也希望大家多多支持【听图阁-专注于Python设计】。