Python中的元组介绍
1.元组的创建
元组(tuple):元组本身是不可变数据类型,没有增删改查
元组内可以存储任意数据类型
t = (1,2.3,True,'star')   ##例如这里面有数字,波尔值,和字符
print(t)
print(type(t))

元组里面包含可变数据类型,可以间接修改元组的内容
t1 = ([1,2,3],4)    ##里面含有一个数组,可以改变里面数组的值
t1[0].append(4)
print(t1)

元组如果只有一个元素的时候,后面一定要加逗号,否则数据类型不确定
t2 = ('hello',)
t3 = (1,)
print(type(t2))
print(type(t3))

2.元组的特性
下面是举例子用的元组
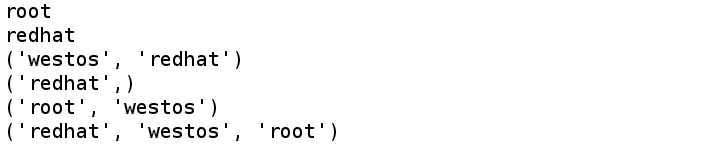
allowUsers = ('root','westos','redhat')
allowPasswd = ('123','456','789')
1)索引和切片
print(allowUsers[0])
print(allowUsers[-1])
print(allowUsers[1:])
print(allowUsers[2:])
print(allowUsers[:-1])
print(allowUsers[::-1])
2)重复
print(allowUsers * 3)
3)连接
print(allowUsers + ('linux','python'))

4)成员操作符
print('westos' in allowUsers)
print('westos' not in allowUsers)

5)for循环
for user in allowUsers:
  print(user)

for index,user in enumerate(allowUsers):
  print('第%d个白名单用户: %s' %(index+1,user))

6)zip:两个元组之间的元素相互对应

3.元组的常用方法
t = (1,2.3,True,'westos','westos')
print(t.count('westos'))
print(t.index(2.3))

4.元组的应用场景
1)变量交换数值
现在给变量赋值,a=1,b=2。如何使用元组快速的将a和b的值互换
#1.先把(a,b)封装成一个元组(1,2)
#2.b,a=a,b ---> b,a=(1,2)
b = (1,2)[0]
a = (1,2)[1]
print(a)
print(b)
这样就将a,b的值互换了
2)打印变量的值
name = 'westos'
age = 11
t = (name,age)
print('name:%s , age:%d' %(name,age))
print('name:%s , age:%d' %t)

3)元组的赋值,有多少个元素,就用多少个变量
t = ('westos',11,100)
name,age,score = t
print(name,age,score)

4)排序加元组的赋值
score = (100,89,45,78,65)
# scoreLi = list(score)
# scoreLi.sort()
# print(scoreLi)
scores = sorted(score)
# print(scores)
minscore,*middlescore,maxscore = scores
print(minscore)
print(middlescore)
print(maxscore)
print('最终成绩为: %.2f' %(sum(middlescore) / len(middlescore)))

总结
以上就是这篇文章的全部内容了,希望本文的内容对大家的学习或者工作具有一定的参考学习价值,谢谢大家对【听图阁-专注于Python设计】的支持。如果你想了解更多相关内容请查看下面相关链接