Python多线程处理实例详解【单进程/多进程】
本文实例讲述了Python多线程处理操作。分享给大家供大家参考,具体如下:
python — 多线程处理
1、一个进程执行完后,继续下一个进程
root@72132server:~# cd /root/python/multiprocess/
root@72132server:~/python/multiprocess# ls
multprocess.py
root@72132server:~/python/multiprocess# cat multprocess.py
#!/usr/bin/python
# --*-- coding:utf-8 --*--
from multiprocessing import Process,Lock#启用多进程,与进程锁
import time,os
def sayhi(i):
  print 'hello world!!!', i
  time.sleep(10)
#lock = Lock()
for n in range(100):#执行n=100次
  p = Process(target=sayhi,args=(n,))#调用函数def,若def函数里面有参数,就是使用args带值赋值,若函数没有参数的话就args()为空。
  p.start()
  p.join()#一个进程结束才会继续下一个进程。如果注释这句意思是一百个进程同时发起
root@72132server:~/python/multiprocess#
运行情况:
1)进程查看
root@72132server:~# cd /root/python/multiprocess/
root@72132server:~/python/multiprocess# ls
multprocess.py
root@72132server:~/python/multiprocess# vi multprocess.py
root@72132server:~/python/multiprocess# ps -ef | grep multi
root   24064 23930 0 20:45 pts/3  00:00:00 grep multi
root@72132server:~/python/multiprocess# ps -ef | grep multi
root   24066 23930 0 20:45 pts/3  00:00:00 grep multi
root@72132server:~/python/multiprocess# ps -ef | grep multi
root   24069 23930 0 20:45 pts/3  00:00:00 grep multi
root@72132server:~/python/multiprocess# ps -ef | grep multi
root   24071 23930 0 20:45 pts/3  00:00:00 grep multi
root@72132server:~/python/multiprocess# ps -ef | grep multi
root   24073 23930 0 20:46 pts/3  00:00:00 grep multi
root@72132server:~/python/multiprocess# ps -ef | grep multi
root   24075 23930 0 20:46 pts/3  00:00:00 grep multi
root@72132server:~/python/multiprocess#
2)脚本运行
root@72132server:~/python/multiprocess# vi multprocess.py
root@72132server:~/python/multiprocess# python multprocess.py
hello world!!! 0
hello world!!! 1
hello world!!! 2
hello world!!! 3
hello world!!! 4
hello world!!! 5
hello world!!! 6
hello world!!! 7
hello world!!! 8
hello world!!! 9
hello world!!! 10
hello world!!! 11
2、100个进行同时运行
root@72132server:~/python/multiprocess# ls
multprocess.py
root@72132server:~/python/multiprocess# cat multprocess.py
#!/usr/bin/python
# --*-- coding:utf-8 --*--
from multiprocessing import Process,Lock#启用多进程,与进程锁
import time,os
def sayhi(i):
  print 'hello world!!!', i
  time.sleep(10)
#lock = Lock()
for n in range(100):#执行n=100次
  p = Process(target=sayhi,args=(n,))#调用函数def,若def函数里面有参数,就是使用args带值赋值,若函数没有参数的话就args()为空。
  p.start()
  p.join()#一个进程结束才会继续下一个进程。如果注释这句意思是一百个进程同时发起
root@72132server:~/python/multiprocess#
root@72132server:~/python/multiprocess# vi multprocess.py
root@72132server:~/python/multiprocess# cat multprocess.py
#!/usr/bin/python
# --*-- coding:utf-8 --*--
from multiprocessing import Process,Lock#启用多进程,与进程锁
import time,os
def sayhi(i):
  print 'hello world!!!', i
  time.sleep(10)
#lock = Lock()
for n in range(100):#执行n=100次
  p = Process(target=sayhi,args=(n,))#调用函数def,若def函数里面有参数,就是使用args带值赋值,若函数没有参数的话就args()为空。
  p.start()
  #p.join()#一个进程结束才会继续下一个进程。如果注释这句意思是一百个进程同时发起
root@72132server:~/python/multiprocess#
运行情况
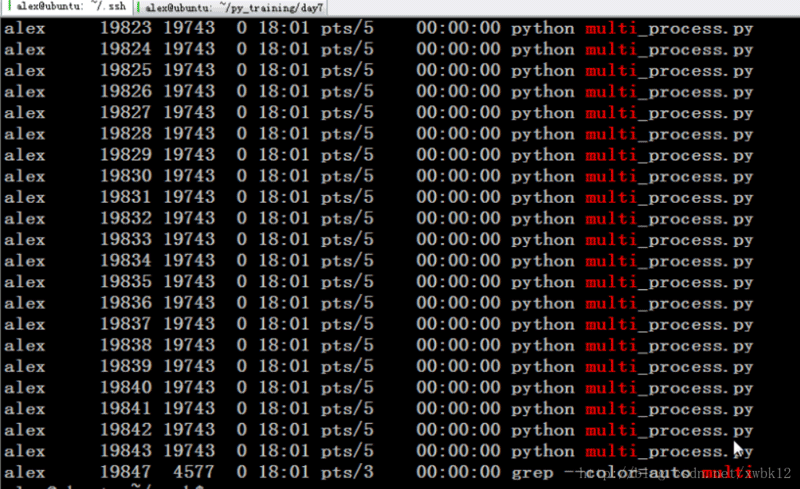
1)进程查看
2)脚本运行(1秒跑完)
root@72132server:~/python/multiprocess# python multprocess.py
hello world!!! 0
hello world!!! 2
hello world!!! 3
hello world!!! 5
hello world!!! 7
hello world!!! 8
hello world!!! 6
hello world!!! 9
hello world!!! 10
hello world!!! 11
hello world!!! 14
hello world!!! 4
hello world!!! 15
hello world!!! 16
hello world!!! 1
hello world!!! 13
hello world!!! 18
hello world!!! 20
hello world!!! 19
hello world!!! 21
hello world!!! 12
hello world!!! 17
hello world!!! 23
hello world!!! 24
hello world!!! 26
hello world!!! 27
hello world!!! 22
hello world!!! 29
hello world!!! 31
hello world!!! 32
hello world!!! 33
hello world!!! 34
hello world!!! 28
hello world!!! 25
hello world!!! 30
hello world!!! 35
hello world!!! 36
hello world!!! 39
hello world!!! 41
hello world!!! 37
hello world!!! 40
hello world!!! 42
hello world!!! 43
hello world!!! 46
hello world!!! 47
hello world!!! 48
hello world!!! 38
hello world!!! 44
hello world!!! 45
hello world!!! 50
hello world!!! 51
hello world!!! 53
hello world!!! 54
hello world!!! 55
hello world!!! 57
hello world!!! 49
hello world!!! 58
hello world!!! 59
hello world!!! 60
hello world!!! 61
hello world!!! 62
hello world!!! 63
hello world!!! 64
hello world!!! 65
hello world!!! 66
hello world!!! 67
hello world!!! 68
hello world!!! 69
hello world!!! 56
hello world!!! 70
hello world!!! 52
hello world!!! 71
hello world!!! 72
hello world!!! 73
hello world!!! 76
hello world!!! 74
hello world!!! 78
hello world!!! 79
hello world!!! 80
hello world!!! 82
hello world!!! 77
hello world!!! 83
hello world!!! 84
hello world!!! 85
hello world!!! 86
hello world!!! 87
hello world!!! 81
hello world!!! 91
hello world!!! 75
hello world!!! 89
hello world!!! 92
hello world!!! 88
hello world!!! 90
hello world!!! 93
hello world!!! 95
hello world!!! 94
hello world!!! 96
hello world!!! 98
hello world!!! 9
更多关于Python相关内容感兴趣的读者可查看本站专题:《Python进程与线程操作技巧总结》、《Python数据结构与算法教程》、《Python函数使用技巧总结》、《Python字符串操作技巧汇总》、《Python入门与进阶经典教程》、《Python+MySQL数据库程序设计入门教程》及《Python常见数据库操作技巧汇总》
希望本文所述对大家Python程序设计有所帮助。