详解python多线程之间的同步(一)
引言:
线程之间经常需要协同工作,通过某种技术,让一个线程访问某些数据时,其它线程不能访问这些数据,直到该线程完成对数据的操作。这些技术包括临界区(Critical Section),互斥量(Mutex),信号量(Semaphore),事件Event等。
Event
threading库中的event对象通过使用内部一个flag标记,通过flag的True或者False的变化来进行操作。
| 名称 | 含义 |
| set( ) | 标记设置为True |
| clear( ) | 标记设置为False |
| is_set( ) | 标记是否为True |
| wait(timeout=None) | 设置等待标记为True的时长,None为无限等待。等到返回True,等不到返回False |
from threading import Thread,Event
import time

def creditor(event:Event):
 print("什么时候还我钱")
 event.wait()
 print("我已经等了很长时间了")


def debtor(event:Event,count=10):
 print("可以宽裕几天吗?")
 money=[]
 while True:
 print("先还你100")
 time.sleep(0.5)
 money.append(1)
 if len(money)>count:
  event.set()
  break
 print("我已经还完你的钱了")

event=Event()
c=Thread(target=creditor,args=(event,))
d=Thread(target=debtor,args=(event,))
c.start()
d.start()
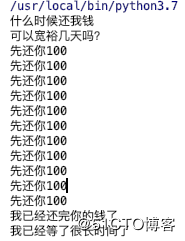
运行结果如下所示:

可以看到creditor函数中因为event.wait( )线程进入等待状态,此时debtor线程进入运行,当满足条件时event.set( )将标记设置为True,creditor线程开始运行。谁wait就是等到flag变为True,或等到超时变为False。不限制等待的个数。
wait的使用
from threading import Event,Thread


def Wait(event:Event,interval):
 while not event.wait(interval):
 print("waiting for you")

e=Event()
Thread(target=Wait,args=(e,3)).start()
e.wait(10)
e.set()
print("main exit")

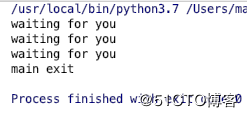
主线程一开始就wait 10s,Waiting线程等待3s返回False,进入循环打印"waiting for you",重复3次,然后主线程set了,这时候Waiting线程变为True,不再进入循环。
Lock
凡是存在资源争用的地方都可以使用锁,从而保证只有一个使用者可以完全使用这个资源
现在要生产10个杯子,由10个工人开始生产
import threading
import time

cups=[]

def worker(count=10):
 print("我是{},我开始生产了".format(threading.current_thread().name))
 flag=False
 while True:
 if len(cups)>count:
  flag=True
 time.sleep(0.05)
 if not flag:
  cups.append(1)
 if flag:
  break
 print("finished.cups={}".format(len(cups)))

for _ in range(10):
 threading.Thread(target=worker,args=(1000,)).start()
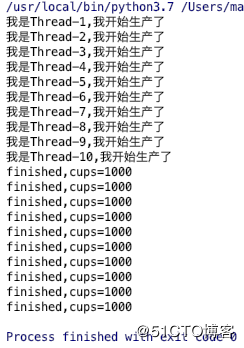
运行结果如下图所示:

我们明明只需要到1000就会break,但是结果却到了1010个,这就是因为有10个线程,其中每个线程都在增加,但是增加后的数目,其他线程并不会知道(每个线程通过len函数拿到数量,但是刚拿到数字,其他线程就立即更新了)
这个时候我们就需要锁lock来实现了,一旦线程获得锁,其他试图获取锁的线程将被阻塞
| 名称 | 含义 |
| acquire(blocking=True,timeout=-1) | 默认阻塞,阻塞可以设置超时时间。非阻塞时,timeout禁止设置。成功获取锁,返回True,否则返回False |
| release( ) | 释放锁。可以从任何线程释放。已上锁的锁,会抛出RuntimeError异常 |
加锁的实现:
import threading
import time

cups=[]
lock=threading.Lock()

def worker(count=10):
 print("我是{},我开始生产了".format(threading.current_thread().name))
 flag=False
 while True:
 lock.acquire()
 if len(cups)>=count:
  flag=True
 time.sleep(0.005)
 if not flag:
  cups.append(1)
 lock.release()
 if flag:
  break
 print("finished,cups={}".format(len(cups)))

for _ in range(10):
 threading.Thread(target=worker,args=(1000,)).start()
运行结果如图所示:

一般来说加锁后还需要一些代码实现,在释放锁之前还有可能抛出异常,一旦出现异常,锁无法释放,但是当前这个线程会因为这个异常而终止,这样会产生死锁,因此使用时要使用如下的方法:
1,使用try...finally语句保证锁的释放
2,with安全上下文管理(锁对象支持上下文管理)
计数器类,用来加,减。
import threading
import time


class Counter:
 def __init__(self):
 self._val = 0
 self.__lock = threading.Lock()

 @property
 def value(self):
 return self._val

 def inc(self):
 try:
  self.__lock.acquire()
  self._val += 1
 finally:
  self.__lock.release()

 def dec(self):
 with self.__lock:
  self._val -= 1


def run(c: Counter, count=100):
 for _ in range(count):
 for i in range(-50, 50):
  if i < 0:
  c.dec()
  else:
  c.inc()


c = Counter()
c1 = 10
c2 = 1000


for i in range(c1):
 threading.Thread(target=run, args=(c, c2)).start()


while True:
 if threading.active_count() == 1:
 print(c.value)
 break
启动了10个线程,1000次从-50到50进行加减,最后得到0,如果没有加锁处理的话,得到的结果未必是自己想要的。
锁的使用场景:
锁适用于访问和修改同一个资源的时候,引起资源争用的情况下。使用锁的注意事项:
- 1,少用锁,除非有必要。多线程访问加锁的资源时,由于锁的存在,实际就变成了串行。
- 2,加锁时间越短越好,不需要就立即释放锁。
- 3,一定要避免死锁,使用with或者try...finally。
非阻塞锁使用
import threading
import time


def worker(tasks):
 for task in tasks:
 time.sleep(0.001)
 if task.lock.acquire(False):
  print("{} {} begin to start".format(threading.current_thread(),task.name))
 else:
  print("{} {} is working".format(threading.current_thread(),task.name))


class Task:
 def __init__(self,name):
 self.name=name
 self.lock=threading.Lock()

tasks=[Task('task-{}'.format(x)) for x in range(10)]

for i in range(5):
 threading.Thread(target=worker,name="worker-{}".format(i),args=(tasks,)).start()
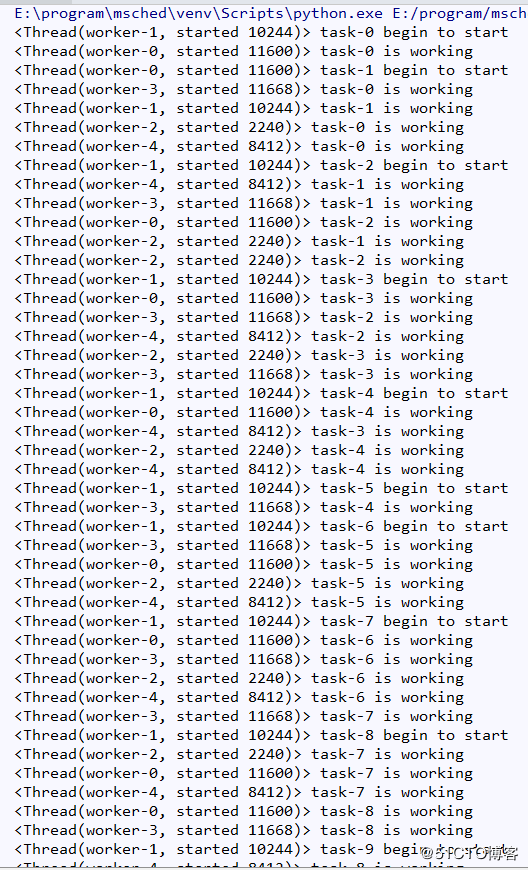
运行结果如下图所示:

总共开启了5个线程,每个线程处理10个任务,因为在if语句里面,task.lock.acquire(False),所以每个线程只有拿到锁是True,其他的线程不会阻塞会返回False。打印"is working"。
以上所述是小编给大家介绍的python多线程之间的同步详解整合,希望对大家有所帮助,如果大家有任何疑问请给我留言,小编会及时回复大家的。在此也非常感谢大家对【听图阁-专注于Python设计】网站的支持!


