用pycharm开发django项目示例代码
在pycharm(企业版)中新建Django工程,注意使用虚拟环境
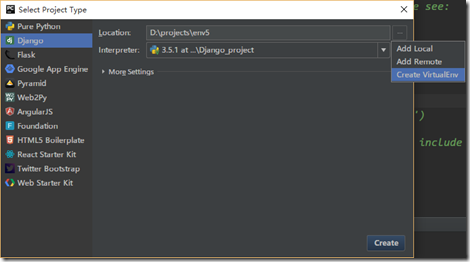
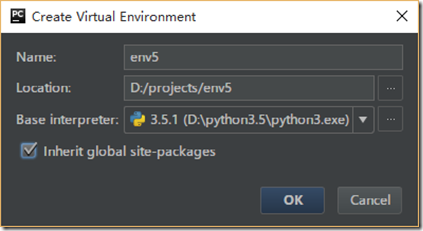
创建成功后,在pycharm显示的工程目录结构如下:
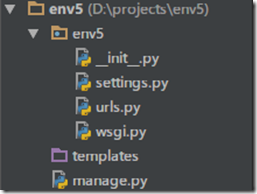
打开pycharm的Terminal,进入该工程的目录新建一个django工程
python3 manage.py startapp django_web
执行成功后,工程目录结构如下:
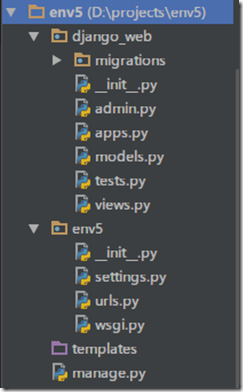
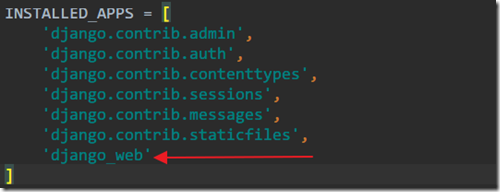
修改settings.py文件,注册该工程
Django的开发遵循MTV模式(models, templates, views),views.py负责执行操作,models.py负责数据处理(如数据库连接),templates目录下存放网页的模板
首先在templates下新建一个index.html文件,并把以下内容替换到该文件中
<!DOCTYPE html>

<html lang="en">
<head>
 <meta charset="UTF-8">
 <title>The blah</title>
 <link rel="stylesheet" type="text/css" href=" new_blah.css" rel="external nofollow" >
</head>
<body>

<div class="header">
 <img src="images/blah.png">
 <ul class="nav">
  <li><a href="#" rel="external nofollow" rel="external nofollow" rel="external nofollow" rel="external nofollow" rel="external nofollow" rel="external nofollow" rel="external nofollow" rel="external nofollow" rel="external nofollow" rel="external nofollow" rel="external nofollow" rel="external nofollow" rel="external nofollow" rel="external nofollow" >Home</a></li>
  <li><a href="#" rel="external nofollow" rel="external nofollow" rel="external nofollow" rel="external nofollow" rel="external nofollow" rel="external nofollow" rel="external nofollow" rel="external nofollow" rel="external nofollow" rel="external nofollow" rel="external nofollow" rel="external nofollow" rel="external nofollow" rel="external nofollow" >Site</a></li>
  <li><a href="#" rel="external nofollow" rel="external nofollow" rel="external nofollow" rel="external nofollow" rel="external nofollow" rel="external nofollow" rel="external nofollow" rel="external nofollow" rel="external nofollow" rel="external nofollow" rel="external nofollow" rel="external nofollow" rel="external nofollow" rel="external nofollow" >Other</a></li>
 </ul>

</div>

<div class="main-content">
 <h2>Article</h2>
 <ul class="article">

  <li>
   <img src="images/0001.jpg" width="100" height="90">
   <h3><a href="#" rel="external nofollow" rel="external nofollow" rel="external nofollow" rel="external nofollow" rel="external nofollow" rel="external nofollow" rel="external nofollow" rel="external nofollow" rel="external nofollow" rel="external nofollow" rel="external nofollow" rel="external nofollow" rel="external nofollow" rel="external nofollow" >The blah</a></h3>
   <p>This is a dangerously delicious cake.</p>
  </li>

  <li>
   <img src="images/0002.jpg" width="100" height="90">
   <h3><a href="#" rel="external nofollow" rel="external nofollow" rel="external nofollow" rel="external nofollow" rel="external nofollow" rel="external nofollow" rel="external nofollow" rel="external nofollow" rel="external nofollow" rel="external nofollow" rel="external nofollow" rel="external nofollow" rel="external nofollow" rel="external nofollow" >The blah</a></h3>
   <p>It's always taco night somewhere!</p>
  </li>

  <li>
   <img src="images/0003.jpg" width="100" height="90">
   <h3><a href="#" rel="external nofollow" rel="external nofollow" rel="external nofollow" rel="external nofollow" rel="external nofollow" rel="external nofollow" rel="external nofollow" rel="external nofollow" rel="external nofollow" rel="external nofollow" rel="external nofollow" rel="external nofollow" rel="external nofollow" rel="external nofollow" >The blah</a></h3>
   <p>Omelette you in on a little secret </p>
  </li>

  <li>
   <img src="images/0004.jpg" width="100" height="90">
   <h3><a href="#" rel="external nofollow" rel="external nofollow" rel="external nofollow" rel="external nofollow" rel="external nofollow" rel="external nofollow" rel="external nofollow" rel="external nofollow" rel="external nofollow" rel="external nofollow" rel="external nofollow" rel="external nofollow" rel="external nofollow" rel="external nofollow" >The blah</a></h3>
   <p>It's a sandwich. That's all we .</p>
  </li>
 </ul>
</div>

<div class="footer">
 <p>© Mugglecoding</p>
</div>
</body>
</html>

<--!http://css3gen.com/box-shadow/-->
首先编写views.py文件,定义访问这个index.html文件的操作
def index(request):

  return render(request, 'index.html')
编写urls.py文件,定义访问这个index.html的url路径(使用正则表达式)
from django.conf.urls import url
from django.contrib import admin
from django_web.views import index #导入views.py文件中的index函数

urlpatterns = [
 url(r'^admin/', admin.site.urls),
 url(r'^index/', index), #在url中凡是以url开头的访问都使用index函数来处理该请求
]
在pycharm的Terminal中输入命令运行服务器:
python3 manager.py runserver
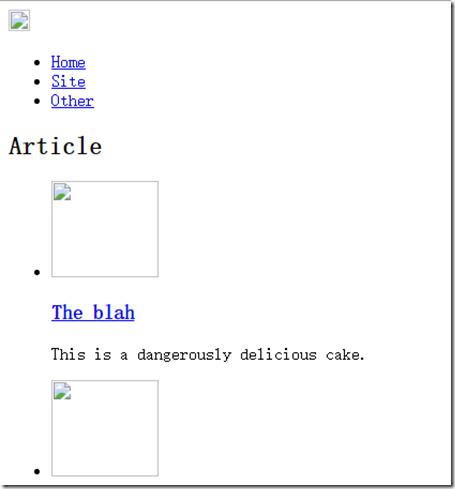
在浏览器中输入url:http://127.0.0.1:8000/index/ 可以看到如下的格式,接下来要做的就是添加资源
将css文件(css文件的内容在最后)和图片(随意找几张图片,更名为如下所示即可)都复制到env5工程下的一个名为static的文件,工程结构如下:
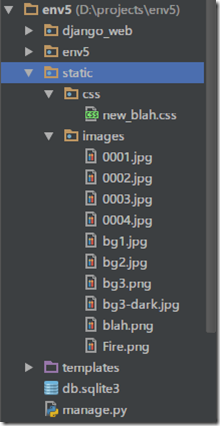
注意:一定要保证与templates目录同级
修改index.html如下
{% load static %}

<html>

<head>
 <link rel="stylesheet" type="text/css" href="{% static 'css/new_blah.css' %}" rel="external nofollow" >
</head>
<body>

<div class="header">
 <img src="{% static 'images/blah.png' %}">
 <ul class="nav">
  <li><a href="#" rel="external nofollow" rel="external nofollow" rel="external nofollow" rel="external nofollow" rel="external nofollow" rel="external nofollow" rel="external nofollow" rel="external nofollow" rel="external nofollow" rel="external nofollow" rel="external nofollow" rel="external nofollow" rel="external nofollow" rel="external nofollow" >Home</a></li>
  <li><a href="#" rel="external nofollow" rel="external nofollow" rel="external nofollow" rel="external nofollow" rel="external nofollow" rel="external nofollow" rel="external nofollow" rel="external nofollow" rel="external nofollow" rel="external nofollow" rel="external nofollow" rel="external nofollow" rel="external nofollow" rel="external nofollow" >Site</a></li>
  <li><a href="#" rel="external nofollow" rel="external nofollow" rel="external nofollow" rel="external nofollow" rel="external nofollow" rel="external nofollow" rel="external nofollow" rel="external nofollow" rel="external nofollow" rel="external nofollow" rel="external nofollow" rel="external nofollow" rel="external nofollow" rel="external nofollow" >Other</a></li>
 </ul>
</div>

<div class="main-content">
 <h2>Article</h2>
 <ul class="articles">

  <li>
   <img src="{% static 'images/0001.jpg' %}" width="100" height="91">

   <div class="article-info">
    <h3><a href="#" rel="external nofollow" rel="external nofollow" rel="external nofollow" rel="external nofollow" rel="external nofollow" rel="external nofollow" rel="external nofollow" rel="external nofollow" rel="external nofollow" rel="external nofollow" rel="external nofollow" rel="external nofollow" rel="external nofollow" rel="external nofollow" >The blah</a></h3>
    <p class="meta-info">
     <span class="meta-cate">fun</span>
     <span class="meta-cate">Wow</span>
    </p>
    <p class="description">Just say something.</p>
   </div>

   <div class="rate">
    <span class="rate-score">4.5</span>
   </div>
  </li>

  <li>
   <img src="{% static 'images/0002.jpg' %}" width="100" height="91">
   <div class="article-info">
    <h3><a href="#" rel="external nofollow" rel="external nofollow" rel="external nofollow" rel="external nofollow" rel="external nofollow" rel="external nofollow" rel="external nofollow" rel="external nofollow" rel="external nofollow" rel="external nofollow" rel="external nofollow" rel="external nofollow" rel="external nofollow" rel="external nofollow" >The blah</a></h3>
    <p class="meta-info">
     <span class="meta-cate">butt</span>
     <span class="meta-cate">NSFW</span>
    </p>
    <p class="description">Just say something.</p>
   </div>

   <div class="rate">
    <img src="{% static 'images/Fire.png' %}" width="18" height="18">
    <span class="rate-score">5.0</span>
   </div>
  </li>

  <li>
   <img src="{% static 'images/0003.jpg' %}" width="100" height="91">
   <div class="article-info">
    <h3><a href="#" rel="external nofollow" rel="external nofollow" rel="external nofollow" rel="external nofollow" rel="external nofollow" rel="external nofollow" rel="external nofollow" rel="external nofollow" rel="external nofollow" rel="external nofollow" rel="external nofollow" rel="external nofollow" rel="external nofollow" rel="external nofollow" >The blah</a></h3>
    <p class="meta-info">
     <span class="meta-cate">sea</span>
    </p>
    <p class="description">Just say something.</p>
   </div>

   <div class="rate">
    <span class="rate-score">3.5</span>
   </div>
  </li>

  <li>
   <img src="{% static 'images/0004.jpg' %}" width="100" height="91">
   <div class="article-info">
    <h3><a href="#" rel="external nofollow" rel="external nofollow" rel="external nofollow" rel="external nofollow" rel="external nofollow" rel="external nofollow" rel="external nofollow" rel="external nofollow" rel="external nofollow" rel="external nofollow" rel="external nofollow" rel="external nofollow" rel="external nofollow" rel="external nofollow" >The blah</a></h3>
    <p class="meta-info">
     <span class="meta-cate">bay</span>
     <span class="meta-cate">boat</span>
     <span class="meta-cate">beach</span>
    </p>
    <p class="description">Just say something.</p>
   </div>

   <div class="rate">
    <span class="rate-score">3.0</span>
   </div>
  </li>
 </ul>
</div>

<div class="footer">
 <p>© Mugglecoding</p>
</div>
</body>

</html>
在settings.py文件的最后增加如下配置
STATICFILES_DIRS = (os.path.join(BASE_DIR, "static"),)
再次打开浏览器就可以看到正常的显示

css文件
body {
 padding: 0 0 0 0;
 background-color: #ffffff;
 background-image: url(../images/bg3-dark.jpg);
 background-position: top left;
 background-repeat: no-repeat;
 background-size: cover;
 font-family: Helvetica, Arial, sans-serif;
}


.main-content {
 width: 500px;
 padding: 20px 20px 20px 20px;
 border: 1px solid #dddddd;
 border-radius:15px;
 margin: 30px auto 0 auto;
 background: #fdffff;
 -webkit-box-shadow: 0 0 22px 0 rgba(50, 50, 50, 1);
 -moz-box-shadow: 0 0 22px 0 rgba(50, 50, 50, 1);
 box-shadow:   0 0 22px 0 rgba(50, 50, 50, 1);


}
.main-content p {
 line-height: 26px;
}
.main-content h2 {
 color: #585858;
}
.articles {
 list-style-type: none;
 padding: 0;
}
.articles img {
 float: left;
 padding-right: 11px;
}
.articles li {
 border-top: 1px solid #F1F1F1;
 background-color: #ffffff;
 height: 90px;
 clear: both;
}
.articles h3 {
 margin: 0;
}
.articles a {
 color:#585858;
 text-decoration: none;
}
.articles p {
 margin: 0;
}

.article-info {
 float: left;
 display: inline-block;
 margin: 8px 0 8px 0;
}

.rate {
 float: right;
 display: inline-block;
 margin:35px 20px 35px 20px;
}

.rate-score {
 font-size: 18px;
 font-weight: bold;
 color: #585858;
}

.rate-score-hot {


}

.meta-info {
}

.meta-cate {
 margin: 0 0.1em;
 padding: 0.1em 0.7em;
 color: #fff;
 background: #37a5f0;
 font-size: 20%;
 border-radius: 10px ;
}

.description {
 color: #cccccc;
}

.nav {
 padding-left: 0;
 margin: 5px 0 20px 0;
 text-align: center;
}
.nav li {
 display: inline;
 padding-right: 10px;
}
.nav li:last-child {
 padding-right: 0;
}
.header {
 padding: 10px 10px 10px 10px;

}

.header a {
 color: #ffffff;
}
.header img {
 display: block;
 margin: 0 auto 0 auto;
}
.header h1 {
 text-align: center;
}


.footer {
 margin-top: 20px;
}
.footer p {
 color: #aaaaaa;
 text-align: center;
 font-weight: bold;
 font-size: 12px;
 font-style: italic;
 text-transform: uppercase;
}
以上就是本文的全部内容,希望对大家的学习有所帮助,也希望大家多多支持【听图阁-专注于Python设计】。