解决安装python3.7.4报错Can''t connect to HTTPS URL because the SSL module is not available
简述
从官网下载了Python3.7.4,直接编译安装后,使用pip3出现了报错信息: Can't connect to HTTPS URL because the SSL module is not available
错误原因
在Python3.7之后的版本,依赖的openssl,必须要是1.1或者1.0.2之后的版本,或者安装了2.6.4之后的libressl。
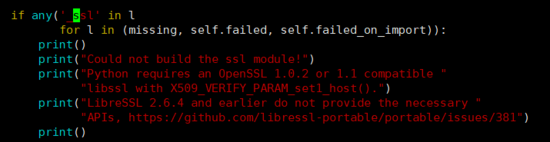
image.png
而本地的openssl依然是1.0.1e的。
[root@localhost ~]# openssl version
OpenSSL 1.0.1e-fips 11 Feb 2013
解决方法
上openssl官网下载1.0.2或者1.1之后的openssl包,编译安装。我选择的是1.0.2r。
[root@localhost ~]# wget http://www.openssl.org/source/openssl-1.0.2r.tar.gz
[root@localhost ~]# tar zxvf openssl-1.0.2r.tar.gz
[root@localhost ~]# ./config --prefix=/opt/openssl1.0.2r --openssldir=/opt/openssl1.0.2r/openssl no-zlib
[root@localhost ~]# make && make install
[root@localhost ~]# echo "/opt/openssl1.0.2r/lib" >> /etc/ld.so.conf
[root@localhost ~]# ldconfig -v
注意:编译openssl1.0.2r的时候建议加上no-zlib,否则后面可能会出现undefined symbol: SSL_CTX_get0_param错误
安装python3.7
下载Python包,编译
[root@localhost ~]# wget https://www.python.org/ftp/python/3.7.4/Python-3.7.4.tar.xz
[root@localhost ~]# tar xvf  Python-3.7.4.tar.xz
[root@localhost ~]# cd Python-3.7.4;./configure --prefix=/data/tools/Python3.7.4
编译完成后不要make,先修改Python源码包中ssl的参数
打开源码解压目录中的 Modules/Setup ,直接搜索 SSL= ,将SSL=后面的目录改为前面openssl的安装目录,并把下面三行的注释去掉。
[root@localhost ~]# vim Modules/Setup
SSL=/opt/openssl1.0.2r
_ssl _ssl.c \
    -DUSE_SSL -I$(SSL)/include -I$(SSL)/include/openssl \
    -L$(SSL)/lib -lssl -lcrypto
改完之后就在解压目录直接make就行了。
[root@localhost ~]# make && make install
[root@localhost ~]# echo "export PATH=/data/tools/Python3.7.4/bin:$PATH" >> ~/.bashrc
[root@localhost ~]# source ~/.bashrc
[root@localhost ~]# pip3 list
Package  Version
---------- -------
pip    19.0.3
setuptools 40.8.0
You are using pip version 19.0.3, however version 19.2.1 is available.
You should consider upgrading via the 'pip install --upgrade pip' command.
总结
以上所述是小编给大家介绍的解决安装python3.7.4报错Can''t connect to HTTPS URL because the SSL module is not available,希望对大家有所帮助,如果大家有任何疑问请给我留言,小编会及时回复大家的。在此也非常感谢大家对【听图阁-专注于Python设计】网站的支持!
如果你觉得本文对你有帮助,欢迎转载,烦请注明出处,谢谢!