python TK库简单应用(实时显示子进程输出)
本文介绍python TK库简单应用(实时显示子进程输出),分享给大家,具体如下:
#!/usr/bin/python3.5
# -*- coding: UTF-8 -*-

import tkinter     # 导入 Tkinter 库
import tkinter.messagebox       # 导入消息框库
import os   #导入OS库
import subprocess

def show_something():
 tkinter.messagebox.showinfo( "Python", "Hello everyone")

def show_while():
 if button3['text'] == 'WHILE_run':
 button3['text'] = 'WHILE_close'
 else:
 button3['text'] = 'WHILE_run'
 data = subprocess.Popen('./a.out',stdout = subprocess.PIPE,stdin=subprocess.PIPE,shell=True)
 while True:
    '''
    与子进程通信,给它输入
    data.stdin.write(("abcdf\n").encode())
 data.stdin.flush()
    '''
 t1.config(state='normal')#设置为可编辑
 #t1.delete('1.0','end') #清空文本框
 t1.insert('end',data.stdout.readline())
 t1.see('end')#设置显示最末尾的数据
 t1.update()
 t1.config(state='disabled')#设置为无法编辑

def show_ls():
 t2.config(state='normal')#设置为可编辑
 t2.delete('1.0','end') #清空文本框
 t2.insert('end',os.popen('ls').read())
 t2.config(state='disabled')#设置为无法编辑

#---创建窗口对象---
root_window = tkinter.Tk()
root_window.title('TEST BY FC')
root_window.geometry('500x500')

#---创建容器---
main_frame = tkinter.Frame(root_window)
main_frame.pack()

#---创建列表---
li   = ['C','python','php','html','SQL','java']
#---创建两个列表组件---
listb = tkinter.Listbox(root_window)
#---给小部件插入数据---
for item in li:
 listb.insert(0,item)
listb.pack()

#---创建子容器,在子容器上创建Label---
frm1 = tkinter.Frame(main_frame)
frm1.pack()
tkinter.Label(frm1, text='hello', bg='green', width=10, height=2).pack(side='left')
frm2 = tkinter.Frame(main_frame)
frm2.pack()
tkinter.Label(frm1,text=' world', bg='yellow', width=10, height=2).pack(side='right')

#创建按钮
button_frm = tkinter.Frame(root_window)
button_frm.pack()
button1 = tkinter.Button(button_frm, text = "确定", bg='red', fg='white', width=10, height=2, command = show_something)
button1.pack()
button2 = tkinter.Button(button_frm, text = "LS", bg='blue', fg='white', width=10, height=2, command = show_ls)
button2.pack()
button3 = tkinter.Button(button_frm, text = "WHILE_run", bg='green', fg='white', width=10, height=2, command = show_while)
button3.pack()

#创建滚动条
s1=tkinter.Scrollbar()
s1.pack(side='right',fill='y') # side是滚动条放置的位置,上下左右。fill是将滚动条沿着y轴填充

#创建文本显示框
t1 = tkinter.Text(bg='lightgreen',width=30, height=10,state='disabled',yscrollcommand=s1.set)#设置为无法编辑
t1.pack()
s1.config(command=t1.yview)
t2 = tkinter.Text(bg='lightblue',width=10, height=2,state='disabled')#设置为无法编辑
t2.pack()


#t2.config(yscrollcommand=s1.set)

#---进入消息循环---
root_window.mainloop()
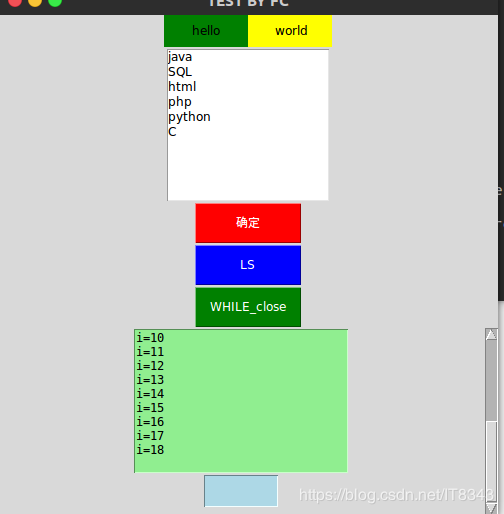
利用TK库做了一个简单的界面,很多细节没有处理,只供学习使用
其中.a.out是一个循环输出的程序,printf输出需要加fflush(stdout)清空缓冲区才可以,cout会自动清空
效果如下
以上就是本文的全部内容,希望对大家的学习有所帮助,也希望大家多多支持【听图阁-专注于Python设计】。