wxPython实现带颜色的进度条
本文实例为大家分享了wxPython实现带颜色进度条的具体代码,供大家参考,具体内容如下
【问题描述】
1、在使用wxpython创建进度条时遇到如下问题,使用SetForegroundColour和SetBackgrounColour指令在Win7下不生效,即无法改变进度条的颜色及其背景颜色。
2、查阅资料发现wx.lib.agw.pygauge可以实现进度条颜色的修改(具体指令请参考pygauge说明文档),但其显示效果为平面较差(如下图):
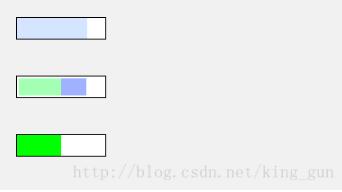
图1-1 pygauge制作的进度条
期望实现的进度条效果如下:
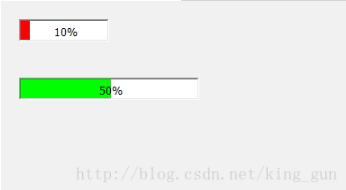
图1-2 期望效果图
【程序代码】
# --------------------------------------------------------------------------------- #
# GAUGE wxPython
#
# Jin Jianchao, @ 25 Oct 2013
# Mail: jianchaojin@gmail.com
#
# End Of Comments
# --------------------------------------------------------------------------------- #

"""
Description
===========
Draw color gauge with wxpython
Usage
=====
Usage example::
  import wx
  import Gauge
  class MyFrame(wx.Frame):
    def __init__(self, parent):
      wx.Frame.__init__(self, parent, -1, "ColourGauge Demo")
      panel = wx.Panel(self)

      gauge1 = Gauge.ColourGauge(panel, -1, size=(100, 25))
      gauge1.setPercent(0.8)
      gauge1.setBarColour(wx.RED)
      gauge1.setBackgroundColour(wx.WHITE)

      gauge2 = Gauge.ColourGauge(panel, -1, size=(200, 50))
      gauge2.setPercent(0.9)
      gauge2.setBarColour(wx.RED)
      gauge2.setBackgroundColour(wx.BLUE)
      sizer = wx.BoxSizer(wx.VERTICAL)
      sizer.Add(gauge1, 0, wx.ALIGN_CENTER_VERTICAL|wx.ALL, 20)
      sizer.Add(gauge2, 0, wx.ALIGN_CENTER_VERTICAL|wx.ALL, 20)

      panel.SetSizer(sizer)
      sizer.Layout()
  # our normal wxApp-derived class, as usual
  app = wx.App(0)
  frame = MyFrame(None)
  app.SetTopWindow(frame)
  frame.Show()
  app.MainLoop()
"""

import wx
import wx.lib.fancytext as fancytext

class ColourGauge(wx.Panel):

  def __init__(self, parent,id, pos=wx.DefaultPosition, size=wx.DefaultSize):
    wx.Panel.__init__(self, id=id, parent=parent, pos=pos, size=size, style=wx.TAB_TRAVERSAL)
    # creat Gauge
    self.gauge = Gauge(self, id=-1, size=size)
    self.SetAutoLayout(True)
    lc = wx.LayoutConstraints()
    lc.top.SameAs(self, wx.Top, 0) #AsIs()
    lc.left.AsIs()
    lc.height.AsIs()
    lc.right.SameAs(self, wx.Right, 0)
    self.gauge.SetConstraints(lc)

  def setPercent(self, percent):
    self.gauge.setPercent(percent)

  def setBackgroundColour(self, colour):
    self.gauge.SetBackgroundColour(colour)

  def setBarColour(self, colour):
    self.gauge.color = colour

  def getBarColour(self):
    return self.gauge.color

  def setStep(self,step):
    self.gauge.step=step

  def makeStep(self):
    if self.gauge.percent>=1.: return
    self.gauge.percent+=self.gauge.step
    if self.gauge.percent>1.:
      self.gauge.percent=1.
    self.Refresh()
    self.Update()

class Gauge(wx.Control):
  default_color = "GREEN" # "MAGENTA","BLUE" # "GREEN" "RED" "YELLOW"
  def __init__(self, parent,id,pos=wx.DefaultPosition,size=wx.DefaultSize):
    wx.Control.__init__(self, parent, id, pos, size)
    self.SetBackgroundColour(wx.WHITE)
    self.color= Gauge.default_color
    self.percent = 0.0
    self.step = 0.0
    wx.EVT_PAINT(self, self.OnPaint)

  def OnPaint(self, evt):
    dc = wx.PaintDC(self)
    dc.Clear()
    dc.BeginDrawing()

    dc.SetPen( wx.Pen(self.color,0) )
    dc.SetBrush( wx.Brush(self.color) )
    w,h = self.GetSizeTuple()
    dc.DrawRectangleRect((0,0,w*self.percent,h))
    percentStr= "%d%%"% int(self.percent*100)
    tx, ty = fancytext.getExtent(percentStr, dc)
    dc.DrawText(percentStr, w/2-tx/2, h/2-ty/2)

    dc.EndDrawing()

  def setPercent(self,percent):
    if percent <0 or percent >1.:
      return
    self.percent = percent
  def setColor(self,color):
    self.color = color
  def getColor(self):
    return self.color

  def setStep(self,step):
    self.step=step

  def makeStep(self):
    if self.percent>=1.: return
    self.percent+=self.step
    if self.percent>1.:
      self.percent=1.
    self.gauge.Refresh()
    self.gauge.Update()
以上就是本文的全部内容,希望对大家的学习有所帮助,也希望大家多多支持【听图阁-专注于Python设计】。