使用pytorch实现可视化中间层的结果
摘要
一直比较想知道图片经过卷积之后中间层的结果,于是使用pytorch写了一个脚本查看,先看效果
这是原图,随便从网上下载的一张大概224*224大小的图片,如下

网络介绍
我们使用的VGG16,包含RULE层总共有30层可以可视化的结果,我们把这30层分别保存在30个文件夹中,每个文件中根据特征的大小保存了64~128张图片
结果如下:
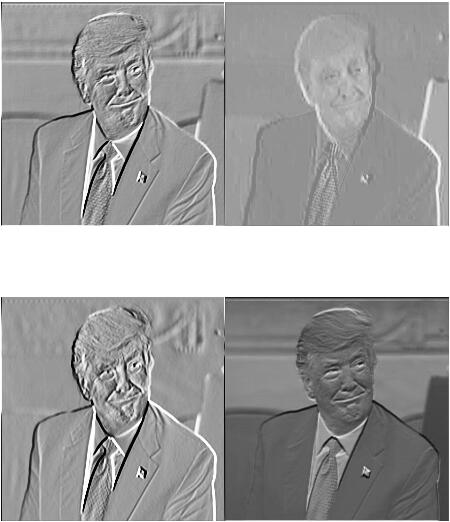
原图大小为224224,经过第一层后大小为64224*224,下面是第一层可视化的结果,总共有64张这样的图片:
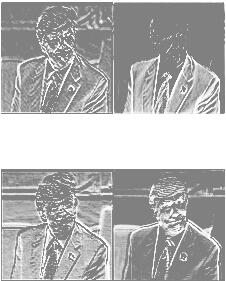
下面看看第六层的结果
这层的输出大小是 1128112*112,总共有128张这样的图片
下面是完整的代码
import cv2
import numpy as np
import torch
from torch.autograd import Variable
from torchvision import models

#创建30个文件夹
def mkdir(path): # 判断是否存在指定文件夹,不存在则创建
  # 引入模块
  import os

  # 去除首位空格
  path = path.strip()
  # 去除尾部 \ 符号
  path = path.rstrip("\\")

  # 判断路径是否存在
  # 存在   True
  # 不存在  False
  isExists = os.path.exists(path)

  # 判断结果
  if not isExists:
    # 如果不存在则创建目录
    # 创建目录操作函数
    os.makedirs(path)
    return True
  else:

    return False


def preprocess_image(cv2im, resize_im=True):
  """
    Processes image for CNNs

  Args:
    PIL_img (PIL_img): Image to process
    resize_im (bool): Resize to 224 or not
  returns:
    im_as_var (Pytorch variable): Variable that contains processed float tensor
  """
  # mean and std list for channels (Imagenet)
  mean = [0.485, 0.456, 0.406]
  std = [0.229, 0.224, 0.225]
  # Resize image
  if resize_im:
    cv2im = cv2.resize(cv2im, (224, 224))
  im_as_arr = np.float32(cv2im)
  im_as_arr = np.ascontiguousarray(im_as_arr[..., ::-1])
  im_as_arr = im_as_arr.transpose(2, 0, 1) # Convert array to D,W,H
  # Normalize the channels
  for channel, _ in enumerate(im_as_arr):
    im_as_arr[channel] /= 255
    im_as_arr[channel] -= mean[channel]
    im_as_arr[channel] /= std[channel]
  # Convert to float tensor
  im_as_ten = torch.from_numpy(im_as_arr).float()
  # Add one more channel to the beginning. Tensor shape = 1,3,224,224
  im_as_ten.unsqueeze_(0)
  # Convert to Pytorch variable
  im_as_var = Variable(im_as_ten, requires_grad=True)
  return im_as_var


class FeatureVisualization():
  def __init__(self,img_path,selected_layer):
    self.img_path=img_path
    self.selected_layer=selected_layer
    self.pretrained_model = models.vgg16(pretrained=True).features
    #print( self.pretrained_model)
  def process_image(self):
    img=cv2.imread(self.img_path)
    img=preprocess_image(img)
    return img

  def get_feature(self):
    # input = Variable(torch.randn(1, 3, 224, 224))
    input=self.process_image()
    print("input shape",input.shape)
    x=input
    for index,layer in enumerate(self.pretrained_model):
      #print(index)
      #print(layer)
      x=layer(x)
      if (index == self.selected_layer):
        return x

  def get_single_feature(self):
    features=self.get_feature()
    print("features.shape",features.shape)
    feature=features[:,0,:,:]
    print(feature.shape)
    feature=feature.view(feature.shape[1],feature.shape[2])
    print(feature.shape)
    return features

  def save_feature_to_img(self):
    #to numpy
    features=self.get_single_feature()
    for i in range(features.shape[1]):
      feature = features[:, i, :, :]
      feature = feature.view(feature.shape[1], feature.shape[2])
      feature = feature.data.numpy()
      # use sigmod to [0,1]
      feature = 1.0 / (1 + np.exp(-1 * feature))
      # to [0,255]
      feature = np.round(feature * 255)
      print(feature[0])
      mkdir('./feature/' + str(self.selected_layer))
      cv2.imwrite('./feature/'+ str( self.selected_layer)+'/' +str(i)+'.jpg', feature)
if __name__=='__main__':
  # get class
  for k in range(30):
    myClass=FeatureVisualization('/home/lqy/examples/TRP.PNG',k)
    print (myClass.pretrained_model)
    myClass.save_feature_to_img()
以上这篇使用pytorch实现可视化中间层的结果就是小编分享给大家的全部内容了,希望能给大家一个参考,也希望大家多多支持【听图阁-专注于Python设计】。