Pytorch实现LSTM和GRU示例
为了解决传统RNN无法长时依赖问题,RNN的两个变体LSTM和GRU被引入。
LSTM
Long Short Term Memory,称为长短期记忆网络,意思就是长的短时记忆,其解决的仍然是短时记忆问题,这种短时记忆比较长,能一定程度上解决长时依赖。
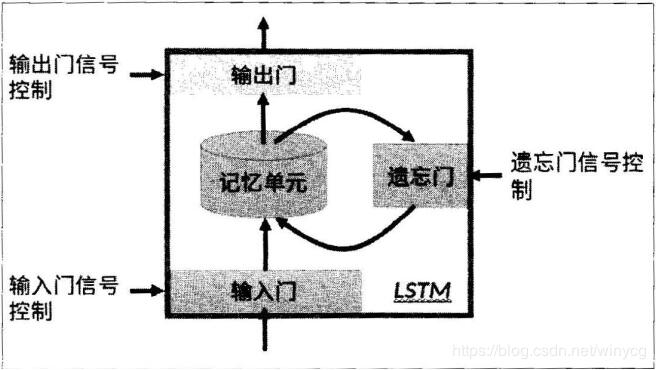
上图为LSTM的抽象结构,LSTM由3个门来控制,分别是输入门、遗忘门和输出门。输入门控制网络的输入,遗忘门控制着记忆单元,输出门控制着网络的输出。最为重要的就是遗忘门,可以决定哪些记忆被保留,由于遗忘门的作用,使得LSTM具有长时记忆的功能。对于给定的任务,遗忘门能够自主学习保留多少之前的记忆,网络能够自主学习。
具体看LSTM单元的内部结构:
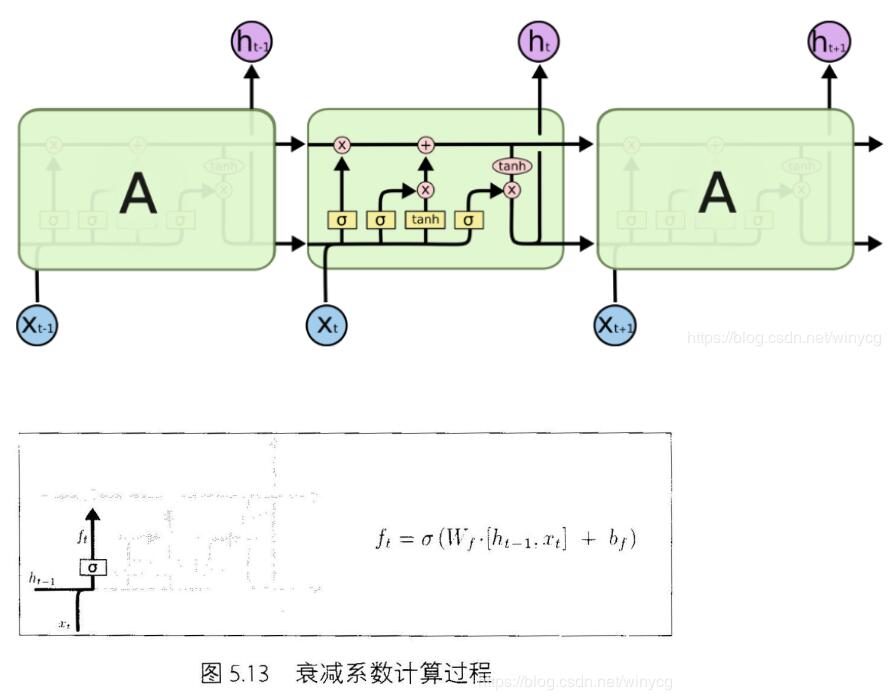
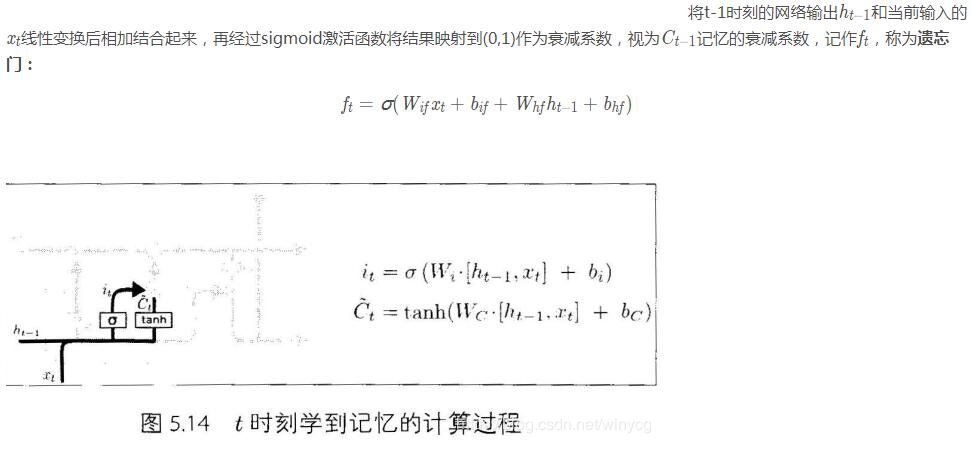
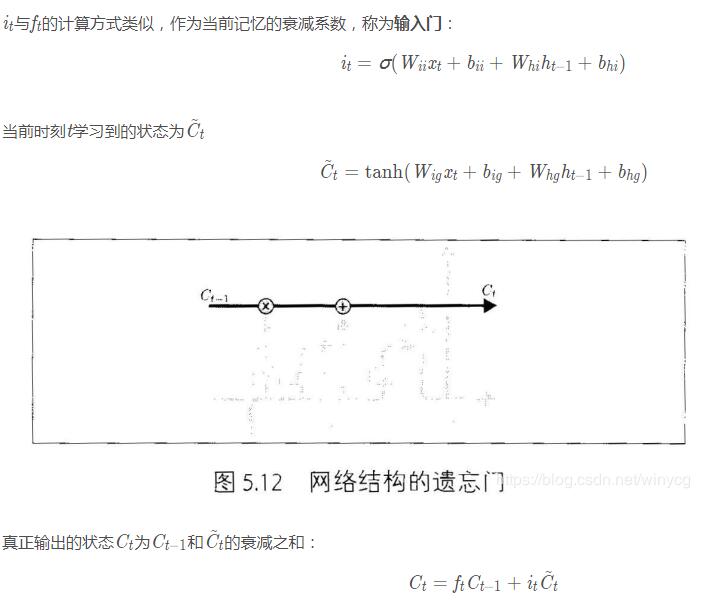
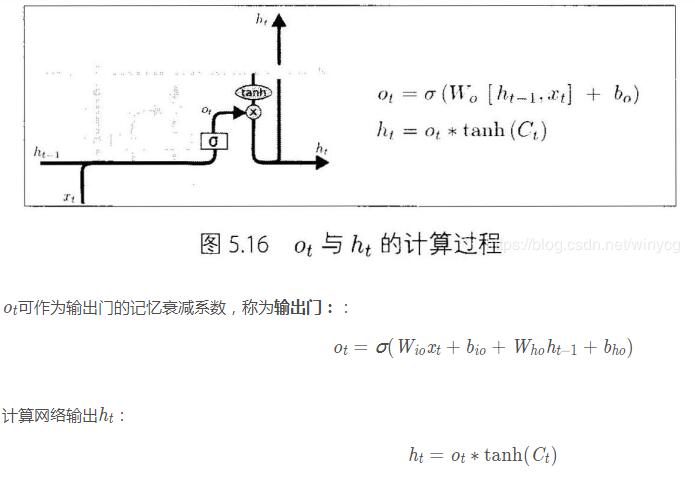
在每篇文章中,作者都会使用和标准LSTM稍微不同的版本,针对特定的任务,特定的网络结构往往表现更好。
GRU
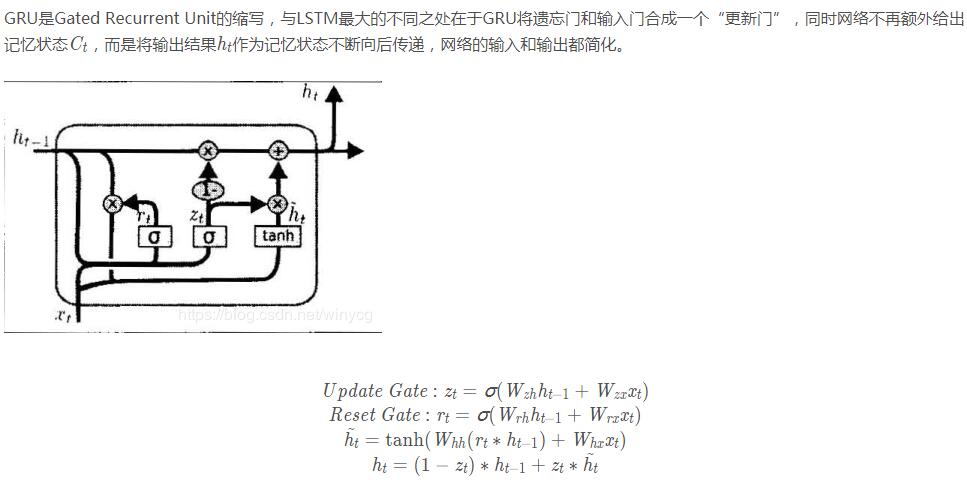
上述的过程的线性变换没有使用偏置。隐藏状态参数不再是标准RNN的4倍,而是3倍,也就是GRU的参数要比LSTM的参数量要少,但是性能差不多。
Pytorch
在Pytorch中使用nn.LSTM()可调用,参数和RNN的参数相同。具体介绍LSTM的输入和输出:
输入: input, (h_0, c_0)
input:输入数据with维度(seq_len,batch,input_size)
h_0:维度为(num_layers*num_directions,batch,hidden_size),在batch中的
初始的隐藏状态.
c_0:初始的单元状态,维度与h_0相同
输出:output, (h_n, c_n)
output:维度为(seq_len, batch, num_directions * hidden_size)。
h_n:最后时刻的输出隐藏状态,维度为 (num_layers * num_directions, batch, hidden_size)
c_n:最后时刻的输出单元状态,维度与h_n相同。
LSTM的变量:

以MNIST分类为例实现LSTM分类
MNIST图片大小为28×28,可以将每张图片看做是长为28的序列,序列中每个元素的特征维度为28。将最后输出的隐藏状态 作为抽象的隐藏特征输入到全连接层进行分类。最后输出的
导入头文件:
import torch
import torch.nn as nn
import torch.optim as optim
import torchvision
from torchvision import transforms
class Rnn(nn.Module):
  def __init__(self, in_dim, hidden_dim, n_layer, n_classes):
    super(Rnn, self).__init__()
    self.n_layer = n_layer
    self.hidden_dim = hidden_dim
    self.lstm = nn.LSTM(in_dim, hidden_dim, n_layer, batch_first=True)
    self.classifier = nn.Linear(hidden_dim, n_classes)

  def forward(self, x):
    out, (h_n, c_n) = self.lstm(x)
    # 此时可以从out中获得最终输出的状态h
    # x = out[:, -1, :]
    x = h_n[-1, :, :]
    x = self.classifier(x)
    return x
训练和测试代码:
transform = transforms.Compose([
  transforms.ToTensor(),
  transforms.Normalize([0.5], [0.5]),
])

trainset = torchvision.datasets.MNIST(root='./data', train=True, download=True, transform=transform)
trainloader = torch.utils.data.DataLoader(trainset, batch_size=128, shuffle=True)

testset = torchvision.datasets.MNIST(root='./data', train=False, download=True, transform=transform)
testloader = torch.utils.data.DataLoader(testset, batch_size=100, shuffle=False)

net = Rnn(28, 10, 2, 10)

net = net.to('cpu')
criterion = nn.CrossEntropyLoss()
optimizer = optim.SGD(net.parameters(), lr=0.1, momentum=0.9)

# Training
def train(epoch):
  print('\nEpoch: %d' % epoch)
  net.train()
  train_loss = 0
  correct = 0
  total = 0
  for batch_idx, (inputs, targets) in enumerate(trainloader):
    inputs, targets = inputs.to('cpu'), targets.to('cpu')
    optimizer.zero_grad()
    outputs = net(torch.squeeze(inputs, 1))
    loss = criterion(outputs, targets)
    loss.backward()
    optimizer.step()

    train_loss += loss.item()
    _, predicted = outputs.max(1)
    total += targets.size(0)
    correct += predicted.eq(targets).sum().item()

    print(batch_idx, len(trainloader), 'Loss: %.3f | Acc: %.3f%% (%d/%d)'
      % (train_loss/(batch_idx+1), 100.*correct/total, correct, total))

def test(epoch):
  global best_acc
  net.eval()
  test_loss = 0
  correct = 0
  total = 0
  with torch.no_grad():
    for batch_idx, (inputs, targets) in enumerate(testloader):
      inputs, targets = inputs.to('cpu'), targets.to('cpu')
      outputs = net(torch.squeeze(inputs, 1))
      loss = criterion(outputs, targets)

      test_loss += loss.item()
      _, predicted = outputs.max(1)
      total += targets.size(0)
      correct += predicted.eq(targets).sum().item()

      print(batch_idx, len(testloader), 'Loss: %.3f | Acc: %.3f%% (%d/%d)'
        % (test_loss/(batch_idx+1), 100.*correct/total, correct, total))


for epoch in range(200):
  train(epoch)
  test(epoch)
以上这篇Pytorch实现LSTM和GRU示例就是小编分享给大家的全部内容了,希望能给大家一个参考,也希望大家多多支持【听图阁-专注于Python设计】。
